Akemi

Kubespray部署纯ipv6 k8s+ceph集群

2025/10/03

kubespray在2.28版本新增了支持纯ipv6的特性
这个ipv6的ceph集群还有点问题,image无法正常映射,之后再研究

环境说明

1
2
3
4
5
6
7
8
9
10
11
12
13
14
15
16
17
18
19
20
21
22
23
24
管理网络: 10.163.2.0/24 (eth0)
k8s集群网络: 1::0/64 (eth1)
k8s存储网络/ceph集群网络: 2::0/64 (eth2)
k8s VIP 1::100/64
10.163.2.143 1::20/64 ansible (k8s客户端机)
10.163.2.102 1::1/64 2::1/64 master1
10.163.2.101 1::2/64 2::2/64 master2
10.163.2.109 1::3/64 2::3/64 master3
10.163.2.108 1::4/64 2::4/64 worker1
10.163.2.131 1::5/64 2::5/64 worker2
10.163.2.110 1::6/64 2::6/64 worker3
10.163.2.136 2::11/64 ceph1
10.163.2.137 2::12/64 ceph2
10.163.2.144 2::13/64 ceph3

ceph v17.2.7 quincy
k8s v1.32.8
calico 3.29.5
ceph-csi 3.14.0

ansible ubuntu 24.03 LTS
其余均为alma 9.6
root密码均为1

kubespray部署k8s

ansible与k8s环境初始化

做免密

1
2
3
4
5
6
7
8
9
10
11
12
13
14
15
16
17
18
19
20
21
22
23
24
25
26
27
28
29
30
31
32
33
34
35
36
37
38
39
40
41
42
43
44
45
46
47
48
49
50
51
52
53
54
55
56
57
58
59
60
61
62
63
64
65
66
67
68
69
70
71
72
73
74
75
76
77
78
79
80
81
82
83
84
85
86
87
88
89
90
91
92
93
94
95
96
97
98
99
100
101
# ansible节点
sudo -i
hostnamectl set-hostname ansible && bash
apt -y install python3-pip sshpass python3.12-venv

echo "10.163.2.143 ansible
10.163.2.102 master1
10.163.2.101 master2
10.163.2.109 master3
10.163.2.108 worker1
10.163.2.131 worker2
10.163.2.110 worker3
10.163.2.136 ceph1
10.163.2.137 ceph2
10.163.2.144 ceph3" >> /etc/hosts

git clone -b release-2.28 https://github.com/kubernetes-sigs/kubespray.git
cd kubespray/

# 创建python虚拟环境
python3 -m venv /root/kubespray/venv/
source /root/kubespray/venv/bin/activate

# 安装python依赖,这一步会把ansible也安装完
pip3 install -r requirements.txt \
-i https://mirrors.aliyun.com/pypi/simple/

# 定义inventory
vim inventory/sample/inventory.ini
[all]
master1 ansible_host=10.163.2.102 ip6=1::1
master2 ansible_host=10.163.2.101 ip6=1::2
master3 ansible_host=10.163.2.109 ip6=1::3
worker1 ansible_host=10.163.2.108 ip6=1::4
worker2 ansible_host=10.163.2.131 ip6=1::5
worker3 ansible_host=10.163.2.110 ip6=1::6
[kube-master]
master1
master2
master3
[etcd]
master1
master2
master3
[kube-node]
master1
master2
master3
worker1
worker2
worker3
[calico_rr]

[k8s_cluster:children]
kube-master
kube-node
calico_rr

# 给所有节点装sshpass
ansible -i inventory/sample/inventory.ini -a "yum -y install sshpass" -u root -k all

# 脚本分发密钥,将/etc/hosts中的主机全部做互信
ssh-keygen -N '' -f ~/.ssh/id_rsa
cat > share_key.sh <<'EOF'
#!/bin/bash
function check() {
if [ $? == 0 ]; then
echo -e "\033[32m${1}=======>success\033[0m"
else
echo -e "\033[31m${1}=======>fail\033[0m"
fi
}
echo "检查依赖"
sshpass &>>/dev/null
if [ $? != 0 ]; then
echo -e "检查失败,未安装sshpass,程序退出"
exit 1
fi
echo "检查完成"

ip=$(cat /etc/hosts |awk 'NR > 3 {print $1}')
for i in $ip; do
ping -c 1 -i 1 ${i} &>> /dev/null
if [ $? == 0 ]; then
sshpass -p1 ssh-copy-id -i ~/.ssh/id_rsa.pub -o StrictHostKeyChecking=no root@${i} &>>/dev/null
check "${i}免密登录"
else
echo "${i}主机不在线"
fi
done
wait # 等待并行结束
EOF
chmod +x share_key.sh
./share_key.sh

# 节点安全相关
ansible -i inventory/sample/inventory.ini all \
-a "sed -i 's/^SELINUX=.*/SELINUX=disable/g' /etc/selinux/config"
ansible -i inventory/sample/inventory.ini all -a "setenforce 0"
ansible -i inventory/sample/inventory.ini all -m service \
-a "name=firewalld state=stopped enabled=false"
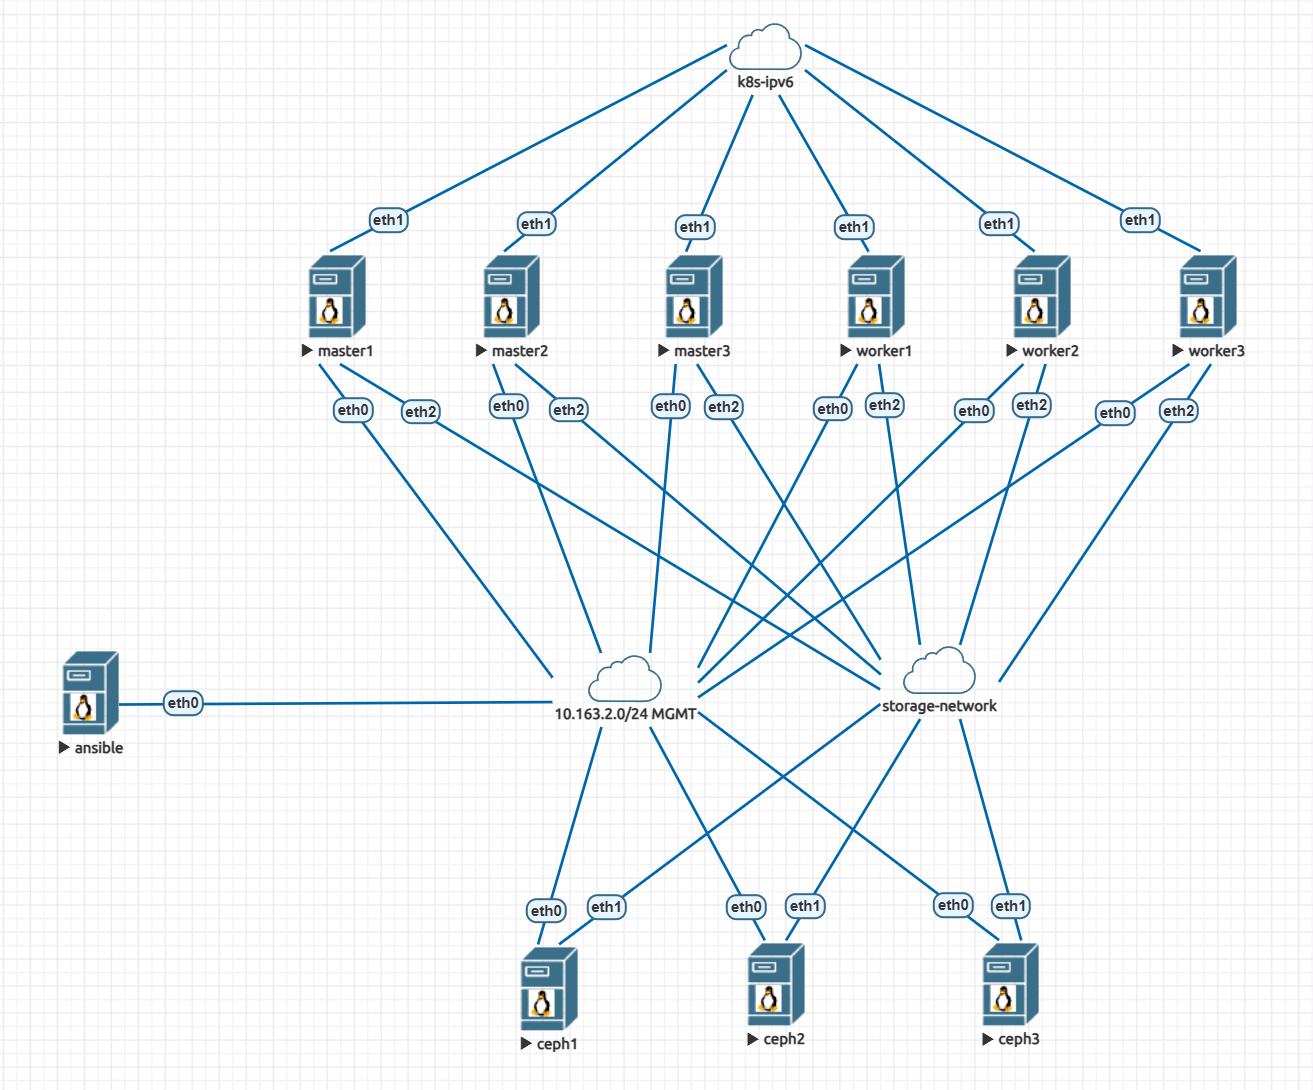
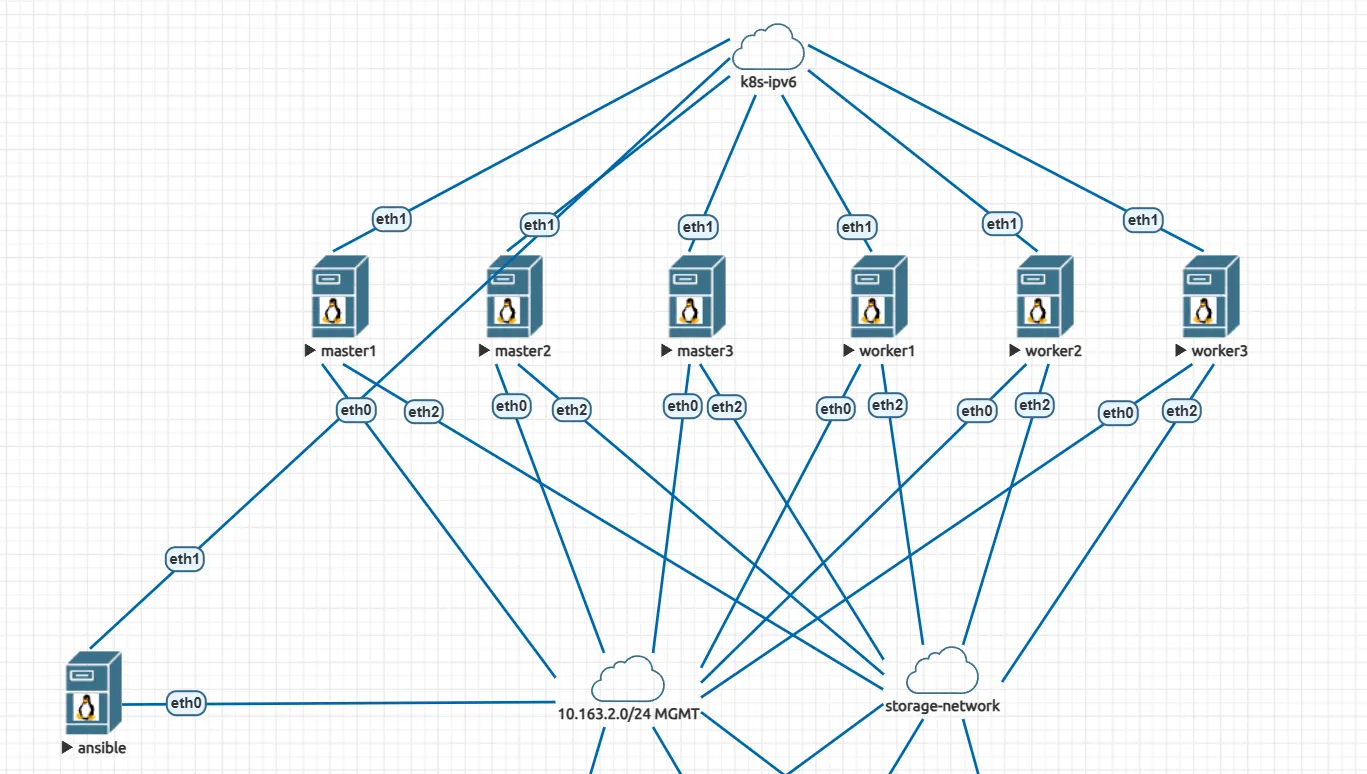
k8s节点ipv6配置

1
2
3
4
5
6
7
8
9
10
11
12
13
14
15
16
# 集群网络配置
ssh master1 "nmcli con add con-name eth1 ifname eth1 type ethernet ipv4.method disabled ipv6.method manual ipv6.addresses 1::1/64 && nmcli con up eth1"
ssh master2 "nmcli con add con-name eth1 ifname eth1 type ethernet ipv4.method disabled ipv6.method manual ipv6.addresses 1::2/64 && nmcli con up eth1"
ssh master3 "nmcli con add con-name eth1 ifname eth1 type ethernet ipv4.method disabled ipv6.method manual ipv6.addresses 1::3/64 && nmcli con up eth1"
ssh worker1 "nmcli con add con-name eth1 ifname eth1 type ethernet ipv4.method disabled ipv6.method manual ipv6.addresses 1::4/64 && nmcli con up eth1"
ssh worker2 "nmcli con add con-name eth1 ifname eth1 type ethernet ipv4.method disabled ipv6.method manual ipv6.addresses 1::5/64 && nmcli con up eth1"
ssh worker3 "nmcli con add con-name eth1 ifname eth1 type ethernet ipv4.method disabled ipv6.method manual ipv6.addresses 1::6/64 && nmcli con up eth1"

# 存储网络配置
ssh master1 "nmcli con add con-name eth2 ifname eth2 type ethernet ipv4.method disabled ipv6.method manual ipv6.addresses 2::1/64 && nmcli con up eth2"
ssh master2 "nmcli con add con-name eth2 ifname eth2 type ethernet ipv4.method disabled ipv6.method manual ipv6.addresses 2::2/64 && nmcli con up eth2"
ssh master3 "nmcli con add con-name eth2 ifname eth2 type ethernet ipv4.method disabled ipv6.method manual ipv6.addresses 2::3/64 && nmcli con up eth2"
ssh worker1 "nmcli con add con-name eth2 ifname eth2 type ethernet ipv4.method disabled ipv6.method manual ipv6.addresses 2::4/64 && nmcli con up eth2"
ssh worker2 "nmcli con add con-name eth2 ifname eth2 type ethernet ipv4.method disabled ipv6.method manual ipv6.addresses 2::5/64 && nmcli con up eth2"
ssh worker3 "nmcli con add con-name eth2 ifname eth2 type ethernet ipv4.method disabled ipv6.method manual ipv6.addresses 2::6/64 && nmcli con up eth2"

准备高可用组件

安装keepalived

1
2
3
4
5
6
7
8
9
10
11
12
13
14
15
16
17
18
19
20
21
22
23
24
25
26
27
28
29
30
31
32
33
34
# 安装
ansible -i inventory/sample/inventory.ini -m yum -a \
"name=keepalived state=latest" kube-master

# 制作一个keepalived配置文件
cat > keepalived.conf <<EOF
! Configuration File for keepalived

global_defs {
router_id LVS_DEVEL
}

vrrp_instance VI_1 {
state MASTER
interface eth1
virtual_router_id 51
priority 100
advert_int 1
authentication {
auth_type PASS
auth_pass 1111
}
virtual_ipaddress {
1::100/64
}
}
EOF

# 复制文件到对应节点
ansible -i inventory/sample/inventory.ini -m copy -a \
"src=keepalived.conf dest=/etc/keepalived/keepalived.conf" kube-master
# 开机自启
ansible -i inventory/sample/inventory.ini -m service -a \
"name=keepalived state=restarted enabled=true" kube-master

安装HAProxy

1
2
3
4
5
6
7
8
9
10
11
12
13
14
15
16
17
18
19
20
21
22
23
24
25
26
27
28
29
30
31
32
33
34
35
36
37
38
39
ansible -i inventory/sample/inventory.ini -m yum -a \
"name=haproxy state=latest" kube-master

# 搞个配置文件
cat > haproxy.cfg <<EOF
global
daemon
maxconn 4000
user haproxy
group haproxy
pidfile /var/run/haproxy.pid

defaults
mode tcp
timeout connect 10s
timeout client 1mc
timeout server 1m
retries 3
maxconn 3000

frontend fe_k8s
bind [::]:6444
default_backend be_k8s

backend be_k8s
balance roundrobin
server master1 [1::1]:6443 check
server master2 [1::2]:6443 check
server master3 [1::3]:6443 check
EOF

#
ansible -i inventory/sample/inventory.ini -m copy -a \
"src=haproxy.cfg dest=/etc/haproxy/haproxy.cfg" kube-master

ansible -i inventory/sample/inventory.ini -m service -a \
"name=haproxy state=restarted enabled=true" kube-master

# 可以先ping一下vip确保工作正常

高可用相关变量

1
2
3
4
5
6
7
8
inventory/sample/group_vars/all/all.yml
添加
...
loadbalancer_apiserver:
address: "1::100"
port: 6444
loadbalancer_apiserver_type: haproxy
loadbalancer_apiserver_port: 6443

调整ansible变量与部署

CNI相关参考文档
https://github.com/kubernetes-sigs/kubespray/blob/master/docs/CNI/calico.md

1
2
3
4
5
6
7
8
9
10
11
12
13
14
15
16
17
18
19
20
21
22
23
24
25
# 开启ipv6
roles/kubespray_defaults/defaults/main/main.yml
...
ipv4_stack: false
ipv6_stack: true
# 可选ipv6配置(以下为默认)
kube_service_addresses_ipv6: fd85:ee78:d8a6:8607::1000/116
kube_pods_subnet_ipv6: fd85:ee78:d8a6:8607::1:0000/112
kube_network_node_prefix_ipv6: 120

# 代理配置,忽略pod网段、service网段、VIP域名
inventory/sample/group_vars/all/all.yml
http_proxy: "http://192.168.10.238:7897"
https_proxy: "http://192.168.10.238:7897"
no_proxy: "lb-apiserver.kubernetes.local,fd85:ee78:d8a6:8607::1000/116,fd85:ee78:d8a6:8607::1:0000/112"

# 网络插件相关,使用calico的subcross模式
#inventory/sample/group_vars/k8s_cluster/k8s-net-calico.yml
#calico_network_backend: "bird"
#calico_ipip_mode: "CrossSubnet"
#calico_vxlan_mode: "Never"
这段crosssubnet配置在ipv6中不适用,别用

# 开始部署
ansible-playbook -i inventory/sample/inventory.ini cluster.yml -v

cephadm部署ceph

环境准备

1
2
3
4
5
6
7
8
9
10
11
12
13
14
15
16
17
18
19
20
21
22
23
24
25
26
27
28
29
30
31
32
33
34
35
36
37
38
39
40
41
42
43
44
45
46
47
48
49
50
51
52
53
54
55
56
57
58
59
60
61
62
63
64
65
66
67
68
69
70
71
72
73
74
75
76
77
78
79
80
81
82
83
84
85
86
87
88
89
90
91
92
93
# 
git clone https://github.com/ceph/cephadm-ansible.git
cd cephadm-ansible

# 前面做过免密登录了,这里就不做了

# 虚拟环境
python3 -m venv ./venv/
source ./venv/bin/activate

# 安装依赖
pip3 install -r requirements.txt \
-i https://mirrors.aliyun.com/pypi/simple/

# 清单文件
cat > inventory <<EOF
[storage]
ceph1 ansible_host=10.163.2.136
ceph2 ansible_host=10.163.2.137
ceph3 ansible_host=10.163.2.144
EOF

# 调整版本与镜像源
sed -i 's/^ceph_release.*/ceph_release: 17.2.7/g' ceph_defaults/defaults/main.yml
sed -i 's#^ceph_mirror.*#ceph_mirror: https://mirrors.aliyun.com/ceph#g' ceph_defaults/defaults/main.yml
sed -i 's#^ceph_stable_key.*#ceph_stable_key: https://mirrors.aliyun.com/ceph/keys/release.asc#g' ceph_defaults/defaults/main.yml

# 初始化集群节点,这里安装epel建议挂代理,不然贼慢
ansible -i inventory storage -a "hostnamectl set-hostname {{ inventory_hostname }}" -b
ansible -i inventory storage -m shell -a 'export http_proxy="http://192.168.10.238:7897" && export https_proxy="http://192.168.10.238:7897" && yum -y install epel-release'

# 设置ipv6地址
ssh ceph1 "nmcli con add con-name eth1 ifname eth1 type ethernet ipv4.method disabled ipv6.method manual ipv6.addresses 2::11/64 && nmcli con up eth1"
ssh ceph2 "nmcli con add con-name eth1 ifname eth1 type ethernet ipv4.method disabled ipv6.method manual ipv6.addresses 2::12/64 && nmcli con up eth1"
ssh ceph3 "nmcli con add con-name eth1 ifname eth1 type ethernet ipv4.method disabled ipv6.method manual ipv6.addresses 2::13/64 && nmcli con up eth1"

# 安全相关
ansible -i inventory all -a "sed -i 's/^SELINUX=.*/SELINUX=disable/g' /etc/selinux/config"
ansible -i inventory all -a "setenforce 0"
ansible -i inventory all -m service -a "name=firewalld state=stopped enabled=false"

cat > environment <<EOF
http_proxy="http://192.168.10.238:7897"
https_proxy="http://192.168.10.238:7897"
EOF

ansible -i inventory all -m copy \
-a "src=./environment dest=/etc/environment"
ansible -i inventory all -m shell \
-a "source /etc/environment"

# 环境预安装
ansible-playbook -i inventory cephadm-preflight.yml -v

# 准备同步hosts文件
cat > hosts <<EOF
10.163.2.136 ceph1
10.163.2.137 ceph2
10.163.2.144 ceph3
2::11 ceph1
2::12 ceph2
2::13 ceph3
EOF
ansible -i inventory all -m copy -a "src=./hosts dest=/etc/"

# 准备ceph节点podman的镜像加速
cat > registries.conf <<EOF
unqualified-search-registries = ["docker.io","quay.io"]
[[registry]]
prefix = "docker.io"
location = "a88uijg4.mirror.aliyuncs.com"
insecure = true
[[registry.mirror]]
location = "docker.lmirror.top"
[[registry.mirror]]
location = "docker.m.daocloud.io"
[[registry.mirror]]
location = "hub.uuuadc.top"
[[registry.mirror]]
location = "docker.anyhub.us.kg"
[[registry.mirror]]
location = "dockerhub.jobcher.com"
[[registry.mirror]]
location = "dockerhub.icu"

[[registry]]
prefix = "quay.io"
location = "quay.lmirror.top"
[[registry.mirror]]
location = "quay.m.daocloud.io"
EOF

ansible -i inventory storage -m copy -a 'src=./registries.conf dest=/etc/containers/registries.conf'

bootstrap引导部署

1
2
3
4
5
6
7
8
9
10
11
12
13
14
15
16
17
18
19
20
21
22
23
24
25
26
27
28
29
30
31
32
33
34
35
36
37
38
39
40
41
42
43
44
45
46
47
48
49
50
51
52
53
54
55
56
57
58
59
60
61
62
63
64
65
66
# 进入ceph1节点
ssh ceph1

# 代理
export http_proxy="http://192.168.10.238:7897"
export https_proxy="http://192.168.10.238:7897"

cephadm bootstrap --mon-ip=[2::11] \
--initial-dashboard-user=admin \
--initial-dashboard-password=wangsheng \
--dashboard-password-noupdate \
--allow-overwrite

ceph -v
#ceph version 17.2.7 (b12291d110049b2f35e32e0de30d70e9a4c060d2) quincy (stable)

# 传送ceph公钥
ssh-copy-id -f -i /etc/ceph/ceph.pub root@ceph2
ssh-copy-id -f -i /etc/ceph/ceph.pub root@ceph3

# 添加ceph节点
ceph orch host add ceph2 [2::12] --labels _admin
ceph orch host add ceph3 [2::13] --labels _admin

# 添加mon与mgr
ceph orch apply mon ceph1,ceph2,ceph3
ceph orch apply mgr --placement "ceph1 ceph2 ceph3"

# 添加所有可用osd
ceph orch apply osd --all-available-devices

# 等待ceph就绪
ceph orch ls
NAME PORTS RUNNING REFRESHED AGE PLACEMENT
alertmanager ?:9093,9094 1/1 43s ago 27m count:1
crash 3/3 43s ago 27m *
grafana ?:3000 1/1 - 27m count:1
mgr 3/3 43s ago 6m ceph1;ceph2;ceph3
mon 3/3 43s ago 6m ceph1;ceph2;ceph3
node-exporter ?:9100 3/3 43s ago 27m *
osd.all-available-devices 9 43s ago 5m *
prometheus ?:9095 1/1 43s ago 27m count:1

ceph orch host ls
HOST ADDR LABELS STATUS
ceph1 2::11 _admin
ceph2 2::12 _admin
ceph3 2::13 _admin
3 hosts in cluster

ceph -w
cluster:
id: 2e8aabea-9d0d-11f0-ba99-5000000a0000
health: HEALTH_OK

services:
mon: 3 daemons, quorum ceph1,ceph2,ceph3 (age 5m)
mgr: ceph1.ywcpof(active, since 24m), standbys: ceph2.vyyrjm, ceph3.wanwzo
osd: 9 osds: 9 up (since 2m), 9 in (since 3m)

data:
pools: 1 pools, 1 pgs
objects: 2 objects, 577 KiB
usage: 2.9 GiB used, 4.4 TiB / 4.4 TiB avail
pgs: 1 active+clean

k8s对接ceph

准备块存储

1
2
3
4
5
6
7
8
9
10
11
12
13
ceph osd pool create k8s-main 64 64
rbd pool init k8s-main
ceph osd pool application enable k8s-main rbd

# 准备keyring
ceph auth get-or-create client.k8s \
mon 'profile rbd' mgr 'allow r' \
osd 'allow rwx pool=k8s-main' \
-o /etc/ceph/ceph.client.k8s.keyring

cat /etc/ceph/ceph.client.k8s.keyring
[client.k8s]
key = AQBN19toVQmvBhAAi3kMM4BcoFzi5mDPC5oSnQ==

环境准备

这个环境中为了方便管理,我给ansible一个ipv6地址,使其可以与k8s集群通信,当做客户端来用

1
2
3
4
5
6
7
8
9
10
11
12
13
14
15
16
17
18
19
20
21
22
23
24
25
26
27
28
29
30
31
32
33
34
35
36
37
38
39
40
# ansible
# 给个IP
cat > /etc/netplan/01-static-ipv6.yaml<<EOF
network:
version: 2
ethernets:
eth1:
addresses:
- 1::20/64
EOF
netplan apply

# 安装kubectl
curl -LO https://dl.k8s.io/release/v1.32.0/bin/linux/amd64/kubectl
chmod +x kubectl
cp kubectl /usr/bin/

mkdir /root/.kube
scp master1:/root/.kube/config /root/.kube/config
echo "1::100 lb-apiserver.kubernetes.local" >> /etc/hosts

echo "source <(kubectl completion bash)" >> ~/.bashrc
source ~/.bashrc

kubectl get pods
# No resources found in default namespace.

# 搞个代理,懒得配containerd的加速器了
cd ~/kubespray
source venv/bin/activate
cat > environment <<EOF
http_proxy="http://192.168.10.238:7897"
https_proxy="http://192.168.10.238:7897"
no_proxy="lb-apiserver.kubernetes.local,fd85:ee78:d8a6:8607::1000/116,fd85:ee78:d8a6:8607::1:0000/112"
EOF

ansible -i inventory/sample/inventory.ini all -m copy \
-a "src=./environment dest=/etc/environment"
ansible -i inventory/sample/inventory.ini all -m shell \
-a "source /etc/environment"

部署CSI-使用helm

由于我k8s集群是v1.32,对应需要Ceph CSI选用v3.14.0及以上的版本

使用yaml部署参考:Ceph-csi供应商给kubernetes集群提供存储 · Akemi
但是yaml部署好像还不兼容ipv6的环境,我试了3.14和3.15都失败了

推荐使用helm部署,版本为v3.14.0

1
2
3
4
5
6
7
8
9
10
11
12
13
14
15
16
17
18
19
20
21
22
23
24
25
26
27
28
29
30
31
32
33
34
35
36
37
38
39
40
41
42
43
44
45
46
47
48
49
50
51
52
53
54
55
56
57
58
59
60
61
62
63
64
65
66
67
68
69
70
71
72
73
74
75
76
77
78
79
80
81
82
83
84
# 安装helm
wget https://get.helm.sh/helm-v3.19.0-linux-amd64.tar.gz
tar -xf helm-v3.19.0-linux-amd64.tar.gz
cp linux-amd64/helm /usr/bin/

# 从git中获取charts(二选一)
git clone -b release-v3.14 https://github.com/ceph/ceph-csi.git
cd ceph-csi/charts/ceph-csi-rbd

# 从仓库中搜索下载(二选一)
helm repo add ceph-csi https://ceph.github.io/csi-charts
helm search repo ceph-csi
#NAME CHART VERSION APP VERSION DESCRIPTION
#ceph-csi/ceph-csi-cephfs 3.15.0 3.15.0 Container Storage Interface (CSI) driver, provi...
#ceph-csi/ceph-csi-rbd 3.15.0 3.15.0 Container Storage Interface (CSI) driver, provi...

helm search repo ceph-csi/ceph-csi-rbd -l
#NAME CHART VERSION APP VERSION DESCRIPTION
#ceph-csi/ceph-csi-rbd 3.15.0 3.15.0 Container Storage Interface (CSI) driver, provi...
#ceph-csi/ceph-csi-rbd 3.14.2 3.14.2 Container Storage Interface (CSI) driver, provi...
#ceph-csi/ceph-csi-rbd 3.14.1 3.14.1 Container Storage Interface (CSI) driver, provi...
#ceph-csi/ceph-csi-rbd 3.14.0 3.14.0 Container Storage Interface (CSI) driver, provi...
#ceph-csi/ceph-csi-rbd 3.13.1 3.13.1 Container Storage Interface (CSI) driver, provi...

helm pull ceph-csi/ceph-csi-rbd --version 3.14.0
tar -xf ceph-csi-rbd-3.14.0.tgz
cd ceph-csi-rbd/

# 修改values文件
添加
...
csiConfig:
- clusterID: "2e8aabea-9d0d-11f0-ba99-5000000a0000"
monitors:
- "[2::11]:6789"
- "[2::12]:6789"
- "[2::13]:6789"
rbd:
netNamespaceFilePath: "{{ .kubeletDir }}/plugins/{{ .driverName }}/net"
mirrorDaemonCount: 1
readAffinity:
enabled: true
crushLocationLabels:
- topology.kubernetes.io/region
- topology.kubernetes.io/zone
...
encryptionKMSConfig:
vault-unique-id-1:
encryptionKMSType: vault
vaultAddress: https://vault.example.com
vaultAuthPath: /v1/auth/kubernetes/login
vaultRole: csi-kubernetes
vaultPassphraseRoot: /v1/secret
vaultPassphrasePath: ceph-csi/
vaultCAVerify: "false"
...
storageClass:
...
create: true
clusterID: 2e8aabea-9d0d-11f0-ba99-5000000a0000
pool: k8s-main
...
secret:
create: true
userID: k8s
userKey: AQBN19toVQmvBhAAi3kMM4BcoFzi5mDPC5oSnQ==
...
# 为供应商启用主机网络:直接使用集群节点端口。不然和ceph无法通信,会报连接ceph超时
# 但有端口冲突的风险
provisioner:
enableHostNetwork: true
...
httpMetrics:
containerPort: 18080
# httpMetrics会使用8080端口,与现有主机端口冲突,修改其端口

mkdir -p /var/lib/kubelet/plugins/rbd.csi.ceph.com/net && chown kube:kube /var/lib/kubelet/plugins/rbd.csi.ceph.com/net

# 部署chart
kubectl create ns ceph-csi-rbd
helm install ceph-csi-rbd -n ceph-csi-rbd ./ -f values.yaml

# 更新
helm upgrade ceph-csi-rbd -n ceph-csi-rbd ./ -f values.yaml

测试

可见csi已经完全起来了

1
2
3
4
5
6
7
8
9
10
11
12
13
14
15
16
17
18
19
20
21
22
23
24
25
26
27
28
29
30
31
32
33
34
35
36
37
38
39
40
41
42
43
44
45
46
47
48
49
50
51
52

# 查看存储类
kubectl get sc
NAME PROVISIONER RECLAIMPOLICY VOLUMEBINDINGMODE ALLOWVOLUMEEXPANSION AGE
csi-rbd-sc rbd.csi.ceph.com Delete Immediate true 21m

# 让AI生成了一个资源文件,直接用卷申请模板测试一下
cat > test_statefulset.yaml <<EOF
apiVersion: apps/v
kind: StatefulSet
metadata:
name: ceph-rbd-test
namespace: default
spec:
serviceName: "ceph-rbd-test"
replicas: 2
selector:
matchLabels:
app: ceph-rbd-test
template:
metadata:
labels:
app: ceph-rbd-test
spec:
containers:
- name: test-container
image: alpine:latest
command: ["/bin/sh", "-c"]
args:
- |
echo "Pod $(hostname) started at $(date)" > /data/pod-info.txt;
echo "Testing write operation..." >> /data/pod-info.txt;
while true; do sleep 3600; done
volumeMounts:
- name: data
mountPath: /data
volumeClaimTemplates:
- metadata:
name: data
spec:
accessModes: [ "ReadWriteOnce" ]
storageClassName: "csi-rbd-sc"
resources:
requests:
storage: 1Gi
EOF

kubectl apply -f test_statefulset.yaml

kubectl get pvc
NAME STATUS VOLUME CAPACITY ACCESS MODES STORAGECLASS VOLUMEATTRIBUTESCLASS AGE
data-ceph-rbd-test-0 Bound pvc-b7e56841-10f6-4826-9482-3565cb5100c8 1Gi RWO csi-rbd-sc <unset> 4m35s
CATALOG
  1. 1. kubespray部署k8s
    1. 1.1. ansible与k8s环境初始化
      1. 1.1.1. 做免密
      2. 1.1.2. k8s节点ipv6配置
    2. 1.2. 准备高可用组件
      1. 1.2.1. 安装keepalived
      2. 1.2.2. 安装HAProxy
    3. 1.3. 调整ansible变量与部署
  2. 2. cephadm部署ceph
    1. 2.1. 环境准备
    2. 2.2. bootstrap引导部署
  3. 3. k8s对接ceph
    1. 3.1. 准备块存储
    2. 3.2. 环境准备
    3. 3.3. 部署CSI-使用helm
  4. 4. 测试