- 锁与集群管理层:
dlm (Distributed Lock Manager) 和 lvm2-lockd 是基石。它们为上层(LVM和GFS2)提供跨节点的分布式锁机制,确保在多个节点同时操作共享存储时数据的一致性。
- 共享存储层:iSCSI 提供共享块设备,multipath确保路径高可用,共享模式的LVM使得所有节点都能看到统一的物理和逻辑卷视图。
- 集群文件系统层:GFS2是关键。它利用底层的DLM,使得
/var/www/html 可以被三个节点同时挂载、读写,而不会导致文件系统损坏。
- 资源管理调度层:Pacemaker 负责管理所有资源(DLM、LVM、Filesystem、HTTPD)的启动、停止、监控和故障转移,并定义它们之间的依赖和顺序约束。
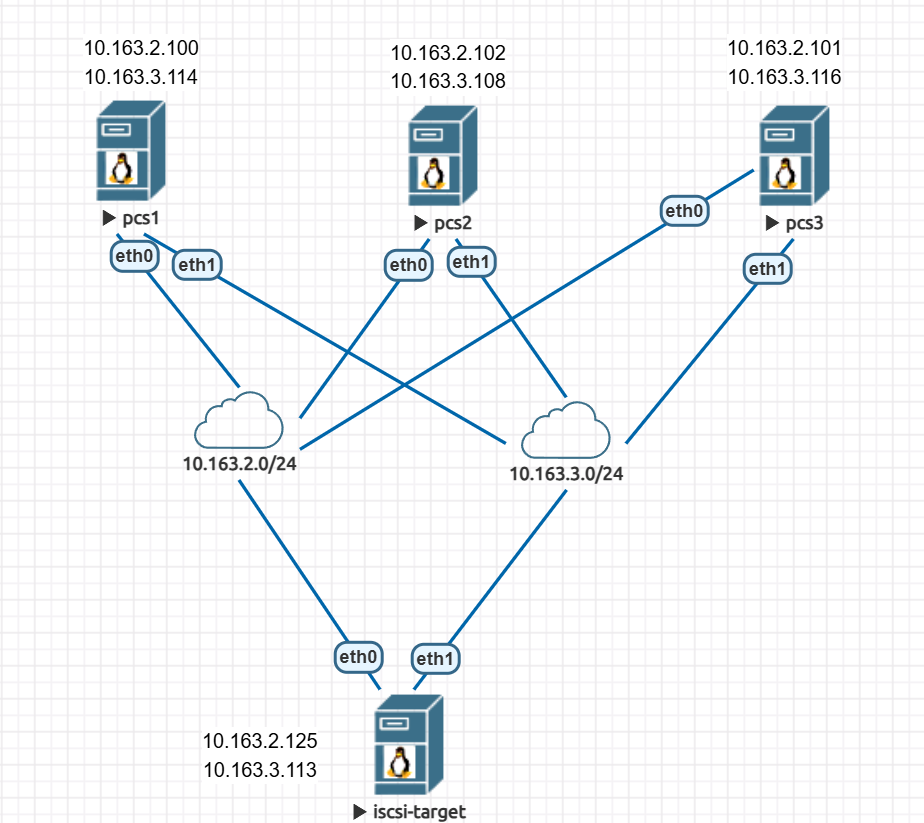
环境说明
1
2
3
4
5
6
7
8
| CentOS Linux release 8.5.2111
10.163.2.100 10.163.3.114 pcs1
10.163.2.102 10.163.3.108 pcs2
10.163.2.101 10.163.3.116 pcs3
10.163.2.125 10.163.3.113 iscsi-target
10.163.2.150 webvip
提前做好互信
|
部署pcs集群
1
2
3
4
5
6
7
8
9
10
11
12
13
14
15
16
17
18
19
20
|
yum -y install pcs pacemaker corosync fence-agents-all
systemctl enable pcsd --now
firewall-cmd --permanent --add-service=high-availability
firewall-cmd --reload
echo 123456 | passwd --stdin hacluster
pcs host auth pcs1 pcs2 pcs3 -u hacluster -p 123456
pcs cluster setup cluster1 pcs1 pcs2 pcs3
pcs cluster start --all
pcs cluster enable --all
pcs stonith create my-fence fence_apc \
ipaddr=127.0.0.1 login=invalid password=invalid \
pcmk_host_list="pcs1 pcs2 pcs3"
|
准备后端ISCSI
1
2
3
4
5
6
7
8
9
10
11
12
13
14
15
16
17
18
19
20
21
|
yum -y install targetcli
firewall-cmd --permanent --add-port=3260/tcp
firewall-cmd --reload
targetcli
backstores/block create multipath-iscsi dev=/dev/sdb
iscsi/ create iqn.2024-08.com.example:block.target
iscsi/iqn.2024-08.com.example:block.target/tpg1/luns/ create /backstores/block/multipath-iscsi
iscsi/iqn.2024-08.com.example:block.target/tpg1/acls/ create iqn.2024-08.com.example:client.pcs1
iscsi/iqn.2024-08.com.example:block.target/tpg1/acls/ create iqn.2024-08.com.example:client.pcs2
iscsi/iqn.2024-08.com.example:block.target/tpg1/acls/ create iqn.2024-08.com.example:client.pcs3
iscsi/iqn.2024-08.com.example:block.target/tpg1/portals/ delete 0.0.0.0 ip_port=3260
iscsi/iqn.2024-08.com.example:block.target/tpg1/portals/ create 10.163.2.125
iscsi/iqn.2024-08.com.example:block.target/tpg1/portals/ create 10.163.3.113
systemctl enable target --now
ss -tunlp | grep 3260
tcp LISTEN 0 256 10.163.2.125:3260 *:*
tcp LISTEN 0 256 10.163.3.113:3260 *:*
|
配置后端存储与dm-multipath
1
2
3
4
5
6
7
8
9
10
11
12
13
14
15
16
|
yum -y install iscsi-initiator-utils device-mapper-multipath
echo "InitiatorName=iqn.2024-08.com.example:client.$(hostname)" > /etc/iscsi/initiatorname.iscsi
systemctl enable iscsid --now
systemctl restart iscsid
iscsiadm -m discovery -t st -p 10.163.2.125
iscsiadm -m node -l
mpathconf --enable
systemctl enable multipathd --now
multipath -ll
|
添加锁资源
1
2
3
4
5
6
7
8
9
10
11
12
13
14
15
16
17
18
19
20
21
22
23
24
25
26
27
28
29
30
31
32
33
34
| 多路径设备为/dev/mapper/mpatha
cat > /etc/yum.repos.d/resilientstorage.repo << EOF
[resilientstorage]
name=CentOS Stream 8 - ResilientStorage
baseurl=https://mirrors.aliyun.com/centos/8-stream/ResilientStorage/x86_64/os/
gpgcheck=1
enabled=1
gpgkey=file:///etc/pki/rpm-gpg/RPM-GPG-KEY-centosofficial
EOF
yum -y install lvm2-lockd dlm
pcs resource create dlm controld --group=lock
pcs resource create lvmlockd ocf:heartbeat:lvmlockd --group=lock
pcs resource clone lock interleave=true
pcs status --full
Full List of Resources:
* Clone Set: lock-clone [lock]:
* Resource Group: lock:0:
* dlm (ocf::pacemaker:controld): Started pcs2
* lvmlockd (ocf::heartbeat:lvmlockd): Started pcs2
* Resource Group: lock:1:
* dlm (ocf::pacemaker:controld): Started pcs3
* lvmlockd (ocf::heartbeat:lvmlockd): Started pcs3
* Resource Group: lock:2:
* dlm (ocf::pacemaker:controld): Started pcs1
* lvmlockd (ocf::heartbeat:lvmlockd): Started pcs1
* my-fence (stonith:fence_apc): Starting pcs3
|
创建共享卷组
1
2
3
4
5
6
7
8
9
10
11
12
13
14
15
16
17
18
19
20
21
|
pvcreate -ff /dev/mapper/mpatha
vgcreate --shared clustervg /dev/mapper/mpatha
vgchange --lock-start clustervg
lvcreate --activate sy -n clusterlv -L 10G clustervg
pcs resource create sharelvm lvm-activate \
vgname=clustervg lvname=clusterlv \
vg_access_mode=lvmlockd activation_mode=shared \
--group=LVMshared
pcs resource clone LVMshared interleave=true
pcs constraint order start lock-clone then LVMshared-clone
pcs constraint colocation add lock-clone with LVMshared-clone
|
创建与挂载gfs2文件系统
1
2
3
4
5
6
7
8
9
10
11
12
13
14
15
| yum -y install gfs2-utils
mkfs.gfs2 -j 4 -t cluster1:gfs /dev/clustervg/clusterlv
cluster1是集群名称
pcs resource create clusterfs filesystem \
device=/dev/clustervg/clusterlv \
directory=/var/www fstype=gfs2 \
--group=LVMshared
在其中一台节点上touch /var/www/test
其他节点也可以看到这个文件ls /var/www/
|
接管httpd服务与vip资源
1
2
3
4
5
6
7
8
9
10
11
12
13
14
15
16
17
18
19
20
21
22
23
24
25
| yum -y install httpd
firewall-cmd --permanent --add-service=http
firewall-cmd --reload
pcs resource create webipip ipaddr2 \
ip=10.163.2.150 cidr_netmask=24 \
--group=web
pcs resource create webserver apache --group=web
pcs constraint order start LVMshared-clone then web
echo 'hello world' > /var/www/html/index.html
pcs resource
* Clone Set: lock-clone [lock]:
* Started: [ pcs1 pcs2 pcs3 ]
* Clone Set: LVMshared-clone [LVMshared]:
* Started: [ pcs1 pcs2 pcs3 ]
* Resource Group: web:
* webipip (ocf::heartbeat:IPaddr2): Started pcs1
* webserver (ocf::heartbeat:apache): Started pcs1
|
httpd资源测试
1
2
3
4
5
6
7
8
9
10
11
12
13
14
15
16
17
18
19
20
21
22
23
24
25
26
27
28
29
30
31
|
pcs constraint location web prefers pcs2
pcs resource status
* Clone Set: lock-clone [lock]:
* Started: [ pcs1 pcs2 pcs3 ]
* Clone Set: LVMshared-clone [LVMshared]:
* Started: [ pcs1 pcs2 pcs3 ]
* Resource Group: web:
* webipip (ocf::heartbeat:IPaddr2): Started pcs2
* webserver (ocf::heartbeat:apache): Started pcs2
systemctl poweroff
pcs resource status
* Clone Set: lock-clone [lock]:
* Started: [ pcs1 pcs3 ]
* Stopped: [ pcs2 ]
* Clone Set: LVMshared-clone [LVMshared]:
* Started: [ pcs1 pcs3 ]
* Stopped: [ pcs2 ]
* Resource Group: web:
* webipip (ocf::heartbeat:IPaddr2): Started pcs1
* webserver (ocf::heartbeat:apache): Started pcs1
可以看到vip到pcs1上去了
curl 10.163.2.150
hello world
|
-
Next Post
SaltStack部署与key操作
-
Previous Post
百T目录并行删除
