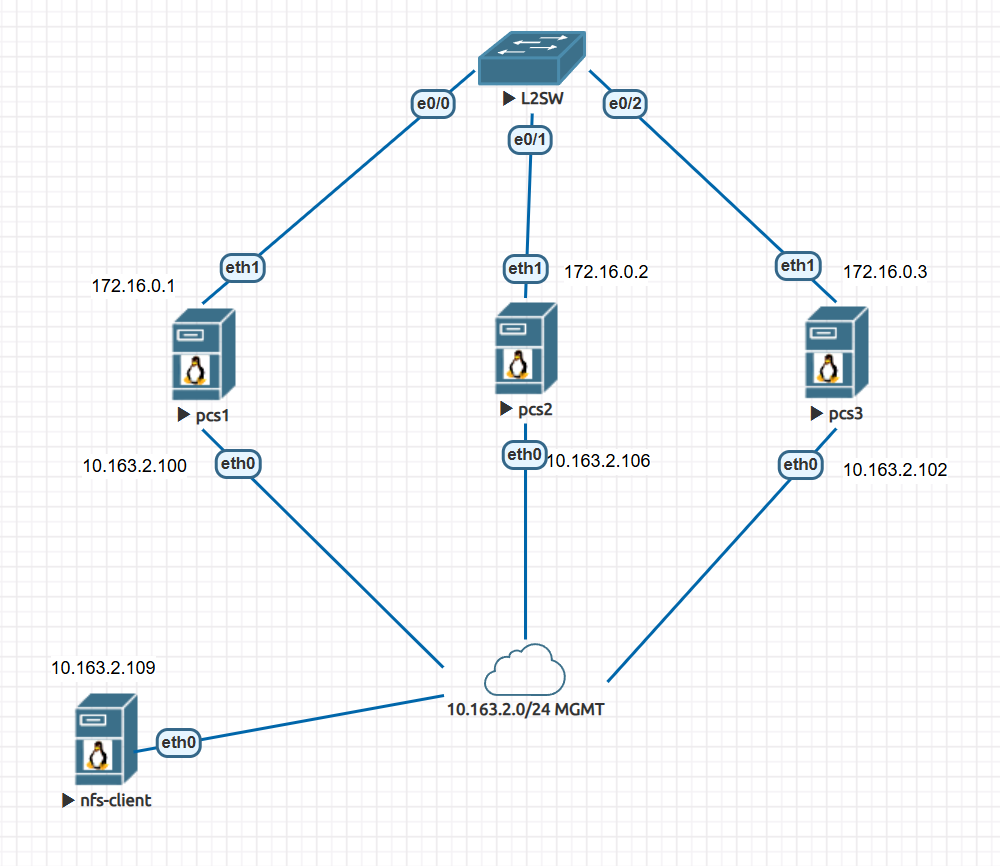
环境准备 1 2 3 4 5 6 7 8 9 10 11 12 13 14 15 16 17 18 19 20 21 22 23 24 25 26 27 28 29 30 31 32 33 34 35 36 37 38 39 40 41 42 43 44 45 管理网络10.163.2.0/24 DHCP 存储网络172.16.0.0/24 系统版本CentOS 8.5.2111 交换机用L2做,这样简单点 正常生产会使用两台L3,两条链路,两块网卡做bond rm -rf /etc/yum.repos.d/*curl -o /etc/yum.repos.d/CentOS-Base.repo https://mirrors.aliyun.com/repo/Centos-vault-8.5.2111.repo cat > /etc/yum.repos.d/HighAvailability.repo << 'EOF' [HighAvailability] name=CentOS-8 - HighAvailability baseurl=http://vault.centos.org/8.5.2111/HighAvailability/$basearch /os/ gpgcheck=0 enabled=1 gpgkey=file:///etc/pki/rpm-gpg/RPM-GPG-KEY-centosofficial EOF yum makecache yum update cat > /etc/hosts << EOF 127.0.0.1 localhost localhost.localdomain localhost4 localhost4.localdomain4 ::1 localhost localhost.localdomain localhost6 localhost6.localdomain6 10.163.2.100 pcs1 10.163.2.106 pcs2 10.163.2.102 pcs3 172.16.0.1 drbd1 172.16.0.2 drbd2 172.16.0.3 drbd3 EOF scp /etc/hosts pcs2:/etc/ scp /etc/hosts pcs3:/etc/ nmcli connection add con-name eth1 ifname eth1 ipv4.addresses 172.16.0.1/24 ipv4.method manual type ethernet nmcli connection add con-name eth1 ifname eth1 ipv4.addresses 172.16.0.2/24 ipv4.method manual type ethernet nmcli connection add con-name eth1 ifname eth1 ipv4.addresses 172.16.0.3/24 ipv4.method manual type ethernet hostnamectl set-hostname drbd1 && bash hostnamectl set-hostname drbd2 && bash hostnamectl set-hostname drbd3 && bash
部署DRBD 每个节点执行
1 2 3 4 5 6 7 8 9 10 11 12 13 14 15 16 17 18 19 20 21 22 23 24 25 26 27 28 29 30 31 32 33 34 35 36 37 38 39 40 41 42 43 44 45 46 47 48 49 50 51 52 53 54 55 56 57 58 59 60 61 62 63 64 65 66 67 68 69 70 71 72 73 74 75 76 77 78 79 80 81 82 83 84 85 86 87 88 89 90 91 92 93 94 95 96 97 98 99 yum group install -y "Development Tools" yum -y install wget vim net-tools lvm2 epel-release yum -y install drbd wget https://pkg.linbit.com/downloads/drbd/9.0/drbd-9.0.32-1.tar.gz tar xf drbd-9.0.32-1.tar.gz cd drbd-9.0.32-1/make && make install modprobe drbd lsmod | grep -i drbd echo drbd > /etc/modules-load.d/drbd.confcommon { ... options { auto-promote yes ; } ... net { protocol C; } pvcreate /dev/sdb vgcreate nfs /dev/sdb lvcreate -n nfs -L 10G nfs echo "resource nfs { meta-disk internal; device /dev/drbd1; net { verify-alg sha256; } on drbd1 { node-id 0; address 172.16.0.1:7788; disk /dev/nfs/nfs; } on drbd2 { node-id 1; address 172.16.0.2:7788; disk /dev/nfs/nfs; } on drbd3 { node-id 2; address 172.16.0.3:7788; disk /dev/nfs/nfs; } # 如果要3节点,需要额外定义connection块 connection { host drbd1 port 7788; host drbd2 port 7788; } connection { host drbd1 port 7788; host drbd3 port 7788; } connection { host drbd2 port 7788; host drbd3 port 7788; } } " > /etc/drbd.d/nfs-drdb.resdrbdadm create-md nfs drbdadm up nfs systemctl enable drbd --now firewall-cmd --permanent --add-port=7788/tcp firewall-cmd --reload drbdadm primary nfs --force mkfs.xfs /dev/drbd1 drbdadm status nfs role:Primary disk:UpToDate drbd2 role:Secondary peer-disk:UpToDate drbd3 role:Secondary peer-disk:UpToDate mkdir /mnt/nfsdd if =/dev/zero of=/mnt/nfs/test-file.img bs=10M count=50
此时如果drbd1挂了,需要手动或脚本将切换后的主节点的/dev/drbd1设备进行挂载,但是如果让Pacemaker接管,就可以避免这个问题
部署Pacemaker 1 2 3 4 5 6 7 8 9 10 11 12 13 14 15 16 17 18 19 20 21 22 23 24 25 26 27 28 29 30 31 32 33 34 35 36 37 38 39 40 41 42 43 44 45 46 47 48 49 rm -rf /etc/yum.repos.d/epel*yum -y install pcs pacemaker corosync fence-agents-all systemctl enable pcsd --now firewall-cmd --permanent --add-service=high-availability firewall-cmd --reload echo 123456 | passwd --stdin haclusterpcs host auth pcs1 pcs2 pcs3 -u hacluster -p 123456 pcs cluster setup mycluster pcs1 pcs2 pcs3 pcs cluster start --all pcs cluster enable --all pcs property set stonith-enabled=false pcs cluster status Cluster Status: Cluster Summary: * Stack: corosync * Current DC: pcs3 (version 2.1.0-8.el8-7c3f660707) - partition with quorum * Last updated: Mon Aug 25 20:25:17 2025 * Last change: Mon Aug 25 20:24:48 2025 by hacluster via crmd on pcs3 * 3 nodes configured * 0 resource instances configured Node List: * Online: [ pcs1 pcs2 pcs3 ] PCSD Status: pcs1: Online pcs2: Online pcs3: Online vim /etc/corosync/corosync.conf quorum { provider: corosync_votequorum wait_for_all=1 last_man_standing=1 } pcs cluster sync pcs cluster reload corosync systemctl restart pacemaker.service systemctl restart pcsd
Pacemaker接管资源 接管drbd 1 2 3 4 5 6 7 8 9 10 11 12 13 14 15 16 17 18 19 20 21 22 23 24 25 26 27 28 29 30 31 32 33 34 35 36 37 38 39 40 41 42 43 44 45 46 47 48 49 50 51 52 53 54 55 56 57 58 59 60 61 62 63 64 65 66 67 68 69 70 71 72 73 74 75 76 77 -f drbd_cfg pcs cluster cib-push drbd_cfg --config pcs resource list | grep drbd service:drbd - systemd unit file for drbd ... yum -y remove epel-release && yum -y install epel-release yum -y install drbd-pacemaker pcs resource list | grep drbd | grep ocf ocf:linbit:drbd - Manages a DRBD device as a Master/Slave resource ocf:linbit:drbd-attr - import DRBD state change events as transient node pcs resource describe ocf:linbit:drbd pcs -f drbd_cfg resource create nfs-drbd ocf:linbit:drbd drbd_resource=nfs \ op monitor interval="29s" role="Master" \ op monitor interval="31s" role="Slave" \ op start interval="0s" timeout ="240s" \ op stop interval="0s" timeout ="100s" Master角色每29秒执行一次健康检查 Slave角色每31秒执行一次健康检查 启动超时240秒,停止超时100秒 pcs -f drbd_cfg resource promotable nfs-drbd \ promoted-max=1 \ promoted-node-max=1 \ clone-max=3 \ clone-node-max=1 \ notify=true 设置只能有一个节点作为Master 单个节点上最多可以运行1个Master示例 资源实例的总数为3 单个节点上最多可以运行1个资源实例 当资源状态发生变化时,Pacemaker会通知所有实例 pcs -f drbd_cfg resource create nfsfs FileSystem \ device='/dev/drbd1' directory='/mnt/nfs' fstype='xfs' pcs -f drbd_cfg constraint colocation add \ nfsfs with nfs-drbd-clone INFINITY \ with-rsc-role=Master pcs resource cleanup nfs-drbd pcs resource cleanup nfs-drbd-clone pcs resource refresh pcs resource status * Clone Set: nfs-drbd-clone [nfs-drbd] (promotable): * Masters: [ pcs2 ] * Slaves: [ pcs1 pcs3 ] * nfsfs (ocf::heartbeat:Filesystem): Started pcs2 现在让pcs2关机systemctl poweroff pcs resource status * Clone Set: nfs-drbd-clone [nfs-drbd] (promotable): * Masters: [ pcs3 ] * Slaves: [ pcs1 ] * Stopped: [ pcs2 ] * nfsfs (ocf::heartbeat:Filesystem): Started pcs3 可以看到已经迁移到pcs3上了,并且nfsfs也过去了
创建nfs资源 1 2 3 4 5 6 7 8 9 10 11 12 13 14 15 16 17 18 19 20 21 22 23 24 25 26 27 28 yum -y install nfs-utils systemctl enable nfs-server.service --now firewall-cmd --add-service=nfs --permanent firewall-cmd --add-service=rpc-bind --permanent firewall-cmd --add-service=mountd --permanent firewall-cmd --add-port=30000-30050/tcp --permanent firewall-cmd --add-port=30000-30050/udp --permanent firewall-cmd --reload pcs -f drbd_cfg resource create nfs-server systemd:nfs-server \ op monitor interval='20s' op start interval='0s' timeout ='20s' \ op stop interval='0s' timeout ='15s' pcs -f drbd_cfg constraint colocation add nfs-server with nfsfs pcs -f drbd_cfg constraint order nfsfs then nfs-server systemctl start nfs-server pcs resource status * Clone Set: nfs-drbd-clone [nfs-drbd] (promotable): * Masters: [ pcs2 ] * Slaves: [ pcs1 pcs3 ] * nfsfs (ocf::heartbeat:Filesystem): Started pcs2 * nfs-server (systemd:nfs-server): Started pcs2 可以测试一下故障转移,我试过了没问题
配置挂载点和VIP资源 1 2 3 4 5 6 7 8 9 10 11 12 13 14 15 16 17 18 19 20 21 22 23 24 25 26 27 28 29 30 31 32 33 34 35 36 pcs -f drbd_cfg resource create exportsdir ocf:heartbeat:exportfs \ directory='/mnt/nfs' fsid='1' \ clientspec='10.163.2.0/24' unlock_on_stop='1' \ options='rw,sync' pcs -f drbd_cfg constraint colocation add nfs-server with exportsdir pcs -f drbd_cfg constraint order exportsdir then nfs-server pcs -f drbd_cfg resource create nfsClusterIP ocf:heartbeat:IPaddr2 \ ip=10.163.2.150 cidr_netmask=24 pcs -f drbd_cfg constraint colocation add nfsClusterIP with exportsdir pcs -f drbd_cfg constraint order exportsdir then nfsClusterIP pcs cluster cib-push drbd_cfg --config pcs resource status * Clone Set: nfs-drbd-clone [nfs-drbd] (promotable): * Masters: [ pcs2 ] * Slaves: [ pcs1 pcs3 ] * nfsfs (ocf::heartbeat:Filesystem): Started pcs2 * nfs-server (systemd:nfs-server): Started pcs2 * exportsdir (ocf::heartbeat:exportfs): Stopped * nfsClusterIP (ocf::heartbeat:IPaddr2): Stopped pcs -f drbd_cfg constraint location nfs-drbd-clone \ prefers pcs1=INFINITY pcs2=50 pcs resource debug-start exportsdir pcs resource debug-start nfsClusterIP
约束合集 1 2 3 4 5 6 7 8 9 10 11 pcs -f drbd_cfg constraint colocation add \ nfsfs with nfs-drbd-clone INFINITY \ with-rsc-role=Master pcs constraint order start nfsfs then start nfs-server pcs constraint order start nfs-server then start exportsdir pcs constraint order start exportsdir then start nfsClusterIP pcs constraint colocation add nfs-server with nfsfs pcs constraint colocation add exportsdir with nfs-server pcs constraint colocation add nfsClusterIP with exportsdir
测试资源迁移 1 2 3 4 5 6 7 8 9 10 11 12 13 14 15 16 17 18 19 20 21 22 23 24 25 26 27 28 29 30 31 32 33 34 35 36 pcs property set no-quorum-policy=ignore pcs property set stonith-enabled=false pcs resource status * Clone Set: nfs-drbd-clone [nfs-drbd] (promotable): * Masters: [ pcs3 ] * Slaves: [ pcs1 pcs2 ] * nfsfs (ocf::heartbeat:Filesystem): Started pcs3 * nfs-server (systemd:nfs-server): Started pcs3 * exportsdir (ocf::heartbeat:exportfs): Started pcs3 * nfsClusterIP (ocf::heartbeat:IPaddr2): Started pcs3 pcs resource status * Clone Set: nfs-drbd-clone [nfs-drbd] (promotable): * Masters: [ pcs1 ] * Slaves: [ pcs2 ] * Stopped: [ pcs3 ] * nfsfs (ocf::heartbeat:Filesystem): Started pcs1 * nfs-server (systemd:nfs-server): Started pcs1 * exportsdir (ocf::heartbeat:exportfs): Started pcs1 * nfsClusterIP (ocf::heartbeat:IPaddr2): Started pcs1 pcs resource status * Clone Set: nfs-drbd-clone [nfs-drbd] (promotable): * Slaves: [ pcs2 ] * Stopped: [ pcs1 pcs3 ] * nfsfs (ocf::heartbeat:Filesystem): Started pcs2 * nfs-server (systemd:nfs-server): Started pcs2 * exportsdir (ocf::heartbeat:exportfs): Started pcs2 * nfsClusterIP (ocf::heartbeat:IPaddr2): Started pcs2 可以看到现在pcs2孤岛模式运行也没有问题 通过ping VIP,发现在两次切换中,只有8个包未送达 因为我们的VIP是最后才起来的,可以认为是前面的服务都已经就绪了