如果出现无法载图的情况,请检查与github的连通性
注:本文较长,建议配合右侧目录食用
关于docker的详细基础可以看另外一篇博文,这里只介绍与k8s相关的部分,以及做一些补充
k8s搭建 k8s1.20搭建 环境
环境初始化 1 2 3 4 5 6 7 8 9 10 11 12 13 14 15 16 17 18 19 20 21 22 23 24 25 26 27 28 29 30 31 32 33 34 35 36 37 38 39 40 41 42 43 44 45 46 47 48 49 50 51 52 53 54 55 56 57 58 59 60 61 62 63 64 65 66 67 68 69 70 71 72 73 74 75 76 77 78 79 80 81 82 83 84 85 86 87 88 89 90 91 92 93 94 95 96 97 98 99 100 101 102 103 104 105 106 107 108 109 110 111 112 113 114 115 116 117 118 119 120 121 122 123 124 125 126 127 128 129 130 131 132 133 134 135 136 137 138 139 140 141 142 143 144 145 146 147 148 149 150 151 152 153 154 155 156 157 hostnamectl set-hostname ws-k8s-master1 && bash echo " 192.168.8.151 ws-k8s-master1 192.168.8.152 ws-k8s-node1 192.168.8.153 ws-k8s-node2 " >> /etc/hostsnmcli con modify ens33 ipv4.addresses 192.168.8.151/24 ipv4.gateway 192.168.8.2 ipv4.dns 192.168.8.2 ipv4.method manual nmcli con up ens33 sed -i 's/^SELINUX=.*/SELINUX=disabled/' /etc/selinux/config setenforce 0 systemctl disable firewalld.service --now yum -y update ssh-keygen ssh-copy-id ws-k8s-node1 ssh-copy-id ws-k8s-node2 swapoff -a sed -i '$ s/^/#/' /etc/fstab modprobe br_netfilter echo "modprobe br_netfilter" >> /etc/profile echo " net.bridge.bridge-nf-call-ip6tables = 1 net.bridge.bridge-nf-call-iptables = 1 net.ipv4.ip_forward = 1 " >> /etc/sysctl.d/k8s.confsysctl -p /etc/sysctl.d/k8s.conf yum-config-manager --add-repo http://mirrors.aliyun.com/docker-ce/linux/centos/docker-ce.repo yum install -y yum-utils device-mapper-persistent-data lvm2 wget net-tools nfs-utils lrzsz gcc gcc-c++ make cmake libxml2-devel openssl-devel curl curl-devel unzip sudo ntp libaio-devel wget vim ncurses-devel autoconf automake zlib-devel python-devel epel-release openssh-server socat ipvsadm conntrack ntpdate telnet ipvsadm yum install -y yum-utils device-mapper-persistent-data lvm2 wget net-tools nfs-utils lrzsz gcc gcc-c++ make cmake libxml2-devel openssl-devel curl curl-devel unzip sudo ntp libaio-devel wget vim ncurses-devel autoconf automake zlib-devel python-devel epel-release openssh-server socat ipvsadm conntrack ntpdate telnet ipvsadm yum install -y yum-utils device-mapper-persistent-data lvm2 wget net-tools nfs-utils lrzsz gcc gcc-c++ make cmake libxml2-devel openssl-devel curl curl-devel unzip sudo ntp libaio-devel wget vim ncurses-devel autoconf automake zlib-devel python-devel epel-release openssh-server socat ipvsadm conntrack ntpdate telnet ipvsadm echo " [kubernetes] name=Kubernetes baseurl=https://mirrors.aliyun.com/kubernetes/yum/repos/kubernetes-el7-x86_64/ enabled=1 gpgcheck=0 " >> /etc/yum.repos.d/kubernetes.reposcp /etc/yum.repos.d/kubernetes.repo ws-k8s-node1:/etc/yum.repos.d/ scp /etc/yum.repos.d/kubernetes.repo ws-k8s-node2:/etc/yum.repos.d/ sed -i 's/^server/#server/g' /etc/chrony.conf sed -i '1s/^/server cn.pool.ntp.org iburst\n/' /etc/chrony.conf systemctl restart chronyd yum -y install docker-ce systemctl enable docker --now echo ' { "registry-mirrors": ["https://bsx9xf1d.mirror.aliyuncs.com"], "exec-opts": ["native.cgroupdriver=systemd"] } ' > /etc/docker/daemon.jsonsystemctl daemon-reload systemctl restart docker reboot hostnamectl set-hostname ws-k8s-node1 && bash echo " 192.168.8.151 ws-k8s-master1 192.168.8.152 ws-k8s-node1 192.168.8.153 ws-k8s-node2 " >> /etc/hostsnmcli con modify ens33 ipv4.addresses 192.168.8.152/24 ipv4.gateway 192.168.8.2 ipv4.dns 192.168.8.2 ipv4.method manual nmcli con up ens33 sed -i 's/^SELINUX=.*/SELINUX=disabled/' /etc/selinux/config setenforce 0 systemctl disable firewalld.service --now yum -y update yum-config-manager --add-repo http://mirrors.aliyun.com/docker-ce/linux/centos/docker-ce.repo yum install -y yum-utils device-mapper-persistent-data lvm2 wget net-tools nfs-utils lrzsz gcc gcc-c++ make cmake libxml2-devel openssl-devel curl curl-devel unzip sudo ntp libaio-devel wget vim ncurses-devel autoconf automake zlib-devel python-devel epel-release openssh-server socat ipvsadm conntrack ntpdate telnet ipvsadm yum install -y yum-utils device-mapper-persistent-data lvm2 wget net-tools nfs-utils lrzsz gcc gcc-c++ make cmake libxml2-devel openssl-devel curl curl-devel unzip sudo ntp libaio-devel wget vim ncurses-devel autoconf automake zlib-devel python-devel epel-release openssh-server socat ipvsadm conntrack ntpdate telnet ipvsadm yum install -y yum-utils device-mapper-persistent-data lvm2 wget net-tools nfs-utils lrzsz gcc gcc-c++ make cmake libxml2-devel openssl-devel curl curl-devel unzip sudo ntp libaio-devel wget vim ncurses-devel autoconf automake zlib-devel python-devel epel-release openssh-server socat ipvsadm conntrack ntpdate telnet ipvsadm ssh-keygen ssh-copy-id ws-k8s-node2 ssh-copy-id ws-k8s-master1 swapoff -a sed -i '$ s/^/#/' /etc/fstab modprobe br_netfilter echo "modprobe br_netfilter" >> /etc/profileecho " net.bridge.bridge-nf-call-ip6tables = 1 net.bridge.bridge-nf-call-iptables = 1 net.ipv4.ip_forward = 1 " >> /etc/sysctl.d/k8s.confsysctl -p /etc/sysctl.d/k8s.conf sed -i 's/^server/#server/g' /etc/chrony.conf sed -i '1s/^/server cn.pool.ntp.org iburst\n/' /etc/chrony.conf systemctl restart chronyd wget -O get-docker.sh https://get.docker.com sh get-docker.sh systemctl enable docker --now echo ' { "registry-mirrors": ["https://bsx9xf1d.mirror.aliyuncs.com"], "exec-opts": ["native.cgroupdriver=systemd"] } ' > /etc/docker/daemon.jsonsystemctl daemon-reload systemctl restart docker reboot hostnamectl set-hostname ws-k8s-node2 && bash echo " 192.168.8.151 ws-k8s-master1 192.168.8.152 ws-k8s-node1 192.168.8.153 ws-k8s-node2 " >> /etc/hostsnmcli con modify ens33 ipv4.addresses 192.168.8.153/24 ipv4.gateway 192.168.8.2 ipv4.dns 192.168.8.2 ipv4.method manual nmcli con up ens33 sed -i 's/^SELINUX=.*/SELINUX=disabled/' /etc/selinux/config setenforce 0 systemctl disable firewalld.service --now yum-config-manager --add-repo http://mirrors.aliyun.com/docker-ce/linux/centos/docker-ce.repo yum install -y yum-utils device-mapper-persistent-data lvm2 wget net-tools nfs-utils lrzsz gcc gcc-c++ make cmake libxml2-devel openssl-devel curl curl-devel unzip sudo ntp libaio-devel wget vim ncurses-devel autoconf automake zlib-devel python-devel epel-release openssh-server socat ipvsadm conntrack ntpdate telnet ipvsadm yum install -y yum-utils device-mapper-persistent-data lvm2 wget net-tools nfs-utils lrzsz gcc gcc-c++ make cmake libxml2-devel openssl-devel curl curl-devel unzip sudo ntp libaio-devel wget vim ncurses-devel autoconf automake zlib-devel python-devel epel-release openssh-server socat ipvsadm conntrack ntpdate telnet ipvsadm yum install -y yum-utils device-mapper-persistent-data lvm2 wget net-tools nfs-utils lrzsz gcc gcc-c++ make cmake libxml2-devel openssl-devel curl curl-devel unzip sudo ntp libaio-devel wget vim ncurses-devel autoconf automake zlib-devel python-devel epel-release openssh-server socat ipvsadm conntrack ntpdate telnet ipvsadm yum -y update ssh-keygen ssh-copy-id ws-k8s-node1 ssh-copy-id ws-k8s-master1 swapoff -a sed -i '$ s/^/#/' /etc/fstab modprobe br_netfilter echo "modprobe br_netfilter" >> /etc/profileecho " net.bridge.bridge-nf-call-ip6tables = 1 net.bridge.bridge-nf-call-iptables = 1 net.ipv4.ip_forward = 1 " >> /etc/sysctl.d/k8s.confsysctl -p /etc/sysctl.d/k8s.conf sed -i 's/^server/#server/g' /etc/chrony.conf sed -i '1s/^/server cn.pool.ntp.org iburst\n/' /etc/chrony.conf systemctl restart chronyd wget -O get-docker.sh https://get.docker.com sh get-docker.sh systemctl enable docker --now echo ' { "registry-mirrors": ["https://bsx9xf1d.mirror.aliyuncs.com"], "exec-opts": ["native.cgroupdriver=systemd"] } ' > /etc/docker/daemon.jsonsystemctl daemon-reload systemctl restart docker reboot
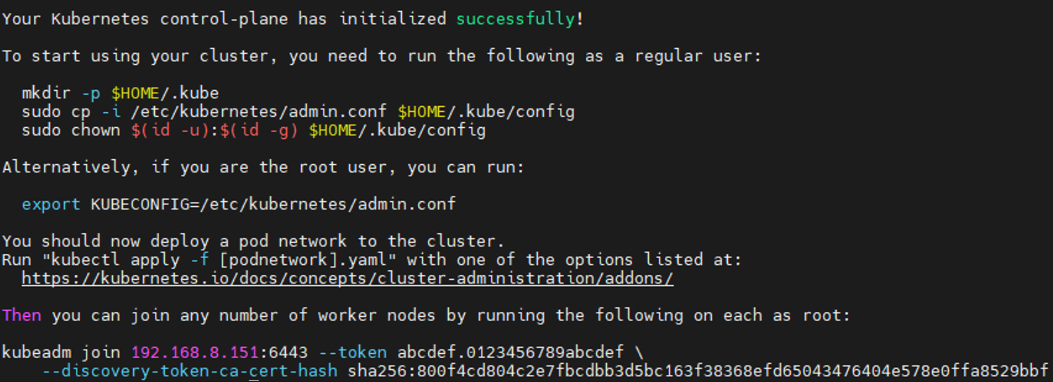
主节点安装k8s 1 2 3 4 5 6 7 8 9 10 11 12 13 14 15 16 17 18 19 20 21 22 23 24 25 26 27 28 29 30 31 32 33 34 35 36 37 38 39 40 41 42 yum install -y kubelet-1.20.6 kubeadm-1.20.6 kubectl-1.20.6 systemctl enable kubelet kubeadm config print init-defaults > kubeadm.yaml vim kubeadm.yaml advertiseAddress: 192.168.8.151 name: ws-k8s-master1 imageRepository: registry.aliyuncs.com/google_containers kubernetesVersion: v1.20.6 在networking中增加并对齐 podSubnet: 10.10.0.0/16 注释criSocket这一行 echo " --- apiVersion: kubeproxy.config.k8s.io/v1alpha1 kind: KubeProxyConfiguration mode: ipvs --- apiVersion: kubelet.config.k8s.io/v1beta1 kind: KubeletConfiguration cgroupDriver: systemd " >> kubeadm.yamlkubeadm init --config=kubeadm.yaml --ignore-preflight-errors=SystemVerification mkdir -p $HOME /.kubesudo cp -i /etc/kubernetes/admin.conf $HOME /.kube/config sudo chown $(id -u):$(id -g) $HOME /.kube/config kubectl get nodes
工作节点添加 1 2 3 4 5 6 7 8 9 10 11 12 13 14 15 16 17 18 19 20 21 22 23 24 25 26 27 28 29 30 31 32 33 34 35 kubeadm token create --print-join-command yum install -y kubelet-1.20.6 kubeadm-1.20.6 kubectl-1.20.6 systemctl enable kubelet kubeadm join 192.168.8.151:6443 --token j7k3oa.761wztev8dgrqv59 \ --discovery-token-ca-cert-hash \ sha256:800f4cd804c2e7fbcdbb3d5bc163f38368efd65043476404e578e0ffa8529bbf \ --ignore-preflight-errors=SystemVerification yum install -y kubelet-1.20.6 kubeadm-1.20.6 kubectl-1.20.6 systemctl enable kubelet kubeadm join 192.168.8.151:6443 --token j7k3oa.761wztev8dgrqv59 \ --discovery-token-ca-cert-hash \ sha256:800f4cd804c2e7fbcdbb3d5bc163f38368efd65043476404e578e0ffa8529bbf \ --ignore-preflight-errors=SystemVerification kubectl get nodes NAME STATUS ROLES AGE VERSION ws-k8s-master1 NotReady control-plane,master 21m v1.20.6 ws-k8s-node1 NotReady <none> 98s v1.20.6 ws-k8s-node2 NotReady <none> 60s v1.20.6 kubectl get pods -n kube-system NAME READY STATUS RESTARTS AGE coredns-7f89b7bc75-6ntkb 0/1 Pending 0 12m coredns-7f89b7bc75-cph9t 0/1 Pending 0 12m etcd-ws-k8s-master1 1/1 Running 0 12m kube-apiserver-ws-k8s-master1 1/1 Running 1 12m kube-controller-manager-ws-k8s-master1 1/1 Running 0 12m kube-proxy-2sltc 1/1 Running 0 12m kube-scheduler-ws-k8s-master1 1/1 Running 0 12m
calico网络插件 Calico通过calico.yaml配置文件https://docs.projectcalico.org/manifests/calico.yaml
一些参数 CALICO_IPV4POOL_IPIP:是否启用IPIP模式,默认采用IPIP
IP_AUTODETECTION_METHOD:获取Node IP地址的方式,默认使用第1个网络接口的IP地址
name: IP_AUTODETECTION_METHOD
Calico组件 1、felix
1 2 3 4 5 6 7 8 9 10 11 12 13 14 15 16 17 18 19 20 21 22 23 24 25 26 27 28 29 30 31 32 33 34 35 36 37 38 39 40 41 42 kubectl get nodes NAME STATUS ROLES AGE VERSION ws-k8s-master1 NotReady control-plane,master 21m v1.20.6 ws-k8s-node1 NotReady <none> 98s v1.20.6 ws-k8s-node2 NotReady <none> 60s v1.20.6 kubectl get pods -n kube-system NAME READY STATUS RESTARTS AGE coredns-7f89b7bc75-6ntkb 0/1 Pending 0 12m coredns-7f89b7bc75-cph9t 0/1 Pending 0 12m etcd-ws-k8s-master1 1/1 Running 0 12m kube-apiserver-ws-k8s-master1 1/1 Running 1 12m kube-controller-manager-ws-k8s-master1 1/1 Running 0 12m kube-proxy-2sltc 1/1 Running 0 12m kube-scheduler-ws-k8s-master1 1/1 Running 0 12m kubectl apply -f calico.yaml kubectl get nodes NAME STATUS ROLES AGE VERSION ws-k8s-master1 Ready control-plane,master 34m v1.20.6 ws-k8s-node1 Ready <none> 14m v1.20.6 ws-k8s-node2 Ready <none> 13m v1.20 kubectl get pods -n kube-system NAME READY STATUS RESTARTS AGE calico-kube-controllers-6949477b58-z9gk4 1/1 Running 0 4m15s calico-node-d6mvs 1/1 Running 0 4m15s calico-node-sx4t8 1/1 Running 0 4m15s calico-node-vdxvc 1/1 Running 0 4m15s coredns-7f89b7bc75-6ntkb 1/1 Running 0 35m coredns-7f89b7bc75-cph9t 1/1 Running 0 35m etcd-ws-k8s-master1 1/1 Running 0 36m kube-apiserver-ws-k8s-master1 1/1 Running 1 36m kube-controller-manager-ws-k8s-master1 1/1 Running 0 36m kube-proxy-2sltc 1/1 Running 0 35m kube-proxy-ndfn7 1/1 Running 0 15m kube-proxy-rmdfb 1/1 Running 0 16m kube-scheduler-ws-k8s-master1 1/1 Running 0 36m
k8s1.26搭建 环境
环境初始化 1 2 3 4 5 6 7 8 9 10 11 12 13 14 15 16 17 18 19 20 21 22 23 24 25 26 27 28 29 30 31 32 33 34 35 36 37 38 39 40 41 42 43 44 45 46 47 48 49 50 51 52 53 54 55 56 57 58 59 60 61 62 63 64 65 66 67 68 69 hostnamectl set-hostname ws-k8s-master1 && bash nmcli con modify ens33 ipv4.addresses 192.168.8.160/24 ipv4.gateway 192.168.8.2 ipv4.dns 192.168.8.2 ipv4.method manual nmcli con up ens33 yum install -y device-mapper-persistent-data lvm2 wget net-tools nfs-utils lrzsz gcc gcc-c++ make cmake libxml2-devel openssl-devel curl curl-devel unzip sudo ntp libaio-devel wget vim ncurses-devel autoconf automake zlib-devel python-devel epel-release openssh-server socat ipvsadm conntrack telnet ipvsadm yum -y update sed -i 's/^SELINUX=.*/SELINUX=disabled/' /etc/selinux/config setenforce 0 systemctl disable firewalld.service --now echo " 192.168.8.160 ws-k8s-master1 192.168.8.161 ws-k8s-node1 " >> /etc/hostsswapoff -a sed -i '$ s/^/#/' /etc/fstab ssh-keygen ssh-copy-id ws-k8s-node1 modprobe br_netfilter cat > /etc/sysctl.d/k8s.conf << EOF net.bridge.bridge-nf-call-ip6tables = 1 net.bridge.bridge-nf-call-iptables = 1 net.ipv4.ip_forward = 1 EOF sysctl -p /etc/sysctl.d/k8s.conf echo " [kubernetes] name=Kubernetes baseurl=https://mirrors.aliyun.com/kubernetes/yum/repos/kubernetes-el7-x86_64/ enabled=1 gpgcheck=0 " >> /etc/yum.repos.d/kubernetes.repoyum-config-manager --add-repo http://mirrors.aliyun.com/docker-ce/linux/centos/docker-ce.repo sed -i 's/^server/#server/g' /etc/chrony.conf sed -i '1s/^/server cn.pool.ntp.org iburst\n/' /etc/chrony.conf reboot hostnamectl set-hostname ws-k8s-node1 && bash nmcli con modify ens33 ipv4.addresses 192.168.8.161/24 ipv4.gateway 192.168.8.2 ipv4.dns 192.168.8.2 ipv4.method manual nmcli con up ens33 yum install -y device-mapper-persistent-data lvm2 wget net-tools nfs-utils lrzsz gcc gcc-c++ make cmake libxml2-devel openssl-devel curl curl-devel unzip sudo ntp libaio-devel wget vim ncurses-devel autoconf automake zlib-devel python-devel epel-release openssh-server socat ipvsadm conntrack telnet ipvsadm yum -y update sed -i 's/^SELINUX=.*/SELINUX=disabled/' /etc/selinux/config setenforce 0 systemctl disable firewalld.service --now echo " 192.168.8.160 ws-k8s-master1 192.168.8.161 ws-k8s-node1 " >> /etc/hostsswapoff -a sed -i '$ s/^/#/' /etc/fstab modprobe br_netfilter cat > /etc/sysctl.d/k8s.conf << EOF net.bridge.bridge-nf-call-ip6tables = 1 net.bridge.bridge-nf-call-iptables = 1 net.ipv4.ip_forward = 1 EOF sysctl -p /etc/sysctl.d/k8s.conf echo " [kubernetes] name=Kubernetes baseurl=https://mirrors.aliyun.com/kubernetes/yum/repos/kubernetes-el7-x86_64/ enabled=1 gpgcheck=0 " >> /etc/yum.repos.d/kubernetes.repoyum-config-manager --add-repo http://mirrors.aliyun.com/docker-ce/linux/centos/docker-ce.repo sed -i 's/^server/#server/g' /etc/chrony.conf sed -i '1s/^/server cn.pool.ntp.org iburst\n/' /etc/chrony.conf reboot
安装containerd 1 2 3 4 5 6 7 8 9 10 11 12 13 14 15 16 17 18 19 20 21 22 23 24 25 26 27 28 29 30 31 32 33 34 35 36 37 38 39 40 41 42 43 44 45 46 47 48 49 50 51 52 53 54 55 56 57 58 59 60 61 62 63 yum install -y containerd.io-1.6.6 mkdir -p /etc/containerdmkdir /etc/containerd/certs.d/docker.io/ -pecho '[host."https://bsx9xf1d.mirror.aliyuncs.com",host."https://registry.docker-cn.com"] capabilities = ["pull"] ' >> /etc/containerd/certs.d/docker.io/hosts.tomlcontainerd config default > /etc/containerd/config.toml 修改 vim /etc/containerd/config.toml SystemdCgroup = True sandbox_image = "registry.aliyuncs.com/google_containers/pause:3.7" config_path = "/etc/containerd/certs.d" systemctl enable containerd.service --now cat > /etc/crictl.yaml <<EOF runtime-endpoint: unix:///run/containerd/containerd.sock image-endpoint: unix:///run/containerd/containerd.sock timeout: 10 debug: false EOF systemctl restart containerd yum install -y docker-ce && systemctl enable docker --now echo ' {"registry-mirrors": ["https://bsx9xf1d.mirror.aliyuncs.com"], "exec-opts": ["native.cgroupdriver=systemd"] }' > /etc/docker/daemon.jsonsystemctl daemon-reload systemctl restart docker yum install -y containerd.io-1.6.6 mkdir -p /etc/containerdcontainerd config default > /etc/containerd/config.toml vim /etc/containerd/config.toml 修改 SystemdCgroup = True sandbox_image = "registry.aliyuncs.com/google_containers/pause:3.7" config_path = "/etc/containerd/certs.d" mkdir /etc/containerd/certs.d/docker.io/ -pecho '[host."https://bsx9xf1d.mirror.aliyuncs.com",host."https://registry.docker-cn.com"] capabilities = ["pull"] ' >> /etc/containerd/certs.d/docker.io/hosts.tomlsystemctl enable containerd.service --now cat > /etc/crictl.yaml <<EOF runtime-endpoint: unix:///run/containerd/containerd.sock image-endpoint: unix:///run/containerd/containerd.sock timeout: 10 debug: false EOF systemctl restart containerd yum install -y docker-ce && systemctl enable docker --now echo ' {"registry-mirrors": ["https://bsx9xf1d.mirror.aliyuncs.com"], "exec-opts": ["native.cgroupdriver=systemd"] }' > /etc/docker/daemon.jsonsystemctl daemon-reload systemctl restart docker
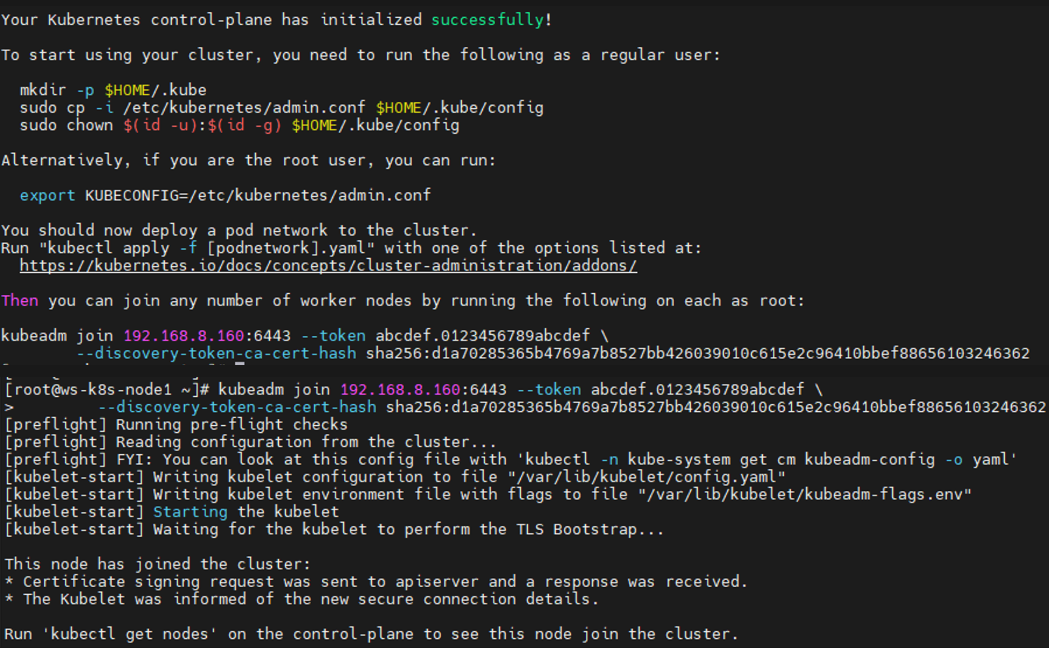
安装k8s 1 2 3 4 5 6 7 8 9 10 11 12 13 14 15 16 17 18 19 20 21 22 23 24 25 26 27 28 29 30 31 32 33 34 35 36 37 38 39 40 41 42 yum install -y kubelet-1.26.0 yum install -y kubeadm-1.26.0 yum install -y kubectl-1.26.0 systemctl enable kubelet crictl config runtime-endpoint unix:///run/containerd/containerd.sock kubeadm config print init-defaults > kubeadm.yaml vim kubeadm.yaml 修改: advertiseAddress: 192.168.8.160 criSocket: unix:///run/containerd/containerd.sock name: ws-k8s-master1 imageRepository: registry.cn-hangzhou.aliyuncs.com/google_containers kubernetesVersion: 1.26.0 在networking下添加: podSubnet: 10.10.0.0/16 echo '--- apiVersion: kubeproxy.config.k8s.io/v1alpha1 kind: KubeProxyConfiguration mode: ipvs #kube代理模式为ipvs --- apiVersion: kubelet.config.k8s.io/v1beta1 kind: KubeletConfiguration #cgroup驱动使用systemd cgroupDriver: systemd' >> kubeadm.yamlkubeadm init --config=kubeadm.yaml --ignore-preflight-errors=SystemVerification mkdir -p $HOME /.kube sudo cp -i /etc/kubernetes/admin.conf $HOME /.kube/config sudo chown $(id -u):$(id -g) $HOME /.kube/config kubectl get nodes kubeadm token create --print-join-command kubeadm join 192.168.8.160:6443 --token oa7h1w.79oq2ol0w3jqcgud \ --discovery-token-ca-cert-hash sha256:d1a70285365b4769a7b8527bb426039010c615e2c96410bbef88656103246362 \ --ignore-preflight-errors=SystemVerification
安装Calico 1 2 3 4 5 6 7 8 9 10 11 12 13 14 15 16 17 18 19 20 21 22 23 24 25 26 27 28 29 30 31 32 33 34 35 36 37 38 39 40 41 42 43 44 45 46 47 48 49 50 51 52 53 54 55 56 57 58 59 60 61 62 63 64 65 66 67 68 69 kubectl get node NAME STATUS ROLES AGE VERSION ws-k8s-master1 NotReady control-plane 30m v1.26.0 ws-k8s-node1 NotReady <none> 28m v1.26.0 kubectl get pods -n kube-system -owide NAME READY STATUS RESTARTS AGE IP NODE NOMINATED NODE READINESS GATES coredns-567c556887-9v7nk 0/1 Pending 0 29m <none> <none> <none> <none> coredns-567c556887-z7b9x 0/1 Pending 0 29m <none> <none> <none> <none> etcd-ws-k8s-master1 1/1 Running 0 29m 192.168.8.160 ws-k8s-master1 <none> <none> kube-apiserver-ws-k8s-master1 1/1 Running 0 29m 192.168.8.160 ws-k8s-master1 <none> <none> kube-controller-manager-ws-k8s-master1 1/1 Running 0 29m 192.168.8.160 ws-k8s-master1 <none> <none> kube-proxy-bg7ck 1/1 Running 0 29m 192.168.8.160 ws-k8s-master1 <none> <none> kube-proxy-s22ng 1/1 Running 1 28m 192.168.8.161 ws-k8s-node1 <none> <none> kube-scheduler-ws-k8s-master1 1/1 Running 0 29m 192.168.8.160 ws-k8s-master1 <none> <none> kubectl apply -f calico.yaml kubectl get pods -n kube-system -owide NAME READY STATUS RESTARTS AGE IP NODE NOMINATED NODE READINESS GATES calico-kube-controllers-d886b8fff-795k8 0/1 Pending 0 4m33s <none> <none> <none> <none> calico-node-hcfmw 0/1 Init:0/3 0 4m32s 192.168.8.161 ws-k8s-node1 <none> <none> calico-node-vds28 0/1 Init:0/3 0 4m33s 192.168.8.160 ws-k8s-master1 <none> <none> kubectl delete -f calico.yaml ctr -n=k8s.io images import calico.tar.gz kubectl apply -f calico.yaml kubectl get pods -n kube-system -owide NAME READY STATUS RESTARTS AGE IP NODE NOMINATED NODE READINESS GATES calico-kube-controllers-d886b8fff-nc6mm 1/1 Running 0 21s 10.10.179.1 ws-k8s-node1 <none> <none> calico-node-4rj9m 1/1 Running 0 21s 192.168.8.161 ws-k8s-node1 <none> <none> calico-node-gn6gm 1/1 Running 0 21s 192.168.8.160 ws-k8s-master1 <none> <none> coredns-567c556887-9v7nk 1/1 Running 0 77m 10.10.189.193 ws-k8s-master1 <none> <none> coredns-567c556887-z7b9x 1/1 Running 0 77m 10.10.189.194 ws-k8s-master1 <none> <none> etcd-ws-k8s-master1 1/1 Running 0 77m 192.168.8.160 ws-k8s-master1 <none> <none> kube-apiserver-ws-k8s-master1 1/1 Running 0 77m 192.168.8.160 ws-k8s-master1 <none> <none> kube-controller-manager-ws-k8s-master1 1/1 Running 0 77m 192.168.8.160 ws-k8s-master1 <none> <none> kube-proxy-bg7ck 1/1 Running 0 77m 192.168.8.160 ws-k8s-master1 <none> <none> kube-proxy-s22ng 1/1 Running 0 75m 192.168.8.161 ws-k8s-node1 <none> <none> kube-scheduler-ws-k8s-master1 1/1 Running 0 77m 192.168.8.160 ws-k8s-master1 <none> <none> [root@ws-k8s-master1 ~] NAME STATUS ROLES AGE VERSION ws-k8s-master1 Ready control-plane 77m v1.26.0 ws-k8s-node1 Ready <none> 76m v1.26.0 ctr -n k8s.io images pull docker.io/library/busybox:1.28 kubectl run busybox --image docker.io/library/busybox:1.28 \ --image-pull-policy=IfNotPresent --restart=Never --rm -it busybox -- sh ping www.baidu.com 64 bytes from 180.101.50.188: seq =0 ttl=127 time=22.460 ms 64 bytes from 180.101.50.188: seq =1 ttl=127 time=16.696 ms nslookup kubernetes.default.svc.cluster.local Server: 10.96.0.10 Address 1: 10.96.0.10 kube-dns.kube-system.svc.cluster.local Name: kubernetes.default.svc.cluster.local Address 1: 10.96.0.1 kubernetes.default.svc.cluster.local
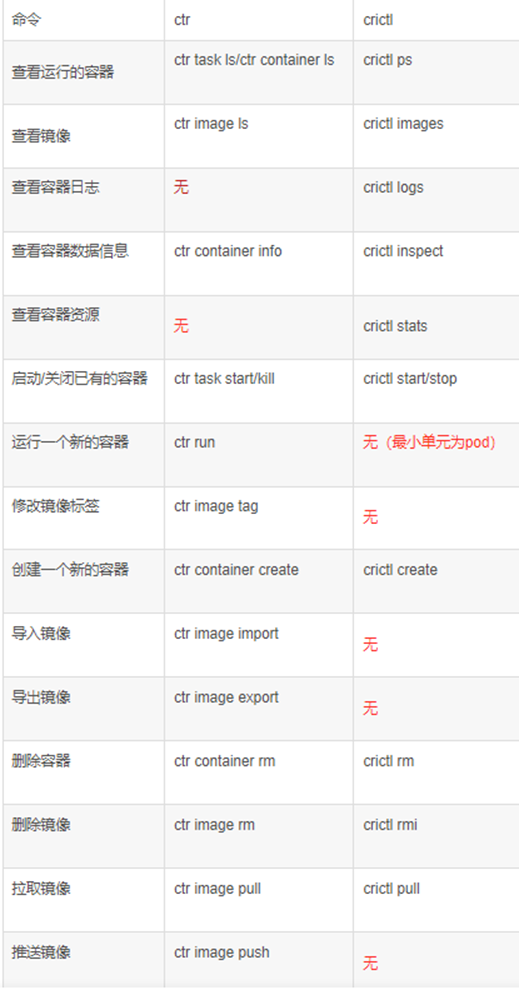
ctr和crictl的区别 ctr是containerd自带的CLI命令行工具
扩容k8s集群 添加工作节点 192.168.8.162 ws-k8s-node2
1 2 3 4 5 6 7 8 9 10 11 12 13 14 15 16 17 18 19 20 21 22 23 24 25 26 27 28 29 30 31 32 33 34 35 36 37 38 39 40 41 42 43 44 45 46 47 48 49 50 51 52 53 54 55 56 57 58 59 60 61 62 63 64 65 66 67 68 69 70 71 72 73 74 75 76 77 78 echo "192.168.8.161 ws-k8s-node2 " >> /etc/hostsssh-copy-id ws-k8s-node2 kubeadm token create --print-join-command echo "192.168.8.161 ws-k8s-node2 " >> /etc/hostshostnamectl set-hostname ws-k8s-node2 && bash nmcli con modify ens33 ipv4.addresses 192.168.8.162/24 ipv4.gateway 192.168.8.2 ipv4.dns 192.168.8.2 ipv4.method manual nmcli con up ens33 yum install -y device-mapper-persistent-data lvm2 wget net-tools nfs-utils lrzsz gcc gcc-c++ make cmake libxml2-devel openssl-devel curl curl-devel unzip sudo ntp libaio-devel wget vim ncurses-devel autoconf automake zlib-devel python-devel epel-release openssh-server socat ipvsadm conntrack telnet ipvsadm yum -y update sed -i 's/^SELINUX=.*/SELINUX=disabled/' /etc/selinux/config setenforce 0 systemctl disable firewalld.service --now echo " 192.168.8.160 ws-k8s-master1 192.168.8.161 ws-k8s-node1 192.168.8.161 ws-k8s-node2 " >> /etc/hostsswapoff -a sed -i '$ s/^/#/' /etc/fstab modprobe br_netfilter cat > /etc/sysctl.d/k8s.conf << EOF net.bridge.bridge-nf-call-ip6tables = 1 net.bridge.bridge-nf-call-iptables = 1 net.ipv4.ip_forward = 1 EOF sysctl -p /etc/sysctl.d/k8s.conf echo " [kubernetes] name=Kubernetes baseurl=https://mirrors.aliyun.com/kubernetes/yum/repos/kubernetes-el7-x86_64/ enabled=1 gpgcheck=0 " >> /etc/yum.repos.d/kubernetes.repoyum-config-manager --add-repo http://mirrors.aliyun.com/docker-ce/linux/centos/docker-ce.repo sed -i 's/^server/#server/g' /etc/chrony.conf sed -i '1s/^/server cn.pool.ntp.org iburst\n/' /etc/chrony.conf yum install -y containerd.io-1.6.6 mkdir -p /etc/containerdcontainerd config default > /etc/containerd/config.toml vim /etc/containerd/config.toml 修改 SystemdCgroup = True sandbox_image = "registry.aliyuncs.com/google_containers/pause:3.7" config_path = "/etc/containerd/certs.d" mkdir /etc/containerd/certs.d/docker.io/ -pecho '[host."https://bsx9xf1d.mirror.aliyuncs.com",host."https://registry.docker-cn.com"] capabilities = ["pull"] ' >> /etc/containerd/certs.d/docker.io/hosts.tomlsystemctl enable containerd.service --now cat > /etc/crictl.yaml <<EOF runtime-endpoint: unix:///run/containerd/containerd.sock image-endpoint: unix:///run/containerd/containerd.sock timeout: 10 debug: false EOF systemctl restart containerd yum install -y docker-ce && systemctl enable docker --now echo ' {"registry-mirrors": ["https://bsx9xf1d.mirror.aliyuncs.com"], "exec-opts": ["native.cgroupdriver=systemd"] }' > /etc/docker/daemon.jsonsystemctl daemon-reload systemctl restart docker yum install -y kubelet-1.26.0 kubeadm-1.26.0 kubectl-1.26.0 systemctl enable kubelet reboot kubeadm join 192.168.8.160:6443 --token h5lkkm.dsybifhcfj9okvbj \ --discovery-token-ca-cert-hash sha256:d1a70285365b4769a7b8527bb426039010c615e2c96410bbef88656103246362 \
k8s1.28高可用搭建 master1 1 2 3 4 5 6 7 8 9 10 11 12 13 14 15 16 17 18 19 20 21 22 23 24 25 26 27 28 29 30 31 32 33 34 35 36 37 38 39 40 41 42 43 44 45 46 47 48 49 50 51 52 53 54 55 56 57 58 59 60 61 62 63 64 65 66 67 68 69 70 71 72 73 74 75 76 77 78 79 80 81 82 83 84 85 86 87 88 89 90 91 92 93 94 95 96 97 98 99 100 101 102 103 104 105 106 107 108 109 110 111 112 113 114 115 116 117 118 119 120 121 122 123 124 125 126 127 128 129 130 131 132 133 134 135 136 137 hostnamectl set-hostname ws-k8s-master1 && bash nmcli con modify ens18 ipv4.addresses 192.168.10.121/24 ipv4.gateway 192.168.10.1 ipv4.dns 192.168.1.1 ipv4.method manual nmcli con up ens18 yum install -y device-mapper-persistent-data lvm2 wget net-tools nfs-utils lrzsz gcc gcc-c++ make cmake libxml2-devel openssl-devel curl curl-devel unzip sudo ntp libaio-devel wget vim ncurses-devel autoconf automake zlib-devel python-devel epel-release openssh-server socat ipvsadm conntrack telnet ipvsadm yum -y update sed -i 's/^SELINUX=.*/SELINUX=disabled/' /etc/selinux/config setenforce 0 systemctl disable firewalld.service --now echo " 127.0.0.1 localhost localhost.localdomain localhost4 localhost4.localdomain4 ::1 localhost localhost.localdomain localhost6 localhost6.localdomain6 192.168.10.100 1panel 192.168.10.120 pve 192.168.10.121 ws-k8s-master1 192.168.10.122 ws-k8s-master2 192.168.10.123 ws-k8s-master3 192.168.10.130 harbor 192.168.10.131 ws-k8s-node1 192.168.10.132 ws-k8s-node2 192.168.10.133 ws-k8s-node3 192.168.10.140 docker-host 192.168.10.141 ceph-node1 192.168.10.142 ceph-node2 192.168.10.143 ceph-node3 " > /etc/hostsswapoff -a sed -i '$ s/^/#/' /etc/fstab modprobe br_netfilter cat > /etc/sysctl.d/k8s.conf << EOF net.bridge.bridge-nf-call-ip6tables = 1 net.bridge.bridge-nf-call-iptables = 1 net.ipv4.ip_forward = 1 EOF sysctl -p /etc/sysctl.d/k8s.conf yum -y install yum-utils yum-config-manager --add-repo http://mirrors.aliyun.com/docker-ce/linux/centos/docker-ce.repo sysctl -p /etc/sysctl.d/k8s.conf echo " [kubernetes] name=Kubernetes baseurl=https://mirrors.aliyun.com/kubernetes/yum/repos/kubernetes-el7-x86_64/ enabled=1 gpgcheck=0 " >> /etc/yum.repos.d/kubernetes.repoyum -y install chrony sed -i 's/^server/#server/g' /etc/chrony.conf sed -i '1s/^/server cn.pool.ntp.org iburst\n/' /etc/chrony.conf yum install -y containerd.io-1.6.6 mkdir -p /etc/containerdmkdir /etc/containerd/certs.d/docker.io/ -pecho '[host."https://hub-mirror.c.163.com",host."https://docker.m.daocloud.io", host."https://ghcr.io",host."https://mirror.baidubce.com",host."https://docker.nju.edu.cn"] capabilities = ["pull"] ' > /etc/containerd/certs.d/docker.io/hosts.tomlcontainerd config default > /etc/containerd/config.toml 修改 vim /etc/containerd/config.toml SystemdCgroup = true sandbox_image = "registry.aliyuncs.com/google_containers/pause:3.7" config_path = "/etc/containerd/certs.d" cat > /etc/crictl.yaml <<EOF runtime-endpoint: unix:///run/containerd/containerd.sock image-endpoint: unix:///run/containerd/containerd.sock timeout: 10 debug: false EOF systemctl enable containerd.service --now systemctl restart containerd yum install -y docker-ce && systemctl enable docker --now cat > /etc/docker/daemon.json << EOF { "registry-mirrors": [ "https://hub-mirror.c.163.com", "https://docker.m.daocloud.io", "https://ghcr.io", "https://mirror.baidubce.com", "https://docker.nju.edu.cn" ] } EOF systemctl daemon-reload systemctl restart docker yum install -y kubelet-1.28.1 kubeadm-1.28.1 kubectl-1.28.1 systemctl enable kubelet kubeadm config print init-defaults > kubeadm.yaml vim kubeadm.yaml 修改: advertiseAddress: 192.168.10.121 criSocket: unix:///run/containerd/containerd.sock name: ws-k8s-master1 imageRepository: registry.cn-hangzhou.aliyuncs.com/google_containers kubernetesVersion: 1.28.0 在networking下添加: podSubnet: 10.244.0.0/16 echo '--- apiVersion: kubeproxy.config.k8s.io/v1alpha1 kind: KubeProxyConfiguration mode: ipvs #kube代理模式为ipvs --- apiVersion: kubelet.config.k8s.io/v1beta1 kind: KubeletConfiguration #cgroup驱动使用systemd cgroupDriver: systemd' >> kubeadm.yamlreboot kubeadm init --config=kubeadm.yaml --ignore-preflight-errors=SystemVerification mkdir -p $HOME /.kube sudo cp -i /etc/kubernetes/admin.conf $HOME /.kube/config sudo chown $(id -u):$(id -g) $HOME /.kube/config kubectl get nodes kubeadm token create --print-join-command kubeadm join 192.168.10.121:6443 --token fz8d9z.o5csc8a17ilub13g --discovery-token-ca-cert-hash sha256:c6fe90eb5632c6e422b694d1392722bed65fd768497a98cc75dcab8589ad35a7
master节点加入 #证书
#把master1的证书放到master2上
#master1:检查kubeadm-config ConfigMap
#master2加入集群,–control-plane表示添加控制节点
kubeadm join 192.168.10.121:6443 –token 3cux79.jadpr1rx79h85er5 –discovery-token-ca-cert-hash sha256:bc2f349ee80ea509d925320d3fa7121b32f978071f9d0d3e612b4a3aff311664
#master3
node与节点加入 1 2 3 4 5 6 7 8 9 10 11 12 13 14 15 16 17 18 19 20 21 22 23 24 25 26 27 28 29 30 31 32 33 34 35 36 37 38 39 40 41 42 43 44 45 46 47 48 49 50 51 52 53 54 55 56 57 58 59 60 61 62 63 64 65 66 67 68 69 70 71 72 73 74 75 76 77 78 79 80 81 82 83 84 85 86 87 88 89 hostnamectl set-hostname ws-k8s-node1 && bash nmcli con modify ens18 ipv4.addresses 192.168.10.131/24 ipv4.gateway 192.168.10.1 ipv4.dns 192.168.1.1 ipv4.method manual nmcli con up ens18 yum install -y device-mapper-persistent-data lvm2 wget net-tools nfs-utils lrzsz gcc gcc-c++ make cmake libxml2-devel openssl-devel curl curl-devel unzip sudo ntp libaio-devel wget vim ncurses-devel autoconf automake zlib-devel python-devel epel-release openssh-server socat ipvsadm conntrack telnet ipvsadm yum -y update sed -i 's/^SELINUX=.*/SELINUX=disabled/' /etc/selinux/config setenforce 0 systemctl disable firewalld.service --now echo " 127.0.0.1 localhost localhost.localdomain localhost4 localhost4.localdomain4 ::1 localhost localhost.localdomain localhost6 localhost6.localdomain6 192.168.10.100 1panel 192.168.10.120 pve 192.168.10.121 ws-k8s-master1 192.168.10.122 ws-k8s-master2 192.168.10.123 ws-k8s-master3 192.168.10.130 harbor 192.168.10.131 ws-k8s-node1 192.168.10.132 ws-k8s-node2 192.168.10.133 ws-k8s-node3 192.168.10.140 docker-host" > /etc/hostsswapoff -a sed -i '$ s/^/#/' /etc/fstab modprobe br_netfilter cat > /etc/sysctl.d/k8s.conf << EOF net.bridge.bridge-nf-call-ip6tables = 1 net.bridge.bridge-nf-call-iptables = 1 net.ipv4.ip_forward = 1 EOF yum -y install yum-utils yum-config-manager --add-repo http://mirrors.aliyun.com/docker-ce/linux/centos/docker-ce.repo sysctl -p /etc/sysctl.d/k8s.conf echo " [kubernetes] name=Kubernetes baseurl=https://mirrors.aliyun.com/kubernetes/yum/repos/kubernetes-el7-x86_64/ enabled=1 gpgcheck=0 " >> /etc/yum.repos.d/kubernetes.repoyum -y install chrony sed -i 's/^server/#server/g' /etc/chrony.conf sed -i '1s/^/server cn.pool.ntp.org iburst\n/' /etc/chrony.conf yum install -y containerd.io-1.6.6 mkdir -p /etc/containerdcontainerd config default > /etc/containerd/config.toml vim /etc/containerd/config.toml 修改 SystemdCgroup = true sandbox_image = "registry.aliyuncs.com/google_containers/pause:3.7" config_path = "/etc/containerd/certs.d" mkdir /etc/containerd/certs.d/docker.io/ -pecho '[host."https://hub-mirror.c.163.com",host."https://docker.m.daocloud.io", host."https://ghcr.io",host."https://mirror.baidubce.com",host."https://docker.nju.edu.cn"] capabilities = ["pull"] ' > /etc/containerd/certs.d/docker.io/hosts.tomlsystemctl enable containerd.service --now cat > /etc/crictl.yaml <<EOF runtime-endpoint: unix:///run/containerd/containerd.sock image-endpoint: unix:///run/containerd/containerd.sock timeout: 10 debug: false EOF systemctl restart containerd yum install -y docker-ce && systemctl enable docker --now cat > /etc/docker/daemon.json << EOF { "registry-mirrors": [ "https://hub-mirror.c.163.com", "https://docker.m.daocloud.io", "https://ghcr.io", "https://mirror.baidubce.com", "https://docker.nju.edu.cn"] } EOF systemctl daemon-reload systemctl restart docker yum install -y kubelet-1.28.1 kubeadm-1.28.1 kubectl-1.28.1 systemctl enable kubelet reboot kubeadm join 192.168.10.121:6443 --token 2x0xe5.erf0z44xtaciwbh7 --discovery-token-ca-cert-hash sha256:c6fe90eb5632c6e422b694d1392722bed65fd768497a98cc75dcab8589ad35a7
calico calico的yaml在github有https://docs.tigera.io/calico/latest/getting-started/kubernetes/requirements
1 2 ctr -n k8s.io images import calico.tar.gz kubectl apply -f calico.yaml
高可用部分 keepalive+nginx做apiserver高可用 配置文件在后面
master1与master2安装nginx和keepalive,且调整配置文件
systemctl daemon-reload
测试
1 2 3 4 5 6 7 8 9 10 11 12 13 14 15 ip a | grep 192.168 inet 192.168.10.121/24 brd 192.168.10.255 scope global noprefixroute ens18 inet 192.168.10.200/24 scope global secondary ens18 systemctl stop keepalived.service ip a | grep 192.168 inet 192.168.10.122/24 brd 192.168.10.255 scope global noprefixroute ens18 inet 192.168.10.200/24 scope global secondary ens18 systemctl start keepalived.service ip a | grep 192.168 inet 192.168.10.121/24 brd 192.168.10.255 scope global noprefixroute ens18 inet 192.168.10.200/24 scope global secondary ens18
配置文件 nginx:
1 2 3 4 5 6 7 8 9 10 11 12 13 14 15 16 17 18 19 20 21 22 23 24 25 26 27 28 29 30 31 32 33 34 35 36 37 38 39 40 41 42 43 44 45 46 47 48 49 50 51 52 53 54 55 user nginx; worker_processes auto; error_log /var/log/nginx/error.log; pid /run/nginx.pid; include /usr/share/nginx/modules/*.conf; events { worker_connections 1024; } stream { log_format main '$remote_addr $upstream_addr - [$time_local] $status $upstream_bytes_sent' ; access_log /var/log/nginx/k8s-access.log main; upstream k8s-apiserver { server 192.168.10.121:6443 weight=5 max_fails=3 fail_timeout=30s; server 192.168.10.122:6443 weight=5 max_fails=3 fail_timeout=30s; server 192.168.10.123:6443 weight=5 max_fails=3 fail_timeout=30s; } server { listen 16443; proxy_pass k8s-apiserver; } } http { log_format main '$remote_addr - $remote_user [$time_local] "$request" ' '$status $body_bytes_sent "$http_referer" ' '"$http_user_agent" "$http_x_forwarded_for"' ; access_log /var/log/nginx/access.log main; sendfile on; tcp_nopush on; tcp_nodelay on; keepalive_timeout 65; types_hash_max_size 2048; include /etc/nginx/mime.types; default_type application/octet-stream; server { listen 80 default_server; server_name _; location / { } } }
主keepalive
1 2 3 4 5 6 7 8 9 10 11 12 13 14 15 16 17 18 19 20 21 22 23 24 25 26 27 28 29 30 31 32 33 34 35 global_defs { notification_email { acassen@firewall.loc failover@firewall.loc sysadmin@firewall.loc } notification_email_from Alexandre.Cassen@firewall.loc smtp_server 127.0.0.1 smtp_connect_timeout 30 router_id NGINX_MASTER } vrrp_script check_nginx { script "/etc/keepalived/check_nginx.sh" } vrrp_instance VI_1 { state MASTER interface ens18 virtual_router_id 51 priority 100 advert_int 1 authentication { auth_type PASS auth_pass 1111 } virtual_ipaddress { 192.168.10.200/24 } track_script { check_nginx } }
备keepalive
1 2 3 4 5 6 7 8 9 10 11 12 13 14 15 16 17 18 19 20 21 22 23 24 25 26 27 28 29 30 31 32 33 34 35 global_defs { notification_email { acassen@firewall.loc failover@firewall.loc sysadmin@firewall.loc } notification_email_from Alexandre.Cassen@firewall.loc smtp_server 127.0.0.1 smtp_connect_timeout 30 router_id NGINX_MASTER } vrrp_script check_nginx { script "/etc/keepalived/check_nginx.sh" } vrrp_instance VI_1 { state BACKUP interface ens18 virtual_router_id 51 priority 90 advert_int 1 authentication { auth_type PASS auth_pass 1111 } virtual_ipaddress { 192.168.10.200/24 } track_script { check_nginx } }
check_nginx.sh
1 2 3 4 5 6 7 8 9 10 11 12 13 14 #!/bin/bash counter=$(ps -ef |grep nginx | grep sbin | egrep -cv "grep|$$" ) if [ $counter -eq 0 ]; then service nginx start sleep 2 counter=$(ps -ef |grep nginx | grep sbin | egrep -cv "grep|$$" ) if [ $counter -eq 0 ]; then service keepalived stop fi fi
etcd数据库高可用 1 2 3 4 5 6 修改所有master节点的etcd.yaml vim /etc/kubernetes/manifests/etcd.yaml --initial-cluster=ws-k8s-master1=https://192.168.10.121:2380,ws-k8s-master2=https://192.168.10.122:2380,ws-k8s-master3=https://192.168.10.123:2380 systemctl restart kubelet
测试
1 2 3 4 docker run --rm -it --net host -v /etc/kubernetes:/etc/kubernetes \ registry.cn-hangzhou.aliyuncs.com/google_containers/etcd:3.5.4-0 etcdctl \ --cert /etc/kubernetes/pki/etcd/peer.crt --key /etc/kubernetes/pki/etcd/peer.key \ --cacert /etc/kubernetes/pki/etcd/ca.crt member list
1 2 3 4 5 docker run --rm -it --net host -v /etc/kubernetes:/etc/kubernetes \ registry.cn-hangzhou.aliyuncs.com/google_containers/etcd:3.5.4-0 etcdctl \ --cert /etc/kubernetes/pki/etcd/peer.crt --key /etc/kubernetes/pki/etcd/peer.key \ --cacert /etc/kubernetes/pki/etcd/ca.crt \ --endpoints=https://192.168.10.121:2379,https://192.168.10.122:2379,https://192.168.10.123:2379 endpoint health --cluster
1 2 3 4 5 docker run --rm -it --net host -v /etc/kubernetes:/etc/kubernetes \ registry.cn-hangzhou.aliyuncs.com/google_containers/etcd:3.5.4-0 etcdctl \ -w table --cert /etc/kubernetes/pki/etcd/peer.crt \ --key /etc/kubernetes/pki/etcd/peer.key --cacert /etc/kubernetes/pki/etcd/ca.crt \ --endpoints=https://192.168.10.121:2379,https://192.168.10.122:2379,https://192.168.10.123:2379 endpoint status --cluster
k8s概述
pod是k8s的最小单位
HPA自动扩容与缩容
VPA自动调节pod的资源请求
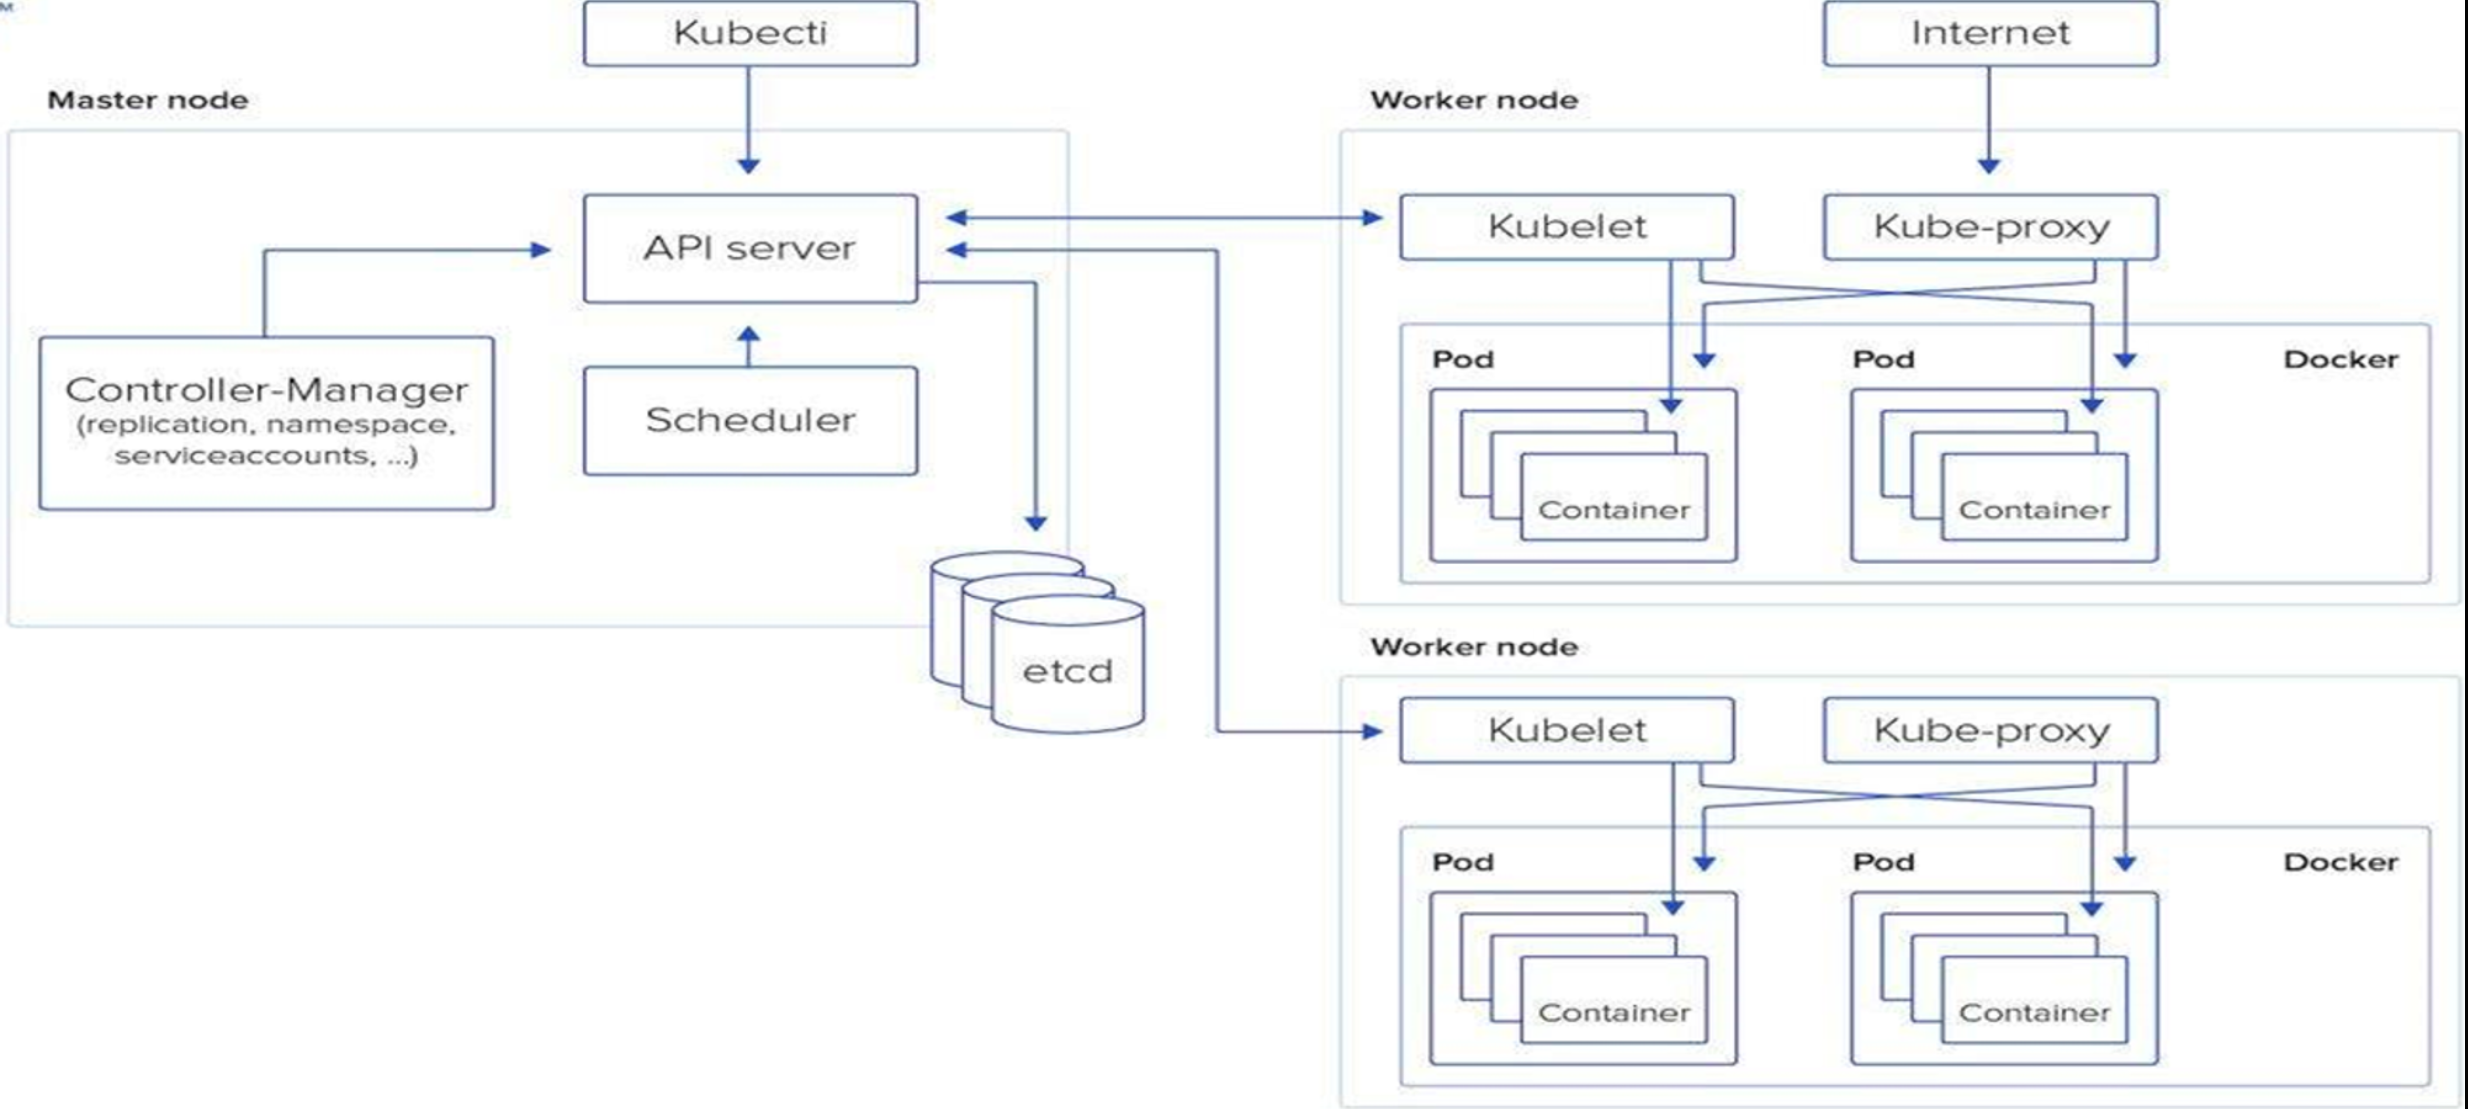
高可用架构:使用keepalive+lvs对API server做高可用
K8s集群至少需要一个主节点(Master)和多个工作节点(Worker)
常用组件:
k8s的资源对象
1.pod
2.Replicaset
3.Deployment
4.Service
6.Statefulset
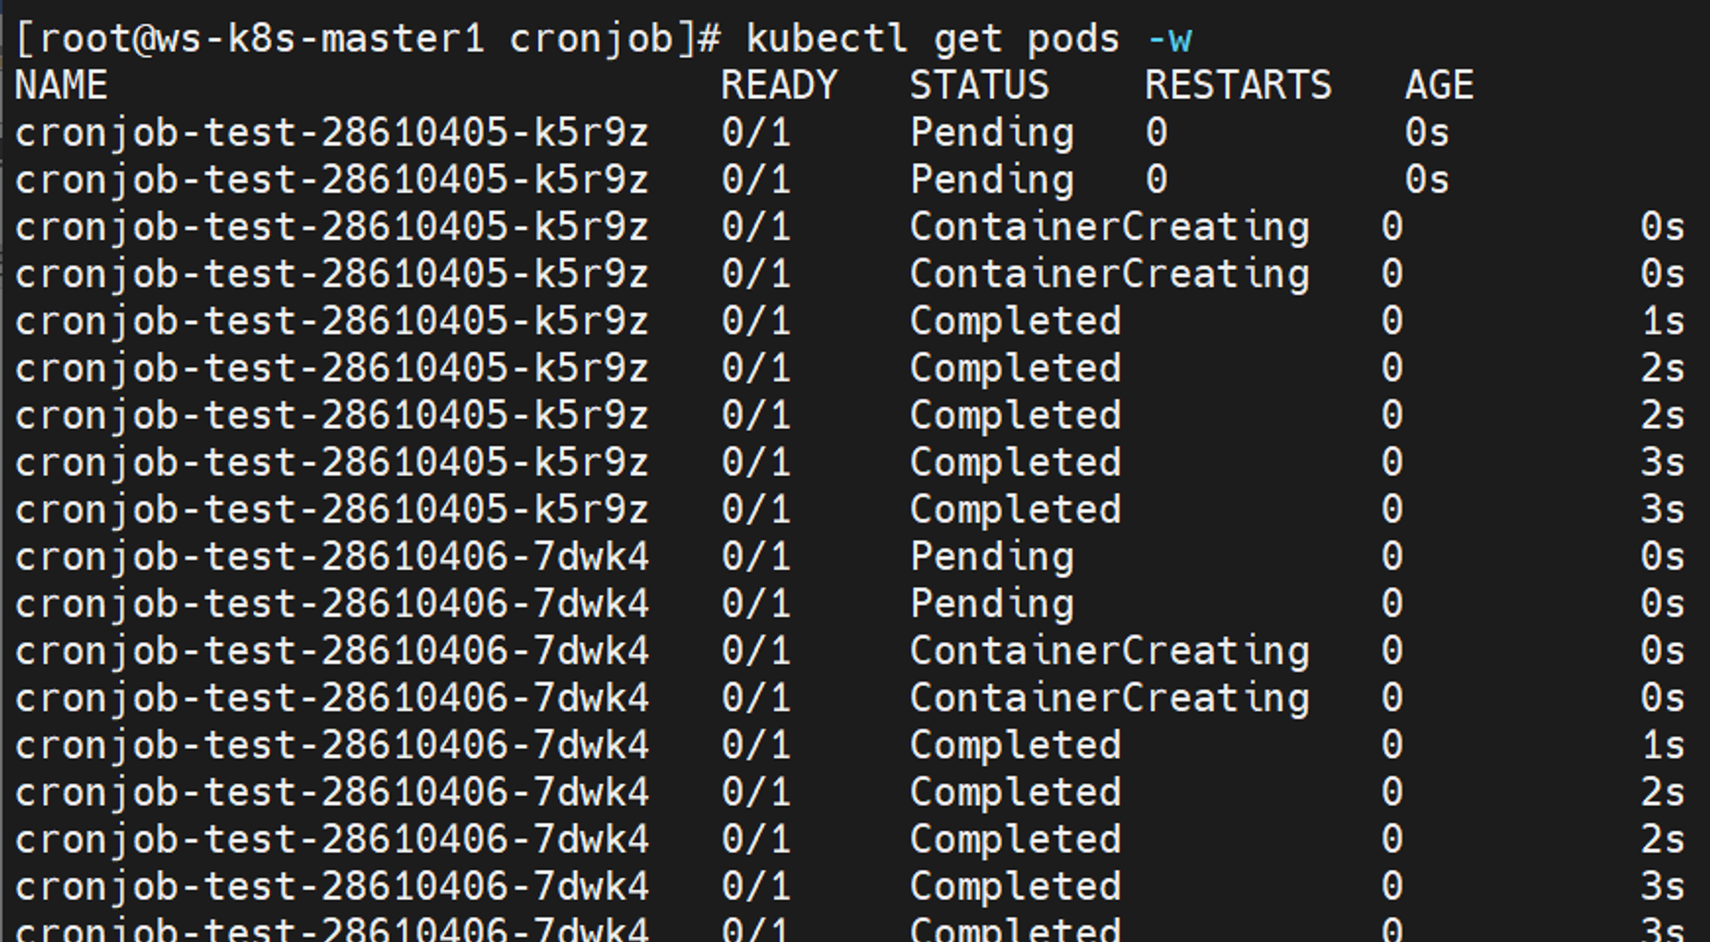
7.Job & CronJob
pod资源 pod概述 https://kubernetes.io/zh/
https://kubernetes.io/zh-cn/docs/concepts/workloads/pods/
Pod是Kubernetes中的最小调度单元,k8s都是以pod的方式运行服务的
pod需要调度到工作节点运行,节点的选择由scheduler调度器实现
pod定义时,会定义init容器、应用容器与业务容器
init用以对主容器做初始化操作,查看服务是否正常
pod网络
kubectl get pods -n kube-system -owide #查看kube-system命名空间中的pod
部分控制节点组件是和管理节点共享ip地址,除此之外的pod都是唯一地址,通过calico网络插件分配
启动Pod时,会先启动⼀个pause 的容器,然后将后续的所有容器都 “link 到这个pause 的容器,以实现⽹络共享。
同一个pod内的容器会在共享环境中运行,共享同一个IP和端口
pod存储
通过挂在存储卷,可以让所有容器访问共享卷,允许共享数据
pod和容器对比
pod是容器组成的集合,可以作为一个或多个容器的载体
创建pod的方式
1.使用yaml文件来创建
2.使用kubectl run创建pod
pod运行方式
1、自主式pod:直接定义一个pod资源
kubectl apply -f pod-tomcat.yaml
kubectl get pods -o wide
kubectl delete pods tomcat-test
2、控制器管理的Pod
常见的管理Pod的控制器:Replicaset、Deployment、Job、CronJob、Daemonset、Statefulset。
以下是一个举例的yaml文件
1 2 3 4 5 6 7 8 9 10 11 12 13 14 15 16 17 18 19 20 21 22 apiVersion: apps/v1 kind: Deployment metadata: name: nginx-test labels: app: nginx-deploy spec: selector: matchLabels: app: nginx replicas: 2 template: metadata: labels: app: nginx spec: containers: - name: my-nginx image: xianchao/nginx:v1 imagePullPolicy: IfNotPresent ports: - containerPort: 80
pod创建的步骤
1 2 3 4 5 6 7 8 9 10 11 12 13 14 15 16 17 18 19 20 21 22 23 kubectl会寻找环境变量kubeconfig 如果没有这个环境变量,会找/root/.kube/config文件 可以通过kubectl config view查看/root/.kube/config内容 kubectl config view apiVersion: v1 clusters: - cluster: certificate-authority-data: DATA+OMITTED server: https://192.168.8.160:6443 name: kubernetes contexts: - context: cluster: kubernetes user: kubernetes-admin name: kubernetes-admin@kubernetes current-context: kubernetes-admin@kubernetes kind: Config preferences: {} users :- name: kubernetes-admin user: client-certificate-data: DATA+OMITTED client-key-data: DATA+OMITTED
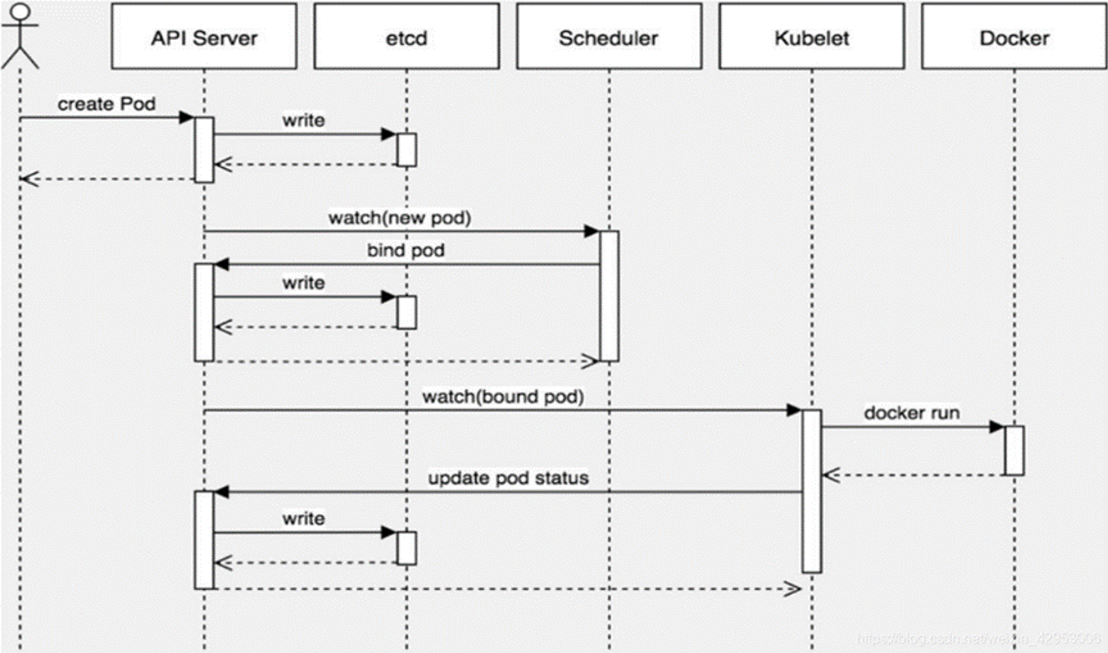
1 2 3 4 5 6 7 8 9 10 pod创建过程 1.**kubectl apply -f nginx-deploy.yaml** 找config文件,基于config文件访问指定的集群,找到api-server,把信息给api-server 2.api-server把kubectl的参数或者yaml的参数,写入etcd api-server把pod信息给scheduler调度器,调度器进行调度,并且把调度节点的信息写到etcd 3.api-server调用kubelet,kubelet调用容器运行时docker/container 4.容器运行时把pod信息返回给api-server,写入etcd
pod的创建 通过kubectl run来创建pod 1 2 3 4 5 6 7 kubectl run --help Usage: kubectl run NAME --image=image [--env="key=value" ] [--port=port ] [--dry-run=server|client ] [--overrides=inline-json ] [--command ] -- [COMMAND ] [args... ] [options ] kubectl run tomcat --image=ws/tomcat --image-pull-policy='IfNotPresent' \ --port=8080
通过yaml文件创建,yaml文件简单写法 1 2 3 4 5 6 7 8 9 10 11 12 13 14 15 16 17 18 19 20 21 22 23 24 25 26 27 28 29 30 31 32 33 34 35 36 37 38 39 40 kubectl explain pod kubectl explain pod.metadata yaml的格式:每个字段都比上级字段多空两格,加短横-可以表示以下同级 vim first-pod apiVersion: v1 kind: Pod metadata: annotations: worker: "ws" labels: app: tomcat name: ws-tomcat namespace: default spec: activeDeadlineSeconds: containers: - name: tomcat image: docker.io/library/tomcat imagePullPolicy: IfNotPresent ports: - containerPort: 8080 hostPort: hostIP: kubectl apply -f pod-first.yaml kubectl get pods NAME READY STATUS RESTARTS AGE nginx-test-5b48846ff4-7n4f6 1 /1 Running 0 122m nginx-test-5b48846ff4-mq5tm 1 /1 Running 0 122m ws-tomcat 1 /1 Running 0 50s
pod简单操作 1 2 3 4 5 6 7 8 9 10 11 12 13 14 15 16 17 18 19 20 21 22 23 24 25 26 kubectl exec -it ws-tomcat -- /bin/bash kubectl exec -it ws-tomcat -c tomcat -- /bin/bash kubectl get pod kubectl get pod -owide master1 2 node1 2 都可以访问pod curl 10.10 .234 .68 :8080 kubectl get pod -l app=tomcat kubectl logs ws-tomcat kubectl describe pods ws-tomcat kubectl delete pods ws-tomcat kubectl delete -f pod-first.yaml kubectl apply -f pod-first.yaml kubectl get pods --show-labels
命名空间与资源配额 命名空间(Namespace)是Kubernetes中用于隔离和组织资源的一种机制。它可以将集群中的资源划分为逻辑上独立的单元,使不同的团队、项目或应用程序可以在同一个集群中共享底层基础设施,同时保持彼此之间的隔离性。
通过使用命名空间,将不同的资源(如Pod、Service、Deployment等)组织在一起,并为它们提供唯一的名称。这样可以避免资源名称的冲突,并提供更好的资源管理和权限控制。
简单一句话:进行各种的资源隔离
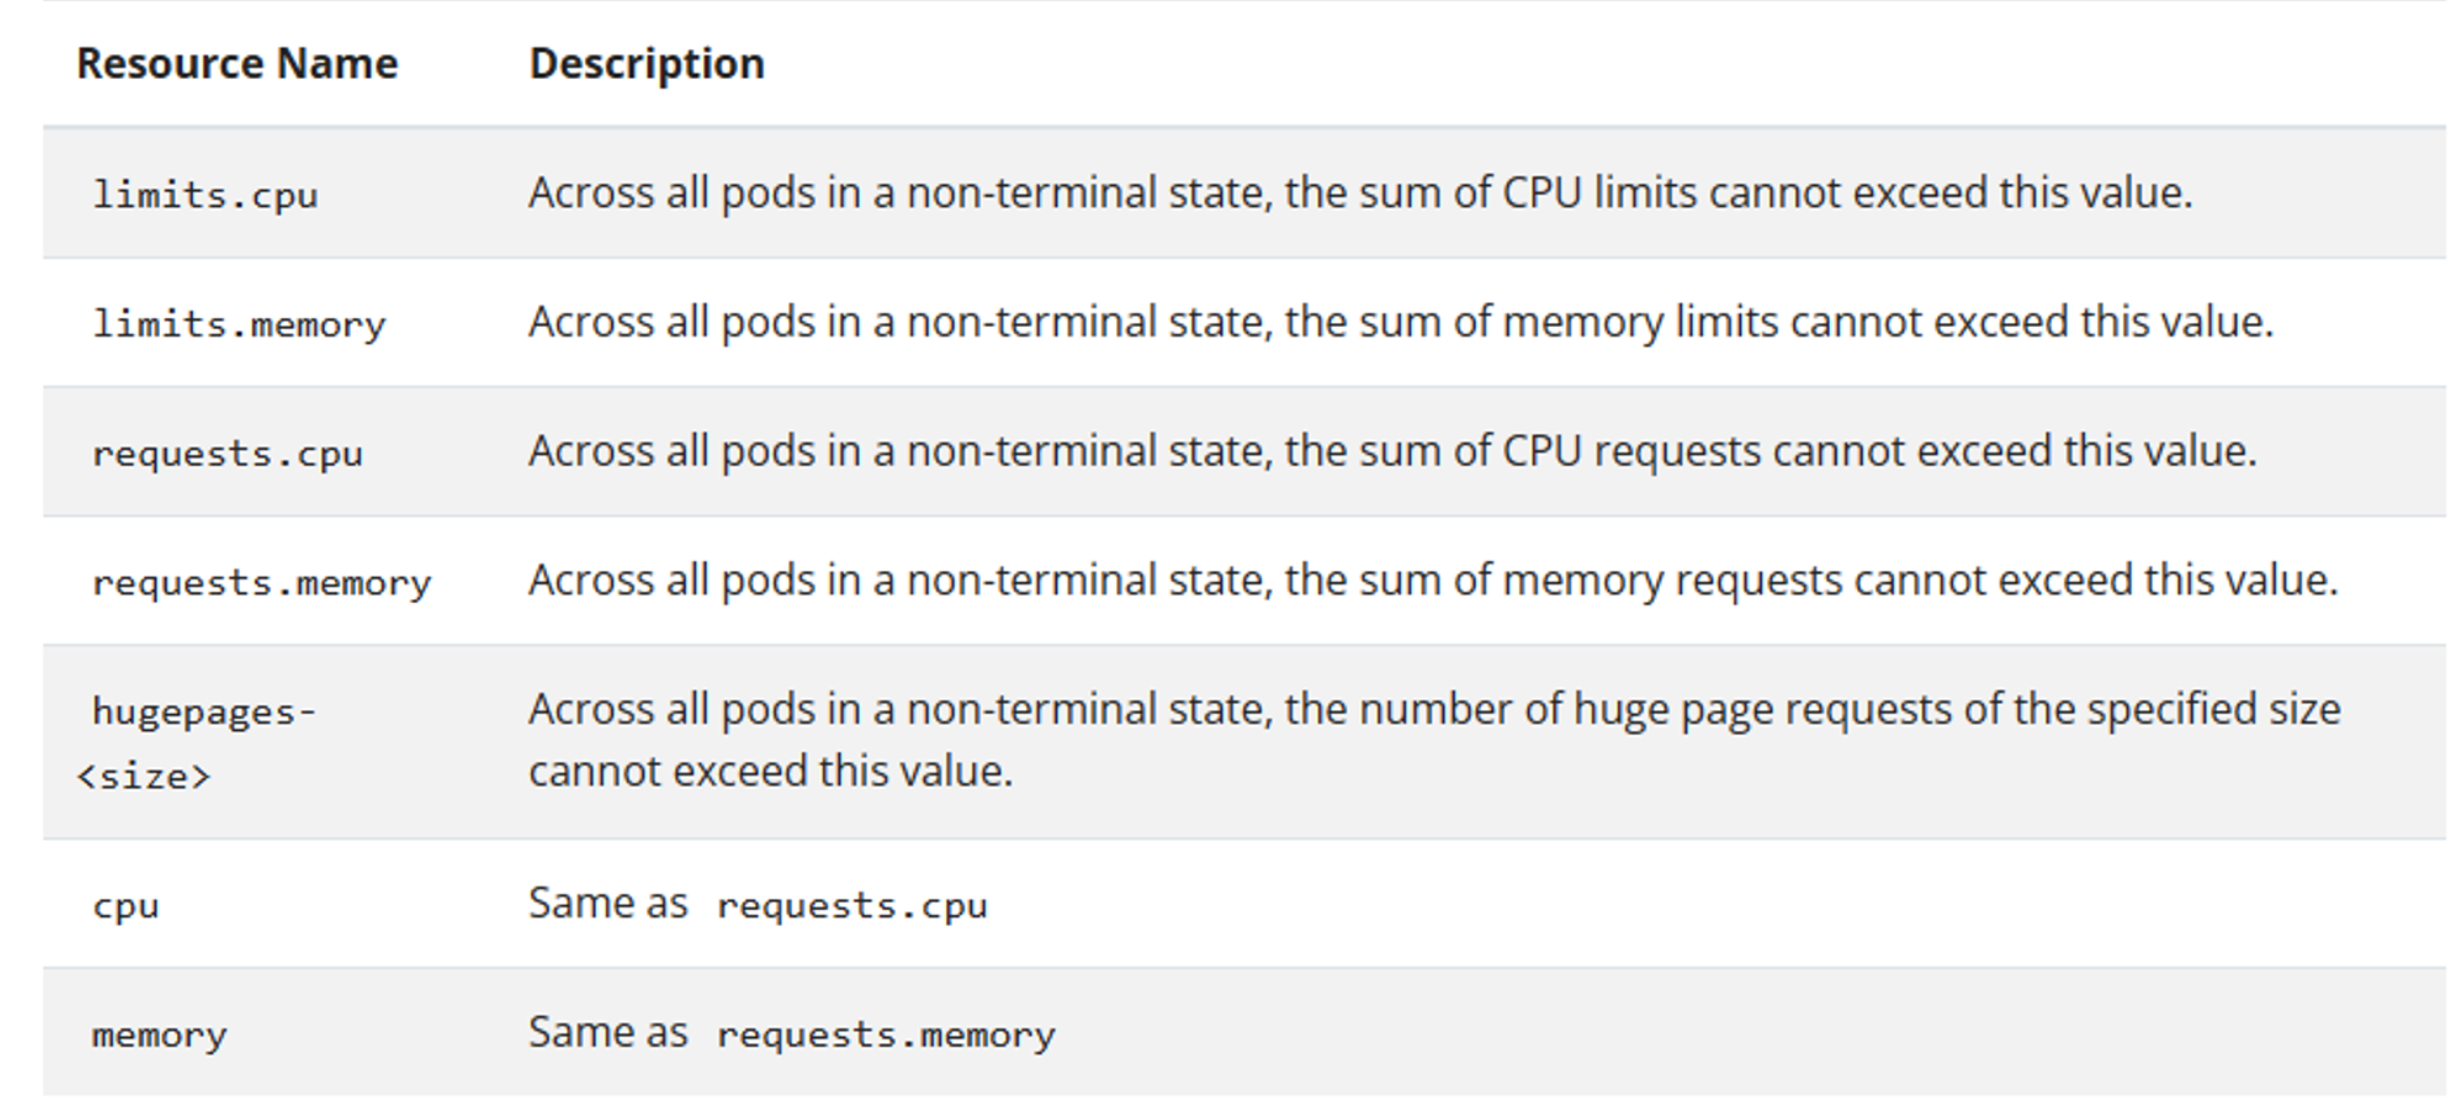
1 2 3 4 5 6 7 8 9 10 11 12 13 14 15 16 17 18 19 20 21 22 23 24 25 26 27 28 29 30 31 32 33 34 35 36 kubectl create ns ws kubectl get ns NAME STATUS AGE default Active 18h kube-node-lease Active 18h kube-public Active 18h kube-system Active 18h ws Active 7s kubectl explain resourcequota kubectl explain resourcequota.metadata kubectl explain resourcequota.spec vim ns-quota.yaml apiVersion: v1 KIND: ResourceQuota metadata: name: cpu-quota namespace: ws spec: hard: limits.cpu: "4" limits.memory: 4Gi requests.cpu: "2" requests.memory: 2Gi kubectl apply -f ns-quota.yaml kubectl get resourcequota -n ws NAME AGE REQUEST LIMIT cpu-quota 75s requests.cpu: 0/2 limits.cpu: 0 /4
pod的标签 标签label是一个键值对,能够通过标判断对象的特点,可以一开始创建pod的时候打标签,也可以创建之后打,大部分资源都可以打标签
1 2 3 4 5 6 7 8 9 10 11 12 13 14 15 16 17 18 19 20 21 22 kubectl label pods ws-tomcat user=ws kubectl get pods --show-labels kubectl get pods ws --show-labels kubectl get pods -l user NAME READY STATUS RESTARTS AGE ws-tomcat 1/1 Running 0 5m kubectl get pods -l user=ws kubectl get pods -L user NAME READY STATUS RESTARTS AGE USER nginx-test-5b48846ff4-7n4f6 1/1 Running 1 (68m ago) 28h nginx-test-5b48846ff4-mq5tm 1/1 Running 1 (68m ago) 28h tomcat-test 1/1 Running 0 7m3s ws-tomcat 1/1 Running 0 6m49s ws kubectl get pods --all-namespaces --show-labels
pod资源亲和性 node调度策略nodeName和nodeSelector 在创建pod等资源时,可以通过调整字段进行node调度,指定资源调度到满足何种条件的node
指定nodeName 1 2 3 4 5 6 7 8 9 10 11 12 13 14 15 16 17 vim testpod1.yaml apiVersion: v1 kind: Pod metadata: name: testpod1 namespace: default labels: app: tomcat spec: nodeName: ws-k8s-node1 containers: - name: test image: docker.io/library/tomcat imagePullPolicy: IfNotPresent kubectl apply -f testpod1.yaml kubectl get pods testpod1 1 /1 Running 0 116s 10.10 .179 .9 ws-k8s-node1 <none> <none>
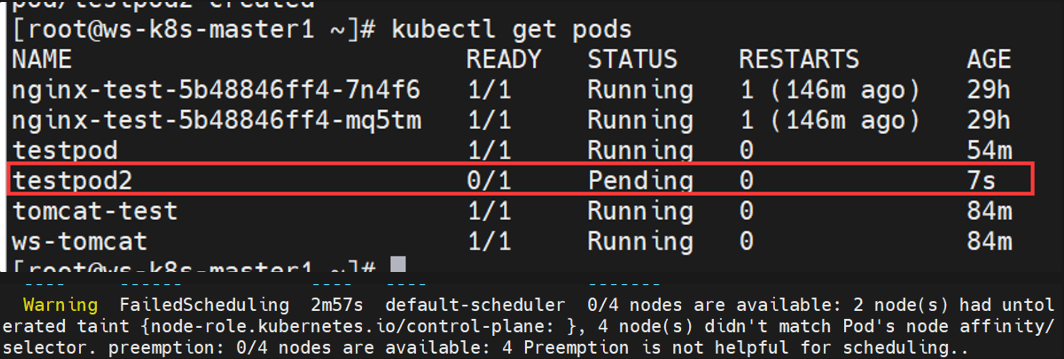
指定nodeSelector 1 2 3 4 5 6 7 8 9 10 11 12 13 14 15 16 17 18 19 20 21 22 23 24 25 26 27 28 29 30 31 32 33 vim testpod2.yaml apiVersion: v1 kind: Pod metadata: name: testpod2 namespace: default labels: app: tomcat spec: nodeSelector: admin: ws containers: - name: test image: docker.io/library/tomcat imagePullPolicy: IfNotPresent kubectl apply -f testpod2.yaml 但因为我没有admin=ws标签的node,所以应用后pod处于pending状态 Examples: kubectl label nodes ws-k8s-node1 admin=ws kubectl get pods | grep testpod2 testpod2 1 /1 Running 0 11m kubectl label nodes ws-k8s-node1 admin- kubectl delete pods testpod2
如果同时使用nodeName和nodeSelector,则会报错亲和性错误,无法正常部署;
node亲和性、pod亲和性、pod反亲和性 亲和性在Kubernetes中起着重要作用,通过定义规则和条件,它允许我们实现精确的Pod调度、资源优化、高性能计算以及容错性和可用性的增强。通过利用亲和性,我们可以更好地管理和控制集群中的工作负载,并满足特定的业务需求。
1 2 3 4 5 6 7 8 9 10 11 12 13 14 15 16 17 kubectl explain pods.spec.affinity RESOURCE: affinity <Object> DESCRIPTION: If specified, the pod's scheduling constraints Affinity is a group of affinity scheduling rules. FIELDS: nodeAffinity <Object> Describes node affinity scheduling rules for the pod. podAffinity <Object> Describes pod affinity scheduling rules (e.g. co-locate this pod in the same node, zone, etc. as some other pod(s)). podAntiAffinity <Object> Describes pod anti-affinity scheduling rules (e.g. avoid putting this pod in the same node, zone, etc. as some other pod(s)).
node节点亲和性 在创建pod时,会根据nodeaffinity来寻找最适合该pod的条件的node
1 2 3 4 5 6 7 8 9 10 11 12 13 14 15 16 17 kubectl explain pods.spec.affinity.nodeAffinity KIND: Pod VERSION: v1 RESOURCE: nodeAffinity <Object> DESCRIPTION: Describes node affinity scheduling rules for the pod. Node affinity is a group of node affinity scheduling rules. FIELDS: preferredDuringSchedulingIgnoredDuringExecution <[]Object> requiredDuringSchedulingIgnoredDuringExecution <Object> preferredDuringSchedulingIgnoredDuringExecution requiredDuringSchedulingIgnoredDuringExecution
硬亲和性 1 2 3 4 5 6 7 8 9 10 11 12 13 14 15 16 17 18 19 20 21 22 23 24 25 26 27 28 29 30 31 32 33 34 35 36 37 38 39 40 41 42 43 44 45 46 47 48 49 50 51 52 53 54 55 56 57 58 59 60 kubectl explain pods.spec.affinity.nodeAffinity.requiredDuringSchedulingIgnoredDuringExecution kubectl explain pods.spec.affinity.nodeAffinity.requiredDuringSchedulingIgnoredDuringExecution.nodeSelectorTerms FIELDS: matchExpressions <[]Object> A list of node selector requirements by node's labels. matchFields <[]Object> #匹配字段 A list of node selector requirements by node' s fields.kubectl explain pods.spec.affinity.nodeAffinity.requiredDuringSchedulingIgnoredDuringExecution.nodeSelectorTerms.matchExpressions key <string> -required- operator <string> -required- values <[]string> - `"DoesNotExist" ` - `"Exists" ` - `"Gt" ` - `"In" ` - `"Lt" ` - `"NotIn" ` vim ying-pod.yaml apiVersion: v1 kind: Pod metadata: name: ying-pod labels: app: tomcat user: ws spec: affinity: nodeAffinity: requiredDuringSchedulingIgnoredDuringExecution: nodeSelectorTerms: - matchExpressions: - key: name opertor: In values: - ws - wss containers: - name: test1 namespace: default image: docker.io/library/tomcat imagePullPolicy: IfNotPresent kubectl apply -f ying-pod.yaml kubectl get pods | grep ying ying-pod 0/1 Pending 0 15m kubectl label nodes ws-k8s-node1 name=ws kubectl get pod -owide | grep ying ying-pod 0/1 ContainerCreating 0 80s <none> ws-k8s-node1 <none> <none> kubectl label nodes ws-k8s-node1 name-
软亲和性 1 2 3 4 5 6 7 8 9 10 11 12 13 14 15 16 17 18 19 20 21 22 23 24 25 26 27 28 29 30 31 32 33 34 35 36 37 38 39 40 41 42 43 44 45 46 47 48 49 50 51 52 53 54 55 56 57 58 59 60 61 62 63 64 65 66 67 68 69 70 71 72 73 74 75 76 77 78 vim ruan-pod.yaml apiVersion: v1 kind: Pod metadata: name: ruan-pod namespace: default spec: containers: - name: test image: docker.io/library/alpine imagePullPolicy: IfNotPresent affinity: nodeAffinity: preferredDuringSchedulingIgnoredDuringExecution: - preference: matchExpressions: - key: name operate: In values: - ws weight: 50 - preference: matchExpressions: - key: name operate: In values: - wws weight: 70 kubectl apply -f ruan-pod.yaml kubectl get pod -owide | grep ruan ruan-pod 0 /1 ContainerCreating 0 3m24s <none> ws-k8s-node2 <none> <none> kubectl label nodes ws-k8s-node1 name=ws kubectl delete -f ruan-pod.yaml kubectl apply -f ruan-pod.yaml kubectl get pods -owide | grep ruan ruan-pod 0 /1 ContainerCreating 0 2s <none> ws-k8s-node1 <none> <none> kubectl label nodes ws-k8s-node2 name=wss kubectl delete -f ruan-pod.yaml kubectl apply -f ruan-pod.yaml kubectl get pods -owide | grep ruan ruan-pod 0 /1 ContainerCreating 0 4m29s <none> ws-k8s-node1 <none> <none> ... - preference: matchExpressions: - key: name operator: In values: - ws weight: 50 - preference: matchExpressions: - key: names operator: In values: - wws weight: 70 ... kubectl label nodes ws-k8s-node2 names=wws kubectl delete -f ruan-pod.yaml kubectl apply -f ruan-pod.yaml kubectl get po -owide | grep ruan ruan-pod 0 /1 ContainerCreating 0 3m47s <none> ws-k8s-node2 <none> <none> kubectl label nodes ws-k8s-node1 name- kubectl label nodes ws-k8s-node2 names- kubectl delete -f ruan-pod.yaml kubectl delete -f ying-pod.yaml --fore --grace-period=0
pod亲和性与反亲和性 pod亲和性(podAffinity)有两种
2.podunaffinity,即两套完全相同,或两套完全不同功能的服务
那么如何判断是不是“同一个区域”就非常重要
1 2 3 4 5 6 kubectl explain pods.spec.affinity.podAffinity preferredDuringSchedulingIgnoredDuringExecution requiredDuringSchedulingIgnoredDuringExecution
pod亲和性
1 2 3 4 5 6 7 8 9 10 11 12 13 14 15 16 17 18 19 20 21 22 23 24 25 26 27 28 29 30 31 32 33 34 35 36 37 38 39 40 41 42 43 44 45 46 47 48 49 50 51 52 53 54 55 56 57 58 59 60 61 62 63 64 65 66 kubectl explain pods.spec.affinity.podAffinity.requiredDuringSchedulingIgnoredDuringExecution labelSelector <Object> namespaceSelector <Object> namespaces <[]string> topologyKey <string> -required- cat > qinhe-pod1.yaml << EOF apiVersion: v1 kind: Pod metadata: name: qinhe1 namespace: default labels: user: ws spec: containers: - name: qinhe1 image: docker.io/library/nginx imagePullPolicy: IfNotPresent EOF kubectl apply -f qinhe-pod1.yaml echo " apiVersion: v1 kind: Pod metadata: name: qinhe2 labels: app: app1 spec: containers: - name: qinhe2 image: docker.io/library/nginx imagePullPolicy: IfNotPresent affinity: podAffinity: # 和pod亲和性 requiredDuringSchedulingIgnoredDuringExecution: - labelSelector: # 以标签为筛选条件 matchExpressions: # 以表达式进行匹配 - {key: user, operator: In, values: [" ws"]} topologyKey: kubernetes.io/hostname " > qinhe-pod2.yaml kubectl apply -f qinhe-pod2.yaml kubectl get pods -owide #因为hostname node1和node2不同,所以只会调度到node1 NAME READY STATUS RESTARTS AGE IP NODE NOMINATED NODE READINESS GATES qinhe1 1/1 Running 0 68s 10.10.179.9 ws-k8s-node1 <none> <none> qinhe2 1/1 Running 0 21s 10.10.179.10 ws-k8s-node1 <none> <none> #修改 ... topologyKey: beta.kubernetes.io/arch ... #node1和node2这两个标签都相同 kubectl delete -f qinhe-pod2.yaml kubectl apply -f qinhe-pod2.yaml kubectl get pods -owide #再查看时会发现qinhe2分到了node2 NAME READY STATUS RESTARTS AGE IP NODE NOMINATED NODE READINESS GATES qinhe1 1/1 Running 0 4m55s 10.10.179.9 ws-k8s-node1 <none> <none> qinhe2 1/1 Running 0 15s 10.10.234.68 ws-k8s-node2 <none> <none> #清理环境 kubectl delete -f qinhe-pod1.yaml kubectl delete -f qinhe-pod2.yaml
pod反亲和性
1 2 3 4 5 6 7 8 9 10 11 12 13 14 15 16 17 18 19 20 21 22 23 24 25 26 27 28 29 30 31 32 33 34 35 36 37 38 39 40 41 42 43 44 45 46 47 48 49 50 51 52 53 54 55 56 57 58 59 60 61 62 63 64 65 66 67 68 69 70 71 72 73 kubectl explain pods.spec.affinity.podAntiAffinity preferredDuringSchedulingIgnoredDuringExecution <[]Object> requiredDuringSchedulingIgnoredDuringExecution <[]Object> cat > qinhe-pod3.yaml << EOF apiVersion: v1 kind: Pod metadata: name: qinhe3 namespace: default labels: user: ws spec: containers: - name: qinhe3 image: docker.io/library/nginx imagePullPolicy: IfNotPresent EOF echo " apiVersion: v1 kind: Pod metadata: name: qinhe4 labels: app: app1 spec: containers: - name: qinhe4 image: docker.io/library/nginx imagePullPolicy: IfNotPresent affinity: podAntiAffinity: # 和pod亲和性 requiredDuringSchedulingIgnoredDuringExecution: - labelSelector: # 以标签为筛选条件 matchExpressions: # 以表达式进行匹配 - {key: user, operator: In, values: [" ws"]} #表达式user=ws topologyKey: kubernetes.io/hostname #以hostname作为区分是否同个区域 " > qinhe-pod4.yamlkubectl apply -f qinhe-pod3.yaml kubectl apply -f qinhe-pod4.yaml kubectl get pods -owide NAME READY STATUS RESTARTS AGE IP NODE NOMINATED NODE READINESS GATES qinhe3 1/1 Running 0 9s 10.10.179.11 ws-k8s-node1 <none> <none> qinhe4 1/1 Running 0 8s 10.10.234.70 ws-k8s-node2 <none> <none> pod4修改为topologyKey: user kubectl label nodes ws-k8s-node1 user=xhy kubectl label nodes ws-k8s-node2 user=xhy kubectl delete -f qinhe-pod4.yaml kubectl apply -f qinhe-pod4.yaml kubectl get pods -owide NAME READY STATUS RESTARTS AGE IP NODE NOMINATED NODE READINESS GATES qinhe3 1/1 Running 0 9m59s 10.10.179.12 ws-k8s-node1 <none> <none> qinhe4 0/1 Pending 0 2s <none> <none> <none> <none> Warning FailedScheduling 74s default-scheduler 0/4 nodes are available: 2 node(s) didn't match pod anti-affinity rules, 2 node(s) had untolerated taint {node-role.kubernetes.io/control-plane: }. preemption: 0/4 nodes are available: 2 No preemption victims found for incoming pod, 2 Preemption is not helpful for scheduling.. #pod反亲和性的软亲和性与node亲和性的软亲和性同理 #清理环境 kubectl label nodes ws-k8s-node1 user- kubectl label nodes ws-k8s-node2 user- kubectl delete -f qinhe-pod3.yaml kubectl delete -f qinhe-pod4.yaml
污点与容忍度 污点类似于标签,可以给node打taints,在创建pod时可以通过tolerations来定义pod对于污点的容忍度
1 2 3 4 5 6 7 8 9 10 11 12 13 14 15 16 17 18 19 20 21 22 23 24 25 26 27 28 29 30 31 32 33 34 35 36 37 38 39 40 41 42 43 44 45 46 47 48 49 50 51 52 53 54 55 56 57 58 59 60 61 62 63 64 65 66 67 68 69 70 71 72 73 74 75 76 77 78 79 80 81 82 83 84 85 86 87 88 89 90 91 92 93 94 95 96 97 98 99 100 101 102 103 104 105 106 107 108 109 110 111 112 113 114 115 116 117 118 119 120 121 122 123 124 125 126 kubectl describe node ws-k8s-master1 | grep -i taint Taints: node-role.kubernetes.io/control-plane:NoSchedule kubectl describe node ws-k8s-node1 | grep -i taint Taints: <none> kubectl explain nodes.spec.taints.effect 1. NoExecute 对已调度的pod不影响,仅对新需要调度的pod进行影响 2. NoSchedule 对已调度和新调度的pod都会有影响 3. PreferNoSchedule 软性的NoSchedule,就算不满足条件也可以调度到不容忍的node上 kubectl get pods -n kube-system -owide kubectl describe pods kube-proxy-bg7ck -n kube-system | grep -i tolerations -A 10 Tolerations: op=Exists node.kubernetes.io/disk-pressure:NoSchedule op=Exists node.kubernetes.io/memory-pressure:NoSchedule op=Exists node.kubernetes.io/network-unavailable:NoSchedule op=Exists node.kubernetes.io/not-ready:NoExecute op=Exists node.kubernetes.io/pid-pressure:NoSchedule op=Exists node.kubernetes.io/unreachable:NoExecute op=Exists node.kubernetes.io/unschedulable:NoSchedule op=Exists Events: <none> kubectl taint node ws-k8s-node1 user=ws:NoSchedule cat > wudian.yaml << EOF apiVersion: v1 kind: Pod metadata: name: wudain-pod namespace: default labels: app: app1 spec: containers: image: docker.io/library/tomcat imagePullPolicy: IfNotPresent EOF kubectl apply -f wudian.yaml kubectl get pods -owide NAME READY STATUS RESTARTS AGE IP NODE NOMINATED NODE READINESS GATES wudain-pod 1 /1 Running 0 18s 10.10 .234 .72 ws-k8s-node2 <none> <none> kubectl taint node ws-k8s-node2 user=xhy:NoExecute kubectl get pods -owide No resources found in default namespace. kubectl apply -f wudian.yaml kubectl get pods -owide NAME READY STATUS RESTARTS AGE IP NODE NOMINATED NODE READINESS GATES wudain-pod 0 /1 Pending 0 3s <none> <none> <none> <none> kubectl describe node ws-k8s-node1 | grep -i taint Taints: user=ws:NoSchedule kubectl describe node ws-k8s-node2 | grep -i taint Taints: user=xhy:NoExecute cat > wudian2.yaml << EOF apiVersion: v1 kind: Pod metadata: name: wudain2-pod namespace: default labels: app: app1 spec: containers: image: docker.io/library/tomcat imagePullPolicy: IfNotPresent tolerations: operator: "Equal" value: "ws" effect: "NoSchedule" EOF kubectl apply -f wudian2.yaml kubectl get pods -owide NAME READY STATUS RESTARTS AGE IP NODE NOMINATED NODE READINESS GATES wudain-pod 0 /1 Pending 0 21m <none> <none> <none> <none> wudain2-pod 1 /1 Running 0 15s 10.10 .179 .13 ws-k8s-node1 <none> <none> cat > wudian3.yaml << EOF apiVersion: v1 kind: Pod metadata: name: wudain3-pod namespace: default labels: app: app1 spec: containers: image: docker.io/library/tomcat imagePullPolicy: IfNotPresent tolerations: operator: "Exists" value: "" effect: "NoExecute" tolerationSeconds: 1800 EOF kubectl apply -f wudian3.yaml kubectl get pods -owide | grep -i node2 wudain3-pod 1 /1 Running 0 59s 10.10 .234 .73 ws-k8s-node2 <none> <none> kubectl delete -f wudian.yaml kubectl delete -f wudian2.yaml kubectl delete -f wudian3.yaml kubectl taint node ws-k8s-node1 user- kubectl taint node ws-k8s-node2 user-
k8s pod重启策略 pod状态与重启策略 参考文档:Pod 的生命周期 | Kubernetes
pod状态 1.pending——挂起
2.failed——失败
3.unknown——未知
4.Error——错误
5.succeeded——成功
6.Unschedulable
7.PodScheduled
8.Initialized
9.ImagePullBackOff
10.evicted
11.CrashLoopBackOff
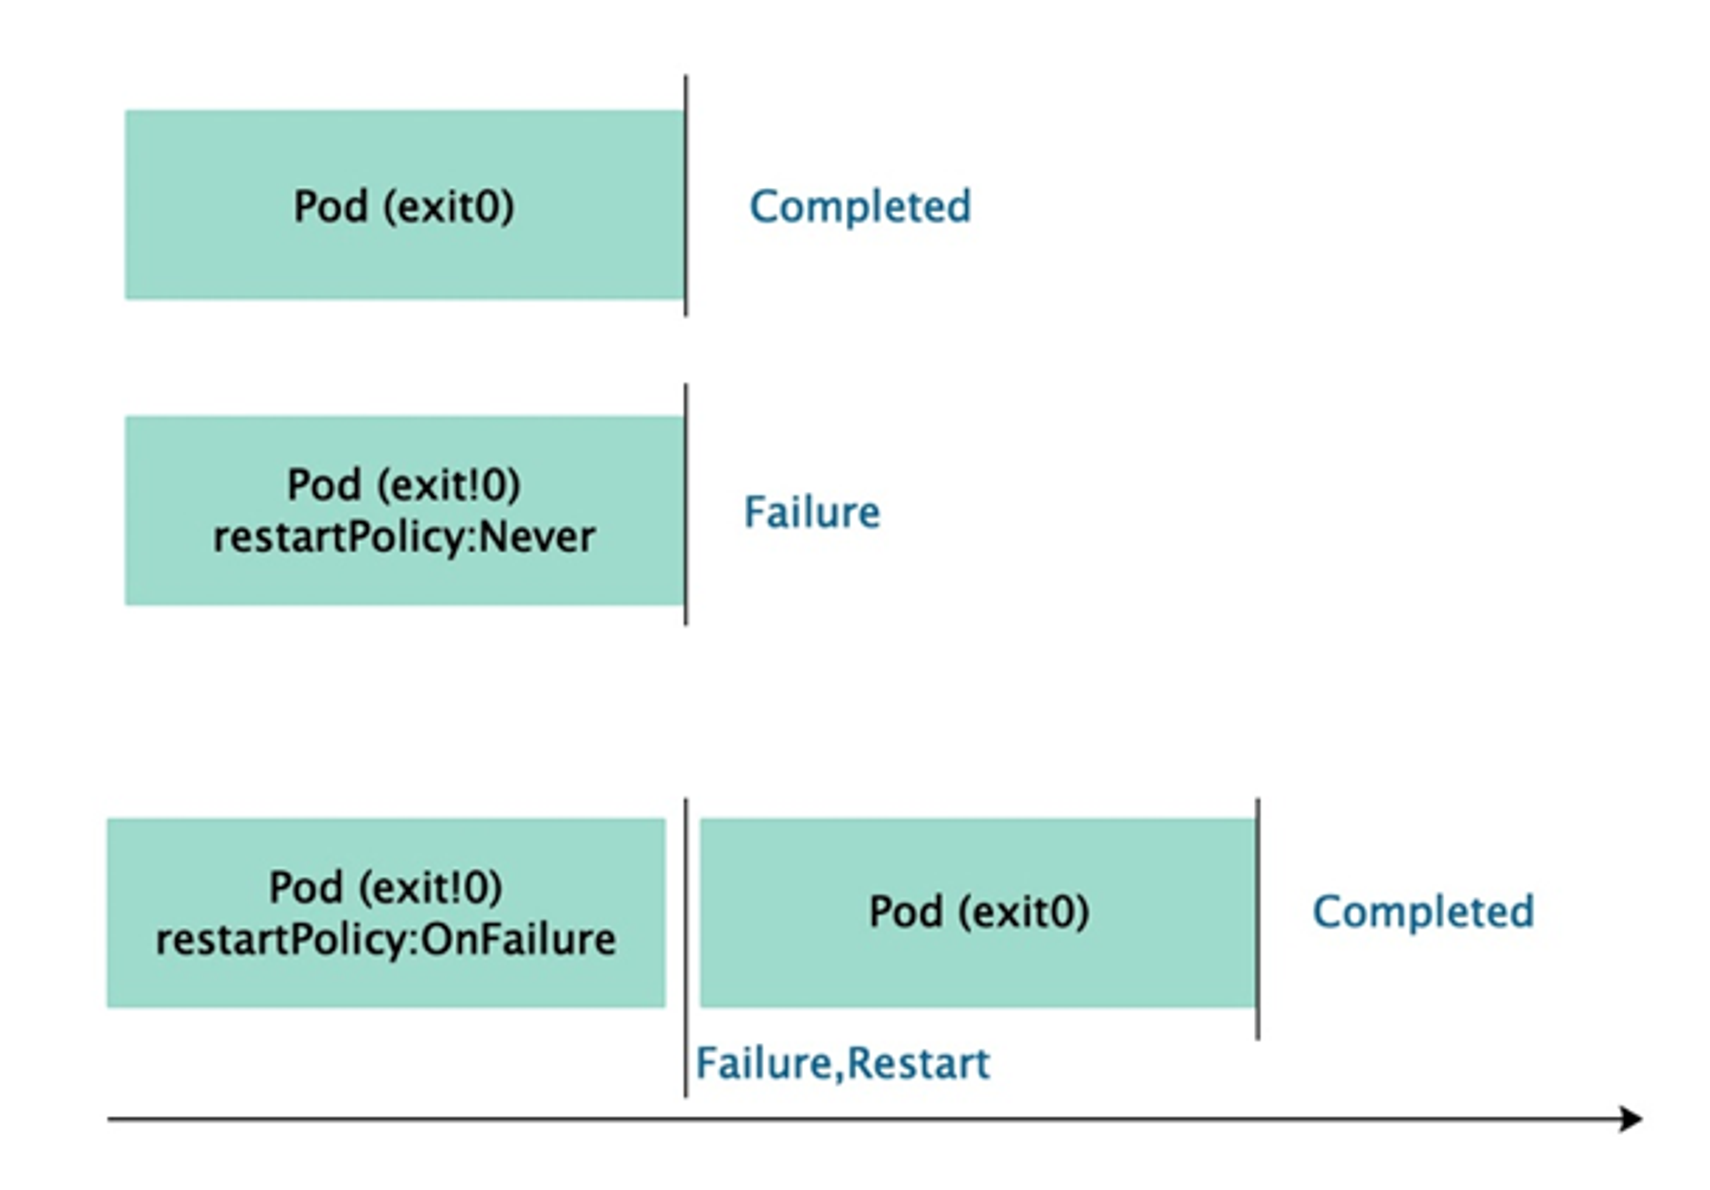
pod重启策略 当容器异常时,可以通过设置RestartPolicy字段,设置pod重启策略来对pod进行重启等操作
1 2 3 4 5 6 7 8 9 10 11 12 13 14 15 16 17 18 19 20 21 22 23 24 25 26 27 28 29 30 31 32 33 34 35 36 37 38 39 40 41 42 43 44 45 46 47 48 49 50 51 52 53 54 55 56 57 58 59 60 61 62 63 64 65 66 67 68 69 70 71 72 73 74 75 76 77 78 79 80 81 82 83 84 85 86 87 88 89 90 91 92 93 kubectl explain pod.spec.restartPolicy KIND: Pod VERSION: v1 FIELD: restartPolicy <string> DESCRIPTION: Restart policy for all containers within the pod. One of Always, OnFailure, Never. Default to Always. More info: https://kubernetes.io/docs/concepts/workloads/pods/pod-lifecycle/#restart-policy Possible enum values: - `"Always"` - `"Never"` - `"OnFailure"`#容器错误退出,即退出码不为0时,则自动重启 cat > always.yaml << EOF apiVersion: v1 kind: Pod metadata: name: always-pod namespace: default spec: restartPolicy: Always containers: - name: test-pod image: docker.io/library/tomcat imagePullPolicy: IfNotPresent EOF kubectl apply -f always.yaml kubectl get po NAME READY STATUS RESTARTS AGE always-pod 1 /1 Running 0 22s kubectl exec -it always-pod -- /bin/bash shutdown.sh kubectl get po NAME READY STATUS RESTARTS AGE always-pod 1 /1 Running 1 (5s ago) 70s cat > never.yaml << EOF apiVersion: v1 kind: Pod metadata: name: never-pod namespace: default spec: restartPolicy: Never containers: - name: test-pod image: docker.io/library/tomcat imagePullPolicy: IfNotPresent EOF kubectl apply -f never.yaml kubectl exec -it never-pod -- /bin/bash shutdown.sh kubectl get pods | grep never never-pod 0 /1 Completed 0 73s cat > onfailure.yaml << EOF apiVersion: v1 kind: Pod metadata: name: onfailure-pod namespace: default spec: restartPolicy: OnFailure containers: - name: test-pod image: docker.io/library/tomcat imagePullPolicy: IfNotPresent EOF kubectl apply -f onfailure.yaml kubectl exec -it onfailure-pod -- /bin/bash kill 1 kubectl get po | grep onfailure onfailure-pod 1 /1 Running 1 (43s ago) 2m11s kubectl exec -it onfailure-pod -- /bin/bash shutdown.sh kubectl get po | grep onfailure onfailure-pod 0 /1 Completed 1 3m58s kubectl delete -f always.yaml kubectl delete -f never.yaml kubectl delete -f onfailure.yaml
pod生命周期——容器钩子与容器探测 参考资料
Pod 的生命周期 | Kubernetes
Init 容器 | Kubernetes
Pod的生命周期可以分为以下几个阶段:
Pending(等待):在这个阶段,Pod被创建,并且正在等待被调度到一个节点上运行。此时,Pod的容器镜像正在下载,网络和存储资源正在分配。
Running(运行中):一旦Pod成功调度到节点上,它进入Running状态。在此阶段,Pod中的容器开始在节点上运行,并且可以处理请求。
Succeeded(成功):如果Pod中的所有容器成功完成了它们的任务,并且退出状态码为0,那么Pod将进入Succeeded状态。一般情况下,这意味着Pod已经完成了它的工作。
Failed(失败):如果Pod中的任何容器以非零的退出状态码退出,或者其中一个容器无法启动,那么Pod将进入Failed状态。这表示Pod执行出现了问题。
Unknown(未知):如果无法获取Pod的状态信息,或者与Pod关联的节点失去联系,那么Pod将进入Unknown状态。
除了这些基本的生命周期阶段,Pod还可以经历一些其他的状态转换,例如:
Terminating(终止中):当Pod被删除或终止时,它进入Terminating状态。在此阶段,Pod的容器正在停止,并且资源正在释放。
Evicted(驱逐):如果节点上的资源不足,Kubernetes可能会驱逐Pod,将其从节点上移除。这将导致Pod进入Evicted状态。
ContainerCreating(创建容器):当Pod的容器正在创建时,Pod将进入ContainerCreating状态。这通常发生在调度期间,当容器镜像正在下载或容器正在启动时。
这些状态和状态转换代表了Pod在其生命周期中可能经历的不同阶段和情况。Kubernetes通过监控和管理Pod的状态来确保Pod的正常运行和可靠性。
Pod生命周期一般包含以下几个流程:
1、创建pause容器
2、创建初始化容器
初始化容器是串行运行的,一个初始化容器运行成功才能运行下一个初始化容器,全部执行完才能执行主容器,并且初始化容器内的数据可以被主容器用到。
初始化容器不支持pod就绪探测,因为初始化容器在pod就绪之前就已经完成
如果初始化容器运行失败,k8s也会根据重启策略restartPolicy决定是否进行重启
3、主容器
4、前置钩子/容器停止前钩子(PreStop Hook)
5、后置钩子/容器启动后钩子(PostStart Hook)
初始化容器 参考资料Init Containers | Kubernetes
1 2 3 4 5 6 7 8 9 10 11 12 13 14 15 16 17 18 19 20 21 22 23 24 25 26 27 28 29 30 31 32 33 34 35 36 kubectl explain pod.spec.initContainers cat > init1.yaml << EOF apiVersion: v1 kind: Pod metadata: name: init1 namespace: default spec: initContainers: - name: init1 image: docker.io/library/nginx imagePullPolicy: IfNotPresent command: ["echo" ,"the first test" ] - name: init2 image: docker.io/library/nginx imagePullPolicy: IfNotPresent command: ["/bin/bash" ,"-c" ,"echo 'the secend test'" ] containers: - name: test image: docker.io/library/nginx imagePullPolicy: IfNotPresent EOF kubectl apply -f init1.yaml kubectl get pods -w NAME READY STATUS RESTARTS AGE init1 0 /1 Pending 0 0s init1 0 /1 Pending 0 0s init1 0 /1 Init:0/2 0 0s init1 0 /1 Init:0/2 0 1s init1 0 /1 Init:1/2 0 2s init1 0 /1 PodInitializing 0 3s init1 1 /1 Running 0 4s
容器钩子 参考文档 https://kubernetes.io/docs/concepts/containers/container-lifecycle-hooks/#container-hooks
1 2 3 4 5 6 7 8 9 10 11 12 13 14 15 16 17 18 19 20 21 22 23 24 25 26 27 28 29 30 31 32 33 34 35 36 37 38 39 40 41 42 43 容器启动后钩子(PostStart 容器停止前钩子(PreStop kubectl explain pods.spec.containers.lifecycle postStart <Object> preStop <Object> kubectl explain pods.spec.containers.lifecycle.postStart exec <Object> httpGet <Object> tcpSocket <Object> cat > hook.yaml << EOF apiVersion: v1 kind: Pod metadata: name: hook namespace: default spec: containers: - name: test image: docker.io/library/nginx imagePullPolicy: IfNotPresent lifecycle: postStart: exec: command: ["/bin/sh" , "-c" , "echo 'test'" ] preStop: exec: command: ["/bin/sh" ,"-c" ,"pkill ssh" ] EOF kubectl apply -f hook.yaml get pods -w NAME READY STATUS RESTARTS AGE init1 1 /1 Running 0 57m hook 0 /1 Pending 0 0s hook 0 /1 Pending 0 0s hook 0 /1 ContainerCreating 0 0s hook 0 /1 ContainerCreating 0 0s hook 1 /1 Running 0 1s kubectl delete -f hook.yaml kubectl delete -f init1.yaml
容器探测 容器探测包括启动探测,就绪探测与存活探测
1、启动探测Startup Probe
用于检测容器内的应用程序是否仍在运行。
如果启动探测失败,则 Kubernetes 认为容器处于不健康状态,并尝试重新启动容器。
如果启动探测成功,则容器被认为是健康的,并继续正常运行。
常见的启动探测方式包括发送 HTTP 请求到容器的特定端点或执行命令并检查返回值。
2、就绪探测Readiness Probe
用于检测容器是否已经启动完成并准备好接收流量。
就绪探测与存活探测类似,但是 在容器启动期间进行检测,而不仅仅是容器启动后。
如果就绪探测失败,则 Kubernetes 认为容器尚未启动完成,将从服务负载均衡中剔除该容器。
如果就绪探测成功,则容器被认为已经启动完成并准备好接收流量。
常见的就绪探测方式与存活探测相似,包括发送 HTTP 请求或执行命令。
3、存活探测Liveness Probe
用于检测容器是否准备好接收流量。
如果存活探测失败,则 Kubernetes 认为容器尚未准备好处理流量,将从服务负载均衡中剔除该容器。
如果存活探测成功,则容器被认为是准备好接收流量的,并加入到服务负载均衡中。
常见的存活探测方式包括发送 HTTP 请求到容器的特定端点或执行命令并检查返回值。
存活探测与就绪探测的区别:
k8s中启动探测会最先进行,就绪探测和存活探测会同时进行
参考资料:配置存活、就绪和启动探针 | Kubernetes
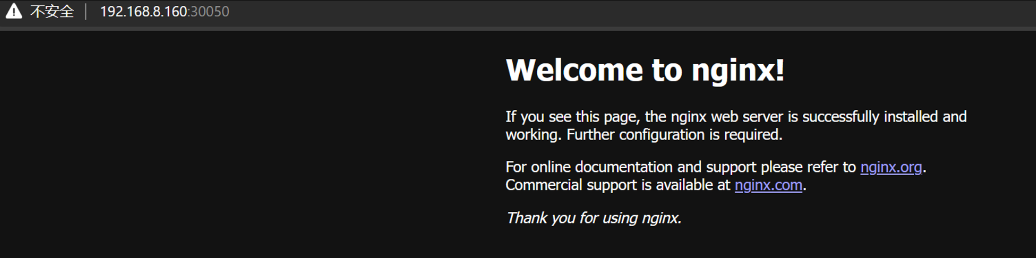
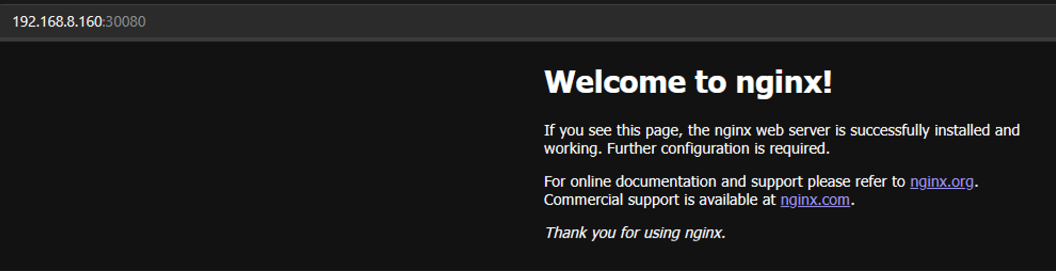
启动探测 1 2 3 4 5 6 7 8 9 10 11 12 13 14 15 16 17 18 19 20 21 22 23 24 25 26 27 28 29 30 31 32 33 34 35 36 37 38 39 40 41 42 43 44 45 46 47 48 49 50 51 52 53 54 55 56 57 58 59 60 61 62 63 64 65 66 67 68 69 70 71 72 73 74 75 76 77 78 79 80 81 82 83 84 85 86 87 88 89 90 91 92 93 94 95 96 97 98 99 100 101 102 103 104 105 106 107 108 109 110 111 112 113 114 115 116 117 118 119 120 121 122 123 124 125 126 127 128 129 130 131 132 133 134 135 136 137 138 139 140 141 142 143 144 145 146 147 148 149 150 151 152 153 154 155 156 157 158 159 160 161 162 163 164 165 166 167 168 169 170 171 172 173 174 175 176 177 178 179 180 181 182 183 184 185 186 187 188 189 190 191 192 193 194 195 196 197 198 199 200 201 202 203 204 205 206 207 kubectl explain pod.spec.containers.startupProbe exec <Object> failureThreshold <integer> grpc <Object> httpGet <Object> initialDelaySeconds <integer> periodSeconds <integer> successThreshold <integer> tcpSocket <Object> terminationGracePeriodSeconds <integer> timeoutSeconds <integer> cat > qidongtance-command.yaml << EOF apiVersion: v1 kind: Pod metadata: name: qidong namespace: default spec: containers: - name: test image: docker.io/library/nginx imagePullPolicy: IfNotPresent startupProbe: exec: command: - "/bin/sh" - "-c" - "echo '1'" initialDelaySeconds: 10 periodSeconds: 5 successThreshold: 1 failureThreshold: 3 timeoutSeconds: 5 EOF kubectl apply -f qidongtance-command.yaml kubectl get pods -w NAME READY STATUS RESTARTS AGE qidong 0 /1 Pending 0 0s qidong 0 /1 Pending 0 0s qidong 0 /1 ContainerCreating 0 0s qidong 0 /1 ContainerCreating 0 1s qidong 0 /1 Running 0 2s qidong 0 /1 Running 0 16s qidong 1 /1 Running 0 16s ... startupProbe: exec: command: - "/bin/sh" - "-c" - "qweasdaq" ... kubectl delete -f qidongtance-command.yaml kubectl apply -f qidongtance-command.yaml kubectl get pods -w NAME READY STATUS RESTARTS AGE qidong 1 /1 Running 0 78s qidong 1 /1 Terminating 0 5m6s qidong 1 /1 Terminating 0 5m6s qidong 0 /1 Terminating 0 5m6s qidong 0 /1 Terminating 0 5m6s qidong 0 /1 Terminating 0 5m6s qidong 0 /1 Pending 0 0s qidong 0 /1 Pending 0 0s qidong 0 /1 ContainerCreating 0 0s qidong 0 /1 ContainerCreating 0 1s qidong 0 /1 Running 0 1s qidong 0 /1 Running 1 (2s ago) 27s qidong 0 /1 Running 2 (2s ago) 47s qidong 0 /1 Running 2 (5s ago) 50s qidong 0 /1 Running 3 (1s ago) 66s qidong 0 /1 Running 4 (1s ago) 86s qidong 0 /1 CrashLoopBackOff 4 (1s ago) 106s kubectl delete -f qidongtance-command.yaml cat > qidongtance-tcp.yaml << EOF apiVersion: v1 kind: Pod metadata: name: qidong namespace: default spec: containers: - name: test image: docker.io/library/nginx imagePullPolicy: IfNotPresent ports: - containerPort: 80 startupProbe: tcpSocket: port: 80 initialDelaySeconds: 10 periodSeconds: 5 successThreshold: 1 failureThreshold: 3 timeoutSeconds: 5 EOF kubectl apply -f qidongtance-tcp.yaml kubectl get pods -w NAME READY STATUS RESTARTS AGE qidong 0 /1 Pending 0 0s qidong 0 /1 Pending 0 0s qidong 0 /1 ContainerCreating 0 0s qidong 0 /1 ContainerCreating 0 1s qidong 0 /1 Running 0 1s qidong 0 /1 Running 0 16s qidong 1 /1 Running 0 16s qidong 1 /1 Running 0 22s curl 10.10 .234 .91 :80 <!DOCTYPE html> <html> <head> <title>Welcome to nginx!</title> <style> html { color-scheme: light dark; }body { width: 35em; margin: 0 auto; font-family: Tahoma , Verdana , Arial , sans-serif; }</style> </head> <body> <h1>Welcome to nginx!</h1> <p>If you see this page, the nginx web server is successfully installed and working. Further configuration is required.</p> <p>For online documentation and support please refer to <a href="http://nginx.org/">nginx.org</a>.<br/> Commercial support is available at <a href="http://nginx.com/">nginx.com</a>.</p> <p><em>Thank you for using nginx.</em></p> </body> </html> kubectl delete -f qidongtance-tcp.yaml cat > qidongtance-httpget.yaml << EOF apiVersion: v1 kind: Pod metadata: name: qidong namespace: default spec: containers: - name: test image: docker.io/library/nginx imagePullPolicy: IfNotPresent ports: - containerPort: 80 startupProbe: httpGet: path: / port: 80 initialDelaySeconds: 10 periodSeconds: 5 successThreshold: 1 failureThreshold: 3 timeoutSeconds: 5 EOF kubectl apply -f qidongtance-httpget.yaml kubectl get pods -w NAME READY STATUS RESTARTS AGE qidong 0 /1 Pending 0 0s qidong 0 /1 Pending 0 0s qidong 0 /1 ContainerCreating 0 0s qidong 0 /1 ContainerCreating 0 1s qidong 0 /1 Running 0 2s qidong 0 /1 Running 0 16s qidong 1 /1 Running 0 16s curl 10.10 .234 .93 :80 <!DOCTYPE html> <html> <head> <title>Welcome to nginx!</title> <style> html { color-scheme: light dark; }body { width: 35em; margin: 0 auto; font-family: Tahoma , Verdana , Arial , sans-serif; }</style> </head> <body> <h1>Welcome to nginx!</h1> <p>If you see this page, the nginx web server is successfully installed and working. Further configuration is required.</p> <p>For online documentation and support please refer to <a href="http://nginx.org/">nginx.org</a>.<br/> Commercial support is available at <a href="http://nginx.com/">nginx.com</a>.</p> <p><em>Thank you for using nginx.</em></p> </body> </html> kubectl delete -f qidongtance-httpget.yaml
存活探测 1 2 3 4 5 6 7 8 9 10 11 12 13 14 15 16 17 18 19 20 21 22 23 24 25 26 27 28 29 30 31 32 33 34 35 36 37 38 39 40 41 42 43 44 45 46 47 48 kubectl explain pod.spec.containers.livenessProbe cat > cunhuotance-command.yaml << EOF apiVersion: v1 kind: Pod metadata: name: cunhuo namespace: default spec: containers: - name: test image: busybox:1.28 imagePullPolicy: IfNotPresent args: - "/bin/sh" - "-c" - "touch /1.txt; sleep 20; rm -rf /1.txt" livenessProbe: initialDelaySeconds: 10 periodSeconds: 5 exec: command: - cat - /1.txt EOF kubectl apply -f cunhuotance-command.yaml kubectl get pods -w NAME READY STATUS RESTARTS AGE cunhuo 1 /1 Running 0 8s cunhuo 0 /1 Completed 0 21s cunhuo 1 /1 Running 1 (2s ago) 22s cunhuo 0 /1 Completed 1 (23s ago) 43s cunhuo 0 /1 CrashLoopBackOff 1 (4s ago) 45s cunhuo 1 /1 Running 2 (15s ago) 56s kubectl get pods -w NAME READY STATUS RESTARTS AGE cunhuo 0 /1 CrashLoopBackOff 2 (12s ago) 88s cunhuo 1 /1 Running 3 (32s ago) 108s cunhuo 0 /1 Completed 3 (52s ago) 2m8s cunhuo 0 /1 CrashLoopBackOff 3 (2s ago) 2m10s cunhuo 0 /1 CrashLoopBackOff 3 (26s ago) 2m34s kubectl delete -f cunhuotance-command.yaml
就绪探测 就绪探测主要用于与pod与service相对接的场景下进行使用
探测pod内接口,探测成功则代表程序启动,就开放对外的接口访问,如果探测失败,则暂时不开放接口访问,直到探测成功
1 2 3 4 5 6 7 8 9 10 11 12 13 14 15 16 17 18 19 20 21 22 23 24 25 26 27 28 29 30 31 32 33 34 35 36 37 38 39 40 apiVersion: v1 kind: Service metadata: name: java spec: type: NodePort ports: port: 8080 targetPort: 8080 nodePort: 31180 port: 8081 targetPort: 8081 nodePort: 31181 selector: app: java --- apiVersion: v1 kind: Pod metadata: name: java spec: containers: labels: app: java image: xxxxx imagePullPolicy: IfNotPresent ports: - name: yewu containerPort: 8080 - name: guanli containerPort: 8081 readinessProbe: initialDelaySeconds: 10 periodSeconds: 5 timeoutSeconds: 5 httpGet: scheme: HTTP port: 8081 path: xxx
k8s控制器ReplicaSet与Deployment 控制器:
在Kubernetes(简称K8s)中,控制器是负责管理和维护集群中资源状态的组件。控制器监视集群中的对象,并根据它们的预期状态来采取行动,以确保系统的期望状态与实际状态保持一致。
对于自主式pod来说,删除pod之后pod就直接消失了,如果因为一些误操作或pod错误退出,就不会自动恢复,这个时候就需要使用k8s的控制器,使用控制器创建的pod可以进行故障的恢复与自愈,并且也可以做资源调度、配置管理等内容
ReplicaSet ReplicaSet是Kubernetes中的一种控制器,用于确保一组Pod副本的运行。它定义了所需的Pod副本数量,并监控它们的运行状态,以确保始终有指定数量的副本在运行。
用的不多,大多数环境中使用deployment资源,deployment的功能包括ReplicaSet
定义ReplicaSet时,需要定义要创建的pod的模板,相当于pod做了多份的负载均衡
以下是一个replicatest的示例文件
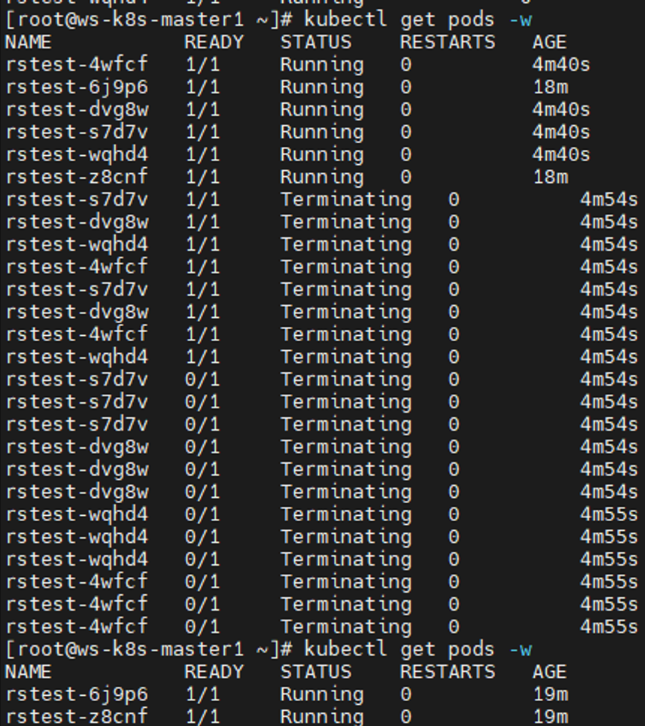
1 2 3 4 5 6 7 8 9 10 11 12 13 14 15 16 17 18 19 20 21 22 23 24 25 26 27 28 29 30 31 32 33 34 35 36 37 38 39 40 41 42 43 44 45 46 47 48 49 50 51 52 53 54 55 56 57 58 59 60 61 62 63 64 65 66 67 68 69 70 71 72 73 74 75 76 77 78 79 80 81 82 83 84 85 86 87 88 89 90 91 92 kubectl explain rs apiVersion <string> kind <string> metadata <Object> spec <Object> status <Object> kubectl explain rs.spec minReadySeconds replicas selector template kubectl explain rs.spec.template.spec cat > rs.yaml << EOF apiVersion: apps/v1 kind: ReplicaSet metadata: name: rstest namespace: default spec: replicas: 5 selector: matchLabels: user: ws template: metadata: labels: user: ws spec: containers: - name: test1 image: docker.io/library/nginx imagePullPolicy: IfNotPresent ports: - containerPort: 80 startupProbe: periodSeconds: 5 initialDelaySeconds: 10 timeoutSeconds: 5 httpGet: scheme: HTTP port: 80 path: / EOF kubectl apply -f rs.yaml kubectl get pods -w | grep Running rstest-2qbrw 1 /1 Running 0 2m34s rstest-6j9p6 1 /1 Running 0 2m34s rstest-ltpn5 1 /1 Running 0 2m34s rstest-z7h27 1 /1 Running 0 2m34s rstest-z8cnf 1 /1 Running 0 2m34s kubectl get rs NAME DESIRED CURRENT READY AGE rstest 5 5 5 2m56s、 kubectl delete pods rstest-hrvtj kubectl get pods -w | grep Running rstest-6j9p6 1 /1 Running 0 6m41s rstest-hrvtj 1 /1 Running 0 32s rstest-ltpn5 1 /1 Running 0 6m41s rstest-z7h27 1 /1 Running 0 6m41s rstest-z8cnf 1 /1 Running 0 6m41s rstest-rmxcq 0 /1 Running 0 1s rstest-rmxcq 0 /1 Running 0 10s rstest-rmxcq 1 /1 Running 0 10s ... replicas: 6 ... kubectl apply -f rs.yaml kubectl get pods -w | grep Running rstest-6j9p6 1 /1 Running 0 12m rstest-ltpn5 1 /1 Running 0 12m rstest-rmxcq 1 /1 Running 0 5m29s rstest-z7h27 1 /1 Running 0 12m rstest-z8cnf 1 /1 Running 0 12m rstest-zwgnl 0 /1 Running 0 1s rstest-zwgnl 0 /1 Running 0 10s rstest-zwgnl 1 /1 Running 0 10s ... replicas: 2 ... kubectl apply -f rs.yaml
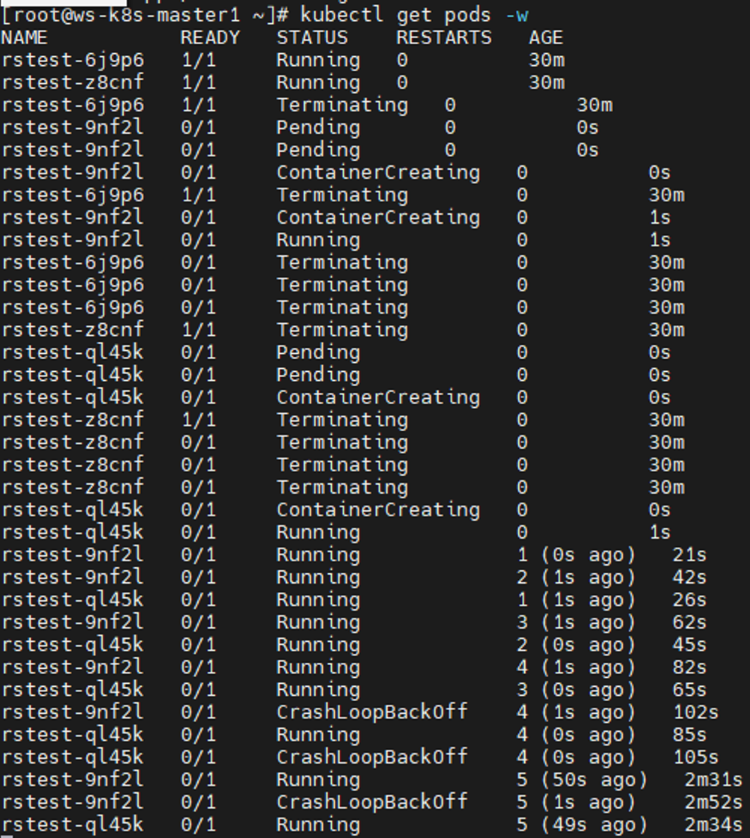
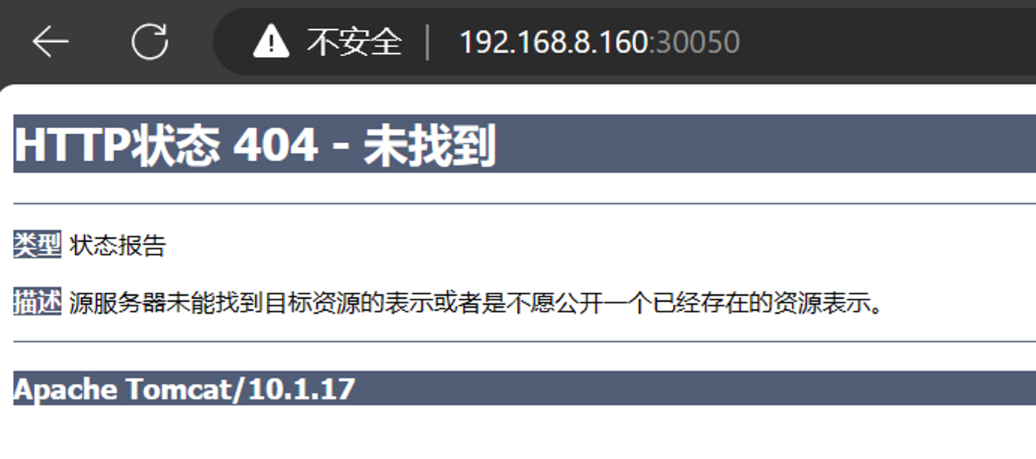
1 2 3 4 5 6 7 8 9 10 11 12 13 14 15 16 17 18 19 20 21 22 23 24 25 26 27 28 29 30 31 32 33 34 35 36 37 38 39 40 41 42 43 44 45 46 47 curl 10.10 .179 .34 :80 <!DOCTYPE html> <html> <head> <title>Welcome to nginx!</title> <style> html { color-scheme: light dark; }body { width: 35em; margin: 0 auto; font-family: Tahoma , Verdana , Arial , sans-serif; }</style> </head> <body> <h1>Welcome to nginx!</h1> <p>If you see this page, the nginx web server is successfully installed and working. Further configuration is required.</p> <p>For online documentation and support please refer to <a href="http://nginx.org/">nginx.org</a>.<br/> Commercial support is available at <a href="http://nginx.com/">nginx.com</a>.</p> <p><em>Thank you for using nginx.</em></p> </body> </html> ... image: docker.io/library/tomcat ... kubectl apply -f rs.yaml kubectl delete pods rstest-6j9p6 kubectl delete pods rstest-z8cnf kubectl get pods -w NAME READY STATUS RESTARTS AGE rstest-c2m98 1 /1 Running 0 3m54s rstest-xkqnl 1 /1 Running 0 3m54s curl 10.10 .234 .124 :8080 <!doctype html><html lang="en"><head><title>HTTP Status 404 – Not Found</title><style type="text/css">body {font-family:Tahoma ,Arial ,sans-serif; } h1, h2, h3, b {color:white;background-color:#525D76; } h1 {font-size:22px; } h2 {font-size:16px; } h3 {font-size:14px; } p {font-size:12px; } a {color:black; } .line {height:1px;background-color:#525D76;border:none; }</style></head><body><h1>HTTP Status 404 – Not Found</h1><hr class="line" /><p><b>Type</b> Status Report</p><p><b>Description</b> The origin server did not find a current representation for the target resource or is not willing to disclose that one exists.</p><hr class="line" /><h3>Apache Tomcat/10.1.17</h3></body></html>[ kubectl delete -f rs.yaml
Deployment Deployment是Kubernetes中的一个重要组件,用于管理应用程序的部署和更新。它提供了一种声明性的方式来定义应用程序的期望状态,并确保集群中的Pod按照这个状态进行部署和维护。
Deployment可以管理多个rs,进行滚动更新时,会使用新的rs,只同时使用一个rs。并且Deployment支持多种更新策略
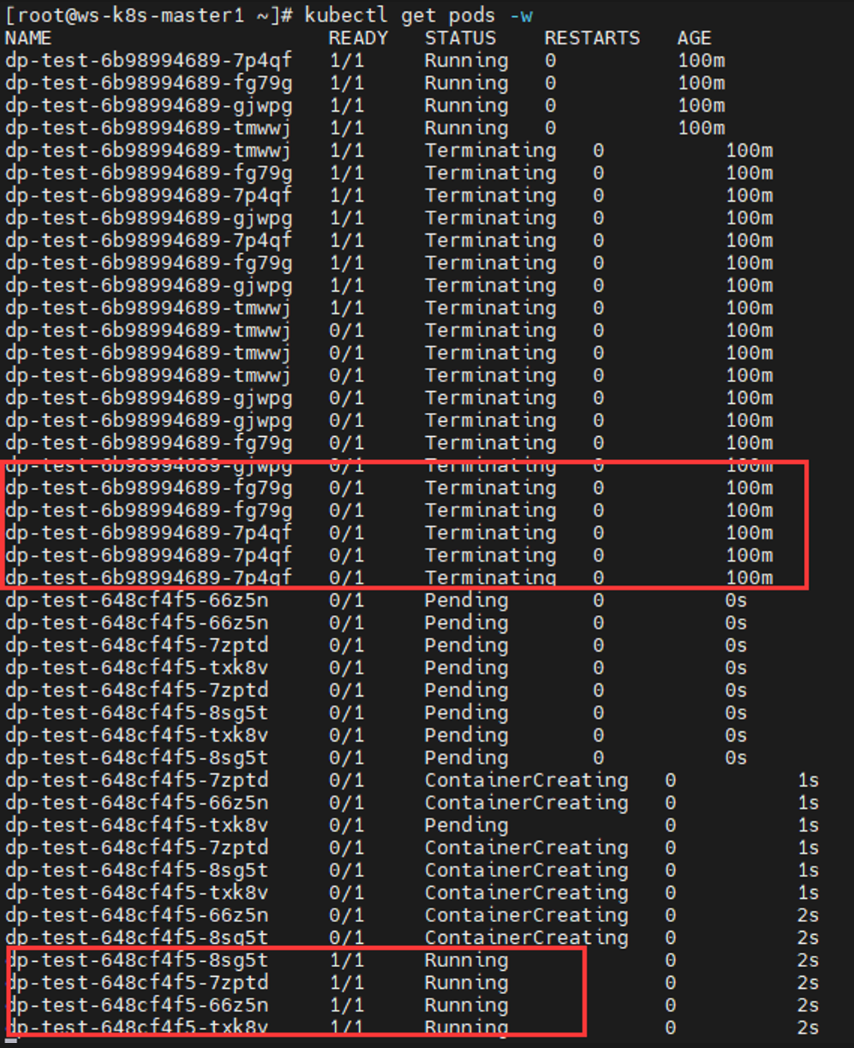
yaml文件编写 1 2 3 4 5 6 7 8 9 10 11 12 13 14 15 16 17 18 19 20 21 22 23 24 25 26 27 28 29 30 31 32 33 34 35 36 37 38 39 40 41 42 43 44 45 46 47 48 49 50 51 52 53 54 55 56 57 58 59 60 61 62 63 64 65 66 67 68 69 70 71 72 73 74 75 76 77 78 79 80 81 82 83 kubectl explain Deployment apiVersion <string> kind <string> metadata <Object> spec <Object> status <Object> kubectl explain Deployment.spec minReadySeconds <integer> paused <boolean> progressDeadlineSeconds <integer> replicas <integer> revisionHistoryLimit <integer> selector <Object> -required- strategy <Object> template <Object> -required- kubectl explain Deployment.spec.strategy rollingUpdate <Object> type <string> Possible enum values: - `"Recreate"` Kill all existing pods before creating new ones. - `"RollingUpdate"` Replace the old ReplicaSets by new one using rolling update i.e gradually scale down the old ReplicaSets and scale up the new one. kubectl explain Deployment.spec.strategy.rollingUpdate maxSurge <string> maxUnavailable <string> kubectl explain Deployment.spec.template metadata <Object> spec <Object> cat > dp.yaml << EOF apiVersion: apps/v1 kind: Deployment metadata: name: dp-test namespace: default labels: app: tomcat spec: replicas: 3 revisionHistoryLimit: 5 selector: matchLabels: app: test template: metadata: name: demo labels: app: test spec: containers: - name: dp1 image: docker.io/library/nginx imagePullPolicy: IfNotPresent ports: - containerPort: 80 EOF kubectl apply -f dp.yaml kubectl get deploy NAME READY UP-TO-DATE AVAILABLE AGE dp-test 3 /3 3 3 69s kubectl get rs NAME DESIRED CURRENT READY AGE dp-test-648cf4f5 3 3 3 114s kubectl get pods NAME READY STATUS RESTARTS AGE dp-test-648cf4f5-hbhmx 1 /1 Running 0 2m7s dp-test-648cf4f5-x9gb4 1 /1 Running 0 2m7s dp-test-648cf4f5-znktp 1 /1 Running 0 2m7s
扩容与缩容 1 2 3 4 5 6 7 8 9 10 11 12 13 14 15 16 17 18 19 20 21 22 23 24 25 26 ... replicas: 5 ... kubectl apply -f dp.yaml kubectl get deploy NAME READY UP-TO-DATE AVAILABLE AGE dp-test 5 /5 5 5 13m kubectl get pods NAME READY STATUS RESTARTS AGE dp-test-648cf4f5-b82kv 1 /1 Running 0 3m29s dp-test-648cf4f5-dssv7 1 /1 Running 0 3m29s dp-test-648cf4f5-hbhmx 1 /1 Running 0 13m dp-test-648cf4f5-x9gb4 1 /1 Running 0 13m dp-test-648cf4f5-znktp 1 /1 Running 0 13m ... replicas: 2 ... kubectl apply -f dp.yaml kubectl get deploy NAME READY UP-TO-DATE AVAILABLE AGE dp-test 2 /2 2 2 14m
滚动更新与自定义策略 1 2 3 4 5 6 7 8 9 10 11 12 13 14 15 16 17 18 19 20 21 22 23 24 25 26 27 28 29 30 31 32 33 34 35 36 37 38 39 40 41 42 43 44 45 46 47 48 49 50 51 52 53 54 55 56 57 58 59 60 61 62 63 64 65 66 67 68 69 70 71 72 73 74 75 76 77 78 79 80 81 82 83 84 85 86 87 88 89 90 91 92 93 94 95 96 97 98 99 100 101 102 103 104 105 106 107 108 109 110 111 112 113 114 115 116 117 118 119 120 121 122 123 124 125 126 127 128 129 130 131 132 133 134 135 136 137 138 139 140 141 142 143 144 145 146 147 148 149 150 151 152 153 154 155 curl 10.10 .179 .43 :80 <!DOCTYPE html> <html> <head> <title>Welcome to nginx!</title> <style> html { color-scheme: light dark; }body { width: 35em; margin: 0 auto; font-family: Tahoma , Verdana , Arial , sans-serif; }</style> </head> <body> <h1>Welcome to nginx!</h1> <p>If you see this page, the nginx web server is successfully installed and working. Further configuration is required.</p> <p>For online documentation and support please refer to <a href="http://nginx.org/">nginx.org</a>.<br/> Commercial support is available at <a href="http://nginx.com/">nginx.com</a>.</p> <p><em>Thank you for using nginx.</em></p> </body> </html> ... replicas: 4 ... image: docker.io/library/tomcat ... kubectl apply -f dp.yaml kubectl get pods -w NAME READY STATUS RESTARTS AGE dp-test-648cf4f5-b82kv 1 /1 Running 0 80m dp-test-648cf4f5-znktp 1 /1 Running 0 90m dp-test-6b98994689-v7d9w 0 /1 Pending 0 0s dp-test-6b98994689-v7d9w 0 /1 Pending 0 0s dp-test-6b98994689-v7d9w 0 /1 ContainerCreating 0 0s dp-test-6b98994689-v7d9w 0 /1 ContainerCreating 0 1s dp-test-6b98994689-v7d9w 1 /1 Running 0 1s dp-test-648cf4f5-znktp 1 /1 Terminating 0 90m dp-test-6b98994689-fzfv6 0 /1 Pending 0 0s dp-test-6b98994689-fzfv6 0 /1 Pending 0 0s dp-test-6b98994689-fzfv6 0 /1 ContainerCreating 0 0s dp-test-648cf4f5-znktp 1 /1 Terminating 0 90m dp-test-6b98994689-fzfv6 0 /1 ContainerCreating 0 1s dp-test-648cf4f5-znktp 0 /1 Terminating 0 90m dp-test-648cf4f5-znktp 0 /1 Terminating 0 90m dp-test-648cf4f5-znktp 0 /1 Terminating 0 90m dp-test-6b98994689-fzfv6 1 /1 Running 0 2s dp-test-648cf4f5-b82kv 1 /1 Terminating 0 80m dp-test-648cf4f5-b82kv 1 /1 Terminating 0 80m dp-test-648cf4f5-b82kv 0 /1 Terminating 0 80m dp-test-648cf4f5-b82kv 0 /1 Terminating 0 80m dp-test-648cf4f5-b82kv 0 /1 Terminating 0 80m kubectl get rs NAME DESIRED CURRENT READY AGE dp-test-648cf4f5 0 0 0 92m dp-test-6b98994689 2 2 2 88s curl 10.10 .234 .66 :8080 <!doctype html><html lang="en"><head><title>HTTP Status 404 – Not Found</title><style type="text/css">body {font-family:Tahoma ,Arial ,sans-serif; } h1, h2, h3, b {color:white;background-color:#525D76; } h1 {font-size:22px; } h2 {font-size:16px; } h3 {font-size:14px; } p {font-size:12px; } a {color:black; } .line {height:1px;background-color:#525D76;border:none; }</style></head><body><h1>HTTP Status 404 – Not Found</h1><hr class="line" /><p><b>Type</b> Status Report</p><p><b>Description</b> The origin server did not find a current representation for the target resource or is not willing to disclose that one exi kubectl rollout history deployment deployment.apps/dp-test REVISION CHANGE-CAUSE 1 <none> 2 <none> kubectl rollout undo deployment.apps/dp-test --to-revision=1 kubectl get rs NAME DESIRED CURRENT READY AGE dp-test-648cf4f5 2 2 2 99m dp-test-6b98994689 0 0 0 8m22s curl 10.10 .179 .46 :80 <!DOCTYPE html> <html> <head> <title>Welcome to nginx!</title> <style> html { color-scheme: light dark; }body { width: 35em; margin: 0 auto; font-family: Tahoma , Verdana , Arial , sans-serif; }</style> </head> <body> <h1>Welcome to nginx!</h1> <p>If you see this page, the nginx web server is successfully installed and working. Further configuration is required.</p> <p>For online documentation and support please refer to <a href="http://nginx.org/">nginx.org</a>.<br/> Commercial support is available at <a href="http://nginx.com/">nginx.com</a>.</p> <p><em>Thank you for using nginx.</em></p> </body> </html> kubectl explain Deployment.spec.strategy rollingUpdate <Object> type <string> Possible enum values: - `"Recreate"` Kill all existing pods before creating new ones. - `"RollingUpdate"` Replace the old ReplicaSets by new one using rolling update i.e gradually scale down the old ReplicaSets and scale up the new one. kubectl explain Deployment.spec.strategy.rollingUpdate maxSurge <string> maxUnavailable <string> maxUnavailable: 0 maxSurge: 1 ... replicas: 4 strategy: rollingUpdate: maxUnavailable: 1 maxSurge: 1 ... kubectl apply -f dp.yaml kubectl get pods -w NAME READY STATUS RESTARTS AGE dp-test-6b98994689-7p4qf 1 /1 Running 0 26s dp-test-6b98994689-fg79g 1 /1 Running 0 28s dp-test-6b98994689-gjwpg 1 /1 Running 0 28s dp-test-6b98994689-tmwwj 1 /1 Running 0 26s ... strategy: type: Recreate ... image: docker.io/library/nginx ... kubectl apply -f dp.yaml kubectl delete -f dp.yaml
使用Deployment进行蓝绿部署 蓝绿部署(Blue-Green Deployment)是一种在应用程序部署过程中实现零停机和无缝切换的策略。它通过同时维护两个完全独立且相同配置的生产环境(蓝色环境和绿色环境),使得在切换新版本应用程序时不会中断用户访问。
与滚动更新不同的是蓝绿部署是同时存在两个环境,然后通过流量切换来切换环境,而滚动更新从始至终只使用了一个环境
1 2 3 4 5 6 7 8 9 10 11 12 13 14 15 16 17 18 19 20 21 22 23 24 25 26 27 28 29 30 31 32 33 34 35 36 37 38 39 40 41 42 43 44 45 46 47 48 49 50 51 52 53 54 55 56 57 58 59 60 61 62 63 64 65 66 67 68 69 70 71 72 73 74 75 76 77 78 79 80 81 82 83 84 85 86 87 88 89 90 91 92 93 94 95 96 97 98 99 100 101 102 103 104 105 106 107 108 109 110 111 112 kubectl create ns blue-green cat > green.yaml << EOF apiVersion: apps/v1 kind: Deployment metadata: name: green namespace: blue-green spec: replicas: 2 selector: matchLabels: color: green template: metadata: labels: color: green spec: containers: - name: test1 image: docker.io/library/nginx imagePullPolicy: IfNotPresent ports: - containerPort: 80 EOF kubectl apply -f green.yaml kubectl get pods -n blue-green --show-labels -owide NAME READY STATUS RESTARTS AGE IP NODE NOMINATED NODE READINESS GATES LABELS green-748cc6748f-76jq6 1 /1 Running 0 67s 10.10 .179 .52 ws-k8s-node1 <none> <none> color=bluegreen,pod-template-hash=748cc6748f green-748cc6748f-tv2rd 1 /1 Running 0 67s 10.10 .234 .73 ws-k8s-node2 <none> <none> color=bluegreen,pod-template-hash=748cc6748f cat > service_bluegreen.yaml << EOF apiVersion: v1 kind: Service metadata: name: lanlv namespace: blue-green spec: type: NodePort ports: nodePort: 30050 name: http selector: color: green EOF kubectl apply -f service_bluegreen.yaml kubectl get svc -n blue-green NAME TYPE CLUSTER-IP EXTERNAL-IP PORT(S) AGE lanlv NodePort 10.105 .133 .209 <none> 80 :30050/TCP 3h23m cat > blue.yaml << EOF apiVersion: apps/v1 kind: Deployment metadata: name: blue namespace: blue-green spec: replicas: 3 selector: matchLabels: color: blue template: metadata: labels: color: blue spec: containers: - name: test2 image: docker.io/library/tomcat imagePullPolicy: IfNotPresent ports: - containerPort: 8080 EOF kubectl apply -f blue.yaml kubectl get pods -n blue-green --show-labels NAME READY STATUS RESTARTS AGE LABELS blue-6c4db4cbcc-79mlg 1 /1 Running 0 3h13m color=blue,pod-template-hash=6c4db4cbcc blue-6c4db4cbcc-pv76m 1 /1 Running 0 3h13m color=blue,pod-template-hash=6c4db4cbcc green-7fc6f944df-5br85 1 /1 Running 0 3h14m color=green,pod-template-hash=7fc6f944df green-7fc6f944df-jvblp 1 /1 Running 0 3h14m color=green,pod-template-hash=7fc6f944df curl 10.105 .133 .209 :80 <!DOCTYPE html> <html> <head> <title>Welcome to nginx!</title> <style> html { color-scheme: light dark; }body { width: 35em; margin: 0 auto; font-family: Tahoma , Verdana , Arial , sans-serif; }</style> </head> <body> <h1>Welcome to nginx!</h1> <p>If you see this page, the nginx web server is successfully installed and working. Further configuration is required.</p> <p>For online documentation and support please refer to <a href="http://nginx.org/">nginx.org</a>.<br/> Commercial support is available at <a href="http://nginx.com/">nginx.com</a>.</p> <p><em>Thank you for using nginx.</em></p> </body> </html>
1 2 3 4 5 6 7 8 9 10 11 12 13 ... - port: 8080 nodePort: 30050 name: http selector: color: blue ... kubectl apply -f service_bluegreen.yaml curl 10.105 .133 .209 :8080 <!doctype html><html lang="en"><head><title>HTTP Status 404 – Not Found</title><style type="text/css">body {font-family:Tahoma ,Arial ,sans-serif; } h1, h2, h3, b {color:white;background-color:#525D76; } h1 {font-size:22px; } h2 {font-size:16px; } h3 {font-size:14px; } p {font-size:12px; } a {color:black; } .line {height:1px;background-color:#525D76;border:none; }</style></head><body><h1>HTTP Status 404 – Not Found</h1><hr class="line" /><p><b>Type</b> Status Report</p><p><b>Description</b> The origin server did not find a current representation for the target resource or is not willing to disclose that one exists.</p><hr class="line" /><h3>Apache Tomcat/10.1.17</h3></body></html>[root@ws-k8s-master1 ~]#
使用Deployment进行金丝雀部署 金丝雀部署(Canary Deployment)是一种逐步发布新版本应用程序的部署策略。它的目标是在生产环境中逐渐引入新版本,以评估其性能、稳定性和用户反馈,同时最小化潜在的风险。
在金丝雀部署中,只有一小部分流量被导向到新版本,而大部分流量仍然被发送到稳定版本。这样可以在真实环境中进行测试,同时保持对用户的影响最小化。如果新版本表现良好,逐渐增加流量份额,直到完全切换到新版本。如果出现问题,可以快速回滚到稳定版本。又称灰度发布
1 2 3 4 5 6 7 8 9 10 11 kubectl set image deployment blue test2=docker.io/library/nginx -n blue-green && kubectl rollout pause deployment blue -n blue-green kubectl rollout resume deployment blue -n blue-green 会开始更新剩余未更新的pod kubectl delete -f service_bluegreen.yaml kubectl delete -f blue.yaml kubectl delete -f green.yaml
四层代理service Service在Kubernetes中提供了一种抽象的方式来公开应用程序的网络访问,并提供了负载均衡和服务发现等功能,使得应用程序在集群内外都能够可靠地进行访问。
每个Service都会自动关联一个对应的Endpoint。当创建一个Service时,Kubernetes会根据Service的选择器(selector)来找到匹配的Pod,并将这些Pod的IP地址和端口信息作为Endpoint的一部分。当Service接收到来自外部或内部的请求时,它会将请求转发到与之关联的Endpoint。Endpoint中包含了后端Pod的IP地址和端口信息,Service会根据负载均衡算法将请求转发到一个或多个后端Pod上。并且Service会自动关联到防火墙规则, 将pod的地址和端口保存在防火墙规则内
以上内容由gtp生成
举个例子,以前我访问pod资源要一个一个访问,现在我把一堆具有相同特征(如标签)的pod绑定一个service,然后在service内侧与pod端口绑定,service外侧映射一个端口到宿主机,service还能改dns改防火墙规则。这样直接访问宿主机的端口就能访问到一组pod的特定端口。跟nginx做反向代理负载均衡差不多
1 2 3 4 5 6 7 8 9 10 11 12 13 14 15 16 17 18 19 20 21 22 23 24 25 26 27 28 29 30 31 32 33 34 35 36 37 38 39 40 41 42 43 44 45 46 47 48 49 50 51 52 53 54 55 56 57 58 59 60 61 62 63 64 65 66 67 68 69 70 71 72 73 74 75 76 77 78 79 80 81 82 83 84 85 86 87 88 89 kubectl explain Service apiVersion <string> kind <string> metadata <Object> spec <Object> status <Object> kubectl explain Service.spec allocateLoadBalancerNodePorts <boolean>#是否是默认映射端口nodeports clusterIP <string> externalIPs <[]string> externalName <string> externalTrafficPolicy <string> healthCheckNodePort <integer> sessionAffinity <string> type <string> ports <[]Object> kubectl explain service.spec.ports name <string> nodePort <integer> port <integer> -required- protocol <string> ctr images pull docker.io/library/nginx:1.21 mkdir service cd service cat > pod.yaml << EOF apiVersion: apps/v1 kind: Deployment metadata: name: pods spec: replicas: 2 selector: matchLabels: nginx: "1.21" template: metadata: labels: nginx: "1.21" spec: containers: - name: test1 image: docker.io/library/nginx:1.21 imagePullPolicy: IfNotPresent ports: - containerPort: 80 startupProbe: periodSeconds: 5 initialDelaySeconds: 20 timeoutSeconds: 5 httpGet: scheme: HTTP port: 80 path: / livenessProbe: periodSeconds: 5 initialDelaySeconds: 20 timeoutSeconds: 5 httpGet: scheme: HTTP port: 80 path: / readinessProbe: periodSeconds: 5 initialDelaySeconds: 20 timeoutSeconds: 5 httpGet: scheme: HTTP port: 80 path: / EOF kubectl apply -f pod.yaml kubectl get pods -w NAME READY STATUS RESTARTS AGE pods-8599b54cf-6tzrx 0 /1 Running 0 12s pods-8599b54cf-vhxd8 0 /1 Running 0 12s pods-8599b54cf-6tzrx 0 /1 Running 0 25s pods-8599b54cf-vhxd8 0 /1 Running 0 25s pods-8599b54cf-6tzrx 1 /1 Running 0 25s pods-8599b54cf-vhxd8 1 /1 Running 0 25s
ClusterIP模式 1 2 3 4 5 6 7 8 9 10 11 12 13 14 15 16 17 18 19 20 21 22 23 24 25 26 27 28 29 30 31 32 33 34 35 36 37 38 39 40 41 42 43 44 45 46 47 48 49 50 51 52 53 54 55 56 57 58 59 60 cat > service-clusterip.yaml << EOF apiVersion: v1 kind: Service metadata: name: service spec: type: ClusterIP ports: - port: 80 protocol: TCP targetPort: 80 selector: nginx: "1.21" EOF kubectl apply -f service.yaml kubectl get svc NAME TYPE CLUSTER-IP EXTERNAL-IP PORT(S) AGE kubernetes ClusterIP 10.96 .0 .1 <none> 443 /TCP 12d service ClusterIP 10.107 .178 .176 <none> 80 /TCP 31s kubectl describe service service | grep Endpoint Endpoints: 10.10 .179 .1 :80,10.10.234.86:80 kubectl get ep service NAME ENDPOINTS AGE service 10.10 .179 .1 :80,10.10.234.86:80 2m54s curl 10.10 .179 .1 :80 service.default.svc.cluster.local:80 kubectl exec pods-8599b54cf-6tzrx -it -- /bin/sh curl service.default.svc.cluster.local:80 <!DOCTYPE html> <html> <head> <title>Welcome to nginx!</title> <style> html { color-scheme: light dark; }body { width: 35em; margin: 0 auto; font-family: Tahoma , Verdana , Arial , sans-serif; }</style> </head> <body> <h1>Welcome to nginx!</h1> <p>If you see this page, the nginx web server is successfully installed and working. Further configuration is required.</p> <p>For online documentation and support please refer to <a href="http://nginx.org/">nginx.org</a>.<br/> Commercial support is available at <a href="http://nginx.com/">nginx.com</a>.</p> <p><em>Thank you for using nginx.</em></p> </body> </html> kubectl delete -f service-clusterip.yaml
nodeport模式 1 2 3 4 5 6 7 8 9 10 11 12 13 14 15 16 17 18 19 20 21 22 23 24 25 26 27 28 29 30 31 32 33 34 35 36 37 38 39 40 cat > service-nodeport.yaml << EOF apiVersion: v1 kind: Service metadata: name: service spec: type: NodePort ports: - port: 80 protocol: TCP targetPort: 80 nodePort: 30080 selector: nginx: "1.21" EOF kubectl apply -f service-nodeport.yaml kubectl get svc NAME TYPE CLUSTER-IP EXTERNAL-IP PORT(S) AGE kubernetes ClusterIP 10.96 .0 .1 <none> 443 /TCP 12d service NodePort 10.108 .9 .134 <none> 80 :30080/TCP 11s ipvsadm -Ln | grep 30080 -A 2 TCP 172.17 .0 .1 :30080 rr -> 10.10 .179 .1 :80 Masq 1 0 0 -> 10.10 .234 .86 :80 Masq 1 0 0 -- TCP 192.168 .8 .160 :30080 rr -> 10.10 .179 .1 :80 Masq 1 0 1 -> 10.10 .234 .86 :80 Masq 1 0 0 -- TCP 192.168 .122 .1 :30080 rr -> 10.10 .179 .1 :80 Masq 1 0 0 -> 10.10 .234 .86 :80 Masq 1 0 0 -- TCP 10.10 .189 .192 :30080 rr -> 10.10 .179 .1 :80 Masq 1 0 0 -> 10.10 .234 .86 :80 Masq 1 0 0 kubectl delete -f service-nodeport.yaml
ExternalName模式 充当一个别名,将服务映射到集群外部的一个外部域名。当使用该服务时,Kubernetes会将服务的DNS解析为ExternalName指定的外部域名,从而实现对外部服务的访问。这种模式适用于需要将服务与集群外部的现有服务进行关联的场景。
1 2 3 4 5 6 7 8 9 10 11 12 13 14 15 16 17 18 19 20 21 22 23 24 25 26 27 28 29 30 31 32 33 34 35 36 37 38 39 40 41 42 43 44 45 46 47 48 49 50 51 52 53 54 55 56 57 58 59 60 61 62 63 64 65 66 67 68 69 70 71 72 73 74 75 76 77 78 79 80 81 82 83 84 85 86 87 88 89 90 91 92 93 kubectl create ns server cat > pod-in-server.yaml << EOF apiVersion: apps/v1 kind: Deployment metadata: name: pods namespace: server spec: replicas: 2 selector: matchLabels: nginx: "1.21" template: metadata: labels: nginx: "1.21" spec: containers: - name: test1 image: docker.io/library/nginx:1.21 imagePullPolicy: IfNotPresent EOF kubectl apply -f pod-in-server.yaml cat > service-in-server.yaml << EOF apiVersion: v1 kind: Service metadata: name: service-in-server namespace: server spec: selector: nginx: "1.21" ports: - name: http protocol: TCP port: 80 targetPort: 80 EOF kubectl apply -f service-in-server.yaml cat > service-externalname.yaml << EOF apiVersion: v1 kind: Service metadata: name: service spec: type: ExternalName externalName: service-in-server.server.svc.cluster.local ports: - port: 80 selector: nginx: "1.21" EOF kubectl apply -f service-externalname.yaml kubectl get pods -n server NAME READY STATUS RESTARTS AGE pods-8649769f54-fs72b 1 /1 Running 0 22s kubectl exec pods-8599b54cf-6tzrx -it -- /bin/sh curl service-in-server.server.svc.cluster.local <!DOCTYPE html> <html> <head> <title>Welcome to nginx!</title> <style> html { color-scheme: light dark; }body { width: 35em; margin: 0 auto; font-family: Tahoma , Verdana , Arial , sans-serif; }</style> </head> <body> <h1>Welcome to nginx!</h1> <p>If you see this page, the nginx web server is successfully installed and working. Further configuration is required.</p> <p>For online documentation and support please refer to <a href="http://nginx.org/">nginx.org</a>.<br/> Commercial support is available at <a href="http://nginx.com/">nginx.com</a>.</p> <p><em>Thank you for using nginx.</em></p> </body> </html> kubectl delete -f service-externalname.yaml kubectl delete -f service-in-server.yaml kubectl delete -f pod-in-server.yaml
通过service和endpoint引用外部mysql的最佳实践 1 2 3 4 5 6 7 8 9 10 11 12 13 14 15 16 17 18 19 20 21 22 23 24 25 26 27 28 29 30 31 32 33 34 35 36 37 yum install mariadb-server.x86_64 -y systemctl start mariadb cat > mysql.yaml << EOF apiVersion: v1 kind: Service metadata: name: mysql spec: type: ClusterIP ports: EOF kubectl apply -f mysql.yaml cat > mysql_endpoint.yaml << EOF apiVersion: v1 kind: Endpoints metadata: name: mysql subsets: - addresses: ports: EOF kubectl apply -f mysql_endpoint.yaml kubectl get Endpoints NAME ENDPOINTS AGE kubernetes 192.168 .8 .159 :6443,192.168.8.160:6443 12d mysql 192.168 .8 .162 :3306 2m29s kubectl describe svc mysql | grep -i endpoint Endpoints: 192.168 .8 .162 :3306
k8s 持久化存储 1 2 3 4 5 6 7 8 9 10 11 12 13 14 15 16 17 18 19 20 21 22 23 24 25 26 27 28 kubectl explain pods.spec.volumes awsElasticBlockStore <Object> azureDisk <Object> azureFile <Object> cephfs <Object> cinder <Object> configMap <Object> csi <Object> downwardAPI <Object> emptyDir <Object> ephemeral <Object> fc <Object> flexVolume <Object> flocker <Object> gcePersistentDisk <Object> gitRepo <Object> glusterfs <Object> hostPath <Object> iscsi <Object> name <string> -required- nfs <Object> persistentVolumeClaim <Object> photonPersistentDisk <Object> portworxVolume <Object> projected <Object> quobyte <Object> rbd <Object>
emptyDir临时目录 该目录在Pod的所有容器之间是可共享的,容器可以读取和写入其中的文件。emptyDir卷的生命周期与Pod的生命周期相同,当Pod被删除或重启时,emptyDir中的数据也会被清除。
1 2 3 4 5 6 7 8 9 10 11 12 13 14 15 16 17 18 19 20 21 22 23 24 25 26 27 28 29 30 31 32 33 34 35 36 37 38 39 40 41 42 43 44 45 46 47 cat > linshi-dir.yaml << EOF apiVersion: v1 kind: Pod metadata: name: stor spec: containers: image: docker.io/library/nginx imagePullPolicy: IfNotPresent volumeMounts: - mountPath: /cache name: linshi volumes: emptyDir: {} EOF kubectl apply -f linshi-dir.yaml kubectl get po -owide NAME READY STATUS RESTARTS AGE IP NODE NOMINATED NODE READINESS GATES stor 1 /1 Running 0 3m28s 10.10 .234 .66 ws-k8s-node2 <none> <none> kubectl get pods stor -o yaml | grep uid ls /var/lib/kubelet/pods -l total 0 drwxr-x--- 5 root root 71 Jan 19 08 :11 35339f94-e827-4227-be53-9b0ac7116ec5 drwxr-x--- 5 root root 71 Jan 19 08 :11 cc056149-ee92-4080-a8d5-15de19f4dee5 drwxr-x--- 5 root root 71 Jan 6 18 :36 e6696d51-c037-49a8-bfeb-c0c452b0558b drwxr-x--- 5 root root 71 Jan 19 08 :11 eaec4ad0-b509-472d-9c8f-7271b6379482 cd 35339f94-e827-4227-be53-9b0ac7116ec5 cd volumes/kubernetes.io~empty-dir kubectl exec -it stor -- /bin/bash touch /cache/1.txt ls linshi/ 1. txt kubectl delete -f linshi-dir.yaml ls linshi/ ls: cannot access linshi/: No such file or directory
hostpath 允许把节点的目录挂载到容器上,但跨节点不行,所以需要确保能够调度到同一节点。
支持持久化存储,类似于容器的bind mount,因此安全性存在问题,需要尽量设置为只读类型
1 2 3 4 5 6 7 8 9 10 11 12 13 14 15 16 17 18 19 20 21 22 23 24 25 26 27 28 29 30 31 32 33 34 35 36 37 38 39 40 cat > hostpath-stor.yaml << EOF apiVersion: v1 kind: Pod metadata: name: stor spec: containers: image: docker.io/library/nginx imagePullPolicy: IfNotPresent volumeMounts: - mountPath: /cache name: hostpath image: docker.io/library/tomcat imagePullPolicy: IfNotPresent volumeMounts: - mountPath: /cache name: hostpath volumes: hostPath: path: /stor-test type: DirectoryOrCreate EOF kubectl apply -f hostpath-stor.yaml kubectl get pods -owide NAME READY STATUS RESTARTS AGE IP NODE NOMINATED NODE READINESS GATES stor 2 /2 Running 1 (2s ago) 5s 10.10 .179 .2 ws-k8s-node1 <none> <none> kubectl exec -it stor -c test1 -- /bin/bash touch /cache/1.txt kubectl exec -it stor -c test2 -- /bin/bash root@stor:/usr/local/tomcat# ls /cache/ 1. txt kubectl delete -f hostpath-stor.yaml
nfs持久化存储 NFS(Network File System)是一种用于在计算机网络中共享文件的协议和文件系统。它允许在不同的计算机之间通过网络访问和共享文件,就像这些文件位于本地文件系统上一样。
NFS是一种分布式文件系统,它允许客户端计算机通过网络挂载和访问远程服务器上的文件系统。NFS使用客户端-服务器模型,其中服务器端维护存储在共享目录中的文件,并向客户端提供访问权限。弥补了hostpath的缺点
1 2 3 4 5 6 7 8 9 10 11 12 13 14 15 16 17 18 19 20 21 22 23 24 25 26 27 28 29 30 31 32 33 34 35 36 37 38 39 40 41 42 43 44 45 46 47 48 49 50 51 52 53 54 55 56 57 58 59 60 61 62 63 64 65 66 67 yum -y install nfs-utils systemctl enable nfs --now mkdir /dirfornfs echo "/dirfornfs *(rw,no_root_squash)" >> /etc/exports exportfs -arv mkdir test mount 192.168 .8 .159 :/dirfornfs test df -Th | grep test 192.168 .8 .159 :/dirfornfs nfs4 50G 7. 6G 43G 16 % /root/test cat > cunchu-nfs.yaml << EOF apiVersion: apps/v1 kind: Deployment metadata: name: test-nfs spec: replicas: 2 minReadySeconds: 10 selector: matchLabels: cunchu: nfs template: metadata: name: nfs-pod labels: cunchu: nfs spec: containers: - name: test-pod image: docker.io/library/nginx imagePullPolicy: IfNotPresent ports: - containerPort: 80 volumeMounts: - name: nfs mountPath: /usr/share/nginx/html volumes: - name: nfs nfs: path: /dirfornfs server: 192.168 .8 .159 EOF kubectl apply -f cunchu-nfs.yaml kubectl get pods -owide NAME READY STATUS RESTARTS AGE IP NODE NOMINATED NODE READINESS GATES test-nfs-5559d84cd6-sb25b 1 /1 Running 0 62s 10.10 .179 .4 ws-k8s-node1 <none> <none> test-nfs-5559d84cd6-w77mf 1 /1 Running 0 62s 10.10 .234 .67 ws-k8s-node2 <none> <none> cd /dirfornfs/ echo '123' > index.html curl 10.10 .179 .4 :80 123 curl 10.10 .234 .67 :80 123 kubectl delete -f cunchu-nfs.yaml
k8s 持久化存储PV和PVC PV和PVC PV 和 PVC 之间的关系是一种动态的供需匹配关系。PVC 表示应用程序对持久化存储的需求,而 PV 表示可用的持久化存储资源。Kubernetes 控制平面会根据 PVC 的需求来选择和绑定合适的 PV,将其挂载到应用程序的 Pod 中,从而使应用程序可以访问持久化存储。
PV可以静态或动态的创建;PV和PVC必须一一对应;PVC如果没有对应的绑定PV则会Pending
PVC被删除后,PV内的数据有两种处理策略分别是Retain保留(默认)、Delete删除
接下来的实验中会对这几种模式进行测试,测试结果发现并没有什么区别(k8s1.26)
静态创建PV 1 2 3 4 5 6 7 8 9 10 11 12 13 14 15 16 17 18 19 20 21 22 23 24 25 26 27 28 29 30 31 32 33 34 35 36 37 38 39 40 41 42 43 44 45 46 47 48 49 50 51 52 53 54 55 56 57 58 59 60 61 62 63 64 65 66 67 68 69 70 71 72 73 74 75 76 77 78 79 80 81 82 83 84 85 86 87 88 89 90 91 92 93 94 95 96 97 98 99 100 101 102 103 104 105 106 107 108 109 110 111 112 113 114 115 116 117 118 119 120 121 122 123 124 125 126 127 128 129 130 131 132 133 134 135 136 137 138 139 140 141 142 143 144 145 146 147 148 149 150 151 152 153 154 155 156 157 158 159 160 161 162 163 164 165 166 167 168 169 170 171 172 173 174 175 176 177 178 179 180 181 182 183 184 185 186 187 188 189 190 191 192 193 194 195 196 197 198 199 200 201 202 203 204 205 206 207 208 209 210 211 212 213 214 215 216 217 218 219 220 221 222 223 224 225 226 227 228 229 230 231 232 233 234 235 236 237 238 239 240 241 242 243 244 245 246 247 248 249 250 251 252 253 254 255 256 257 258 259 260 261 262 263 264 265 266 267 268 269 270 271 272 273 274 275 276 277 278 279 280 281 282 283 284 285 286 287 288 yum -y install nfs-utils mkdir -p /dirfornfs/{1..5} echo "/dirfornfs *(rw,no_root_squash) /dirfornfs/1 *(rw,no_root_squash) /dirfornfs/2 *(rw,no_root_squash) /dirfornfs/3 *(rw,no_root_squash) /dirfornfs/4 *(rw,no_root_squash) /dirfornfs/5 *(rw,no_root_squash)" > /etc/exports cat > jintai-PV.yaml << EOF apiVersion: v1 kind: PersistentVolume metadata: name: jintai-pv1 labels: stor: pv1 spec: nfs: server: 192.168 .8 .159 path: /dirfornfs/1 accessModes: ["ReadWriteOnce" ] capacity: storage: 1. 5Gi --- apiVersion: v1 kind: PersistentVolume metadata: name: jintai-pv2 labels: stor: pv2 spec: nfs: server: 192.168 .8 .159 path: /dirfornfs/2 accessModes: ["ReadWriteMany" ] capacity: storage: 2Gi --- apiVersion: v1 kind: PersistentVolume metadata: name: jintai-pv3 labels: stor: pv3 spec: nfs: server: 192.168 .8 .159 path: /dirfornfs/3 accessModes: ["ReadOnlyMany" ] capacity: storage: 3Gi EOF kubectl apply -f jintai-PV.yaml kubectl get pv NAME CAPACITY ACCESS MODES RECLAIM POLICY STATUS jintai-pv1 1536Mi RWO Retain Available jintai-pv2 2Gi RWX Retain Available jintai-pv3 3Gi ROX Retain Available cat > pvc.yaml << EOF apiVersion: v1 kind: PersistentVolumeClaim metadata: name: pvc1 spec: accessModes: ["ReadWriteOnce" ] selector: matchLabels: stor: pv1 resources: requests: storage: 1. 5Gi --- apiVersion: v1 kind: PersistentVolumeClaim metadata: name: pvc2 spec: accessModes: ["ReadWriteMany" ] selector: matchLabels: stor: pv2 resources: requests: storage: 2Gi --- apiVersion: v1 kind: PersistentVolumeClaim metadata: name: pvc3 spec: accessModes: ["ReadOnlyMany" ] selector: matchLabels: stor: pv3 resources: requests: storage: 3Gi EOF kubectl apply -f pvc.yaml kubectl get pvc NAME STATUS VOLUME CAPACITY ACCESS MODES STORAGECLASS AGE pvc1 Bound jintai-pv1 1536Mi RWO 54s pvc2 Bound jintai-pv2 2Gi RWX 54s pvc3 Bound jintai-pv3 3Gi ROX 54s cat > pod-pvc.yaml << EOF apiVersion: apps/v1 kind: Deployment metadata: name: pod-pvc1 spec: replicas: 3 selector: matchLabels: stor: pvc template: metadata: labels: stor: pvc spec: containers: - name: test image: docker.io/library/nginx imagePullPolicy: IfNotPresent volumeMounts: - mountPath: /usr/share/nginx/html name: pvc1 volumes: - name: pvc1 persistentVolumeClaim: claimName: pvc1 --- apiVersion: apps/v1 kind: Deployment metadata: name: pod-pvc2 spec: replicas: 3 selector: matchLabels: stor: pvc template: metadata: labels: stor: pvc spec: containers: - name: test image: docker.io/library/nginx imagePullPolicy: IfNotPresent volumeMounts: - mountPath: /usr/share/nginx/html name: pvc2 volumes: - name: pvc2 persistentVolumeClaim: claimName: pvc2 --- apiVersion: apps/v1 kind: Deployment metadata: name: pod-pvc3 spec: replicas: 3 selector: matchLabels: stor: pvc template: metadata: labels: stor: pvc spec: containers: - name: test image: docker.io/library/nginx imagePullPolicy: IfNotPresent volumeMounts: - mountPath: /usr/share/nginx/html name: pvc3 volumes: - name: pvc3 persistentVolumeClaim: claimName: pvc3 EOF kubectl apply -f pod-pvc.yaml kubectl get pods -owide NAME READY STATUS RESTARTS AGE IP NODE NOMINATED NODE READINESS GATES pod-pvc1-69b655447-5zmjn 1 /1 Running 0 95s 10.10 .179 .12 ws-k8s-node1 <none> <none> pod-pvc1-69b655447-crnfr 1 /1 Running 0 95s 10.10 .179 .11 ws-k8s-node1 <none> <none> pod-pvc1-69b655447-kzpf5 1 /1 Running 0 95s 10.10 .234 .75 ws-k8s-node2 <none> <none> pod-pvc2-697979cddb-6x658 1 /1 Running 0 95s 10.10 .179 .13 ws-k8s-node1 <none> <none> pod-pvc2-697979cddb-bxcxm 1 /1 Running 0 95s 10.10 .179 .15 ws-k8s-node1 <none> <none> pod-pvc2-697979cddb-zffwh 1 /1 Running 0 95s 10.10 .234 .74 ws-k8s-node2 <none> <none> pod-pvc3-7588fbc489-2v8pt 1 /1 Running 0 95s 10.10 .179 .14 ws-k8s-node1 <none> <none> pod-pvc3-7588fbc489-5scpd 1 /1 Running 0 95s 10.10 .234 .76 ws-k8s-node2 <none> <none> pod-pvc3-7588fbc489-b7cp9 1 /1 Running 0 95s 10.10 .234 .77 ws-k8s-node2 <none> <none> kubectl exec -it pod-pvc1-69b655447-5zmjn -- /bin/bash cd /usr/share/nginx/html/ touch 11 exit kubectl exec -it pod-pvc1-69b655447-kzpf5 -- /bin/bash ls /usr/share/nginx/html/11 /usr/share/nginx/html/11 root@pod-pvc3-7588fbc489-b7cp9:/# touch 123454 /usr/share/nginx/html/ root@pod-pvc3-7588fbc489-b7cp9:/# root@pod-pvc3-7588fbc489-b7cp9:/# ls /usr/share/nginx/html/ root@pod-pvc3-7588fbc489-b7cp9:/# 无输出 kubectl delete -f pod-pvc.yaml kubectl delete -f pvc.yaml kubectl delete -f jintai-PV.yaml kubectl apply -f jintai-PV.yaml kubectl apply -f pvc.yaml kubectl apply -f pod-pvc.yaml kubectl exec -it pod-pvc1-69b655447-46h5h -- /bin/bash ls /usr/share/nginx/html/ 11 vim jintai-PV.yaml ... capacity: storage: 1. 5Gi persistentVolumeReclaimPolicy: Delete --- ... kubectl delete -f pod-pvc.yaml kubectl delete -f pvc.yaml kubectl delete -f jintai-PV.yaml kubectl apply -f jintai-PV.yaml kubectl apply -f pvc.yaml kubectl apply -f pod-pvc.yaml cat > pod-test.yaml << EOF apiVersion: v1 kind: Pod metadata: name: pod-pvc-test spec: containers: - name: test10 image: docker.io/library/nginx imagePullPolicy: IfNotPresent volumeMounts: - mountPath: /usr/share/nginx/html name: pvc1 volumes: - name: pvc1 persistentVolumeClaim: claimName: pvc1 EOF kubectl apply -f pod-test.yaml kubectl exec -it pod-pvc-test -- /bin/bash cd /usr/share/nginx/html/ mkdir 123 exit kubectl exec -it pod-pvc1-69b655447-7lxwl -- /bin/bash ls /usr/share/nginx/html/ 123 12345 kubectl delete -f pod-test.yaml ls /usr/share/nginx/html/ 123 12345 kubectl delete -f pod-pvc.yaml kubectl delete -f pvc.yaml kubectl delete -f jintai-PV.yaml
StorageClass创建pv 1 2 3 4 5 6 7 8 9 10 11 12 13 14 15 16 17 18 19 20 21 22 23 24 25 26 27 28 29 30 31 32 33 34 35 36 37 38 39 40 41 42 43 44 45 46 47 48 49 50 51 52 53 54 55 56 57 58 59 60 61 62 63 64 65 66 67 68 69 70 71 72 73 74 75 76 77 78 79 80 81 82 83 84 85 86 87 88 89 90 91 92 93 94 95 96 97 98 99 100 101 102 103 104 105 106 107 108 109 110 111 112 113 114 115 116 117 118 119 120 121 122 123 124 125 126 127 128 129 130 131 132 133 kubectl explain storageclass allowVolumeExpansion <boolean> allowedTopologies <[]Object> apiVersion <string> kind <string> metadata <Object> mountOptions <[]string> parameters <map[string]string> provisioner <string> -required- reclaimPolicy <string> volumeBindingMode <string> mkdir -p /dirfornfs/nfs echo "/dirfornfs/nfs *(rw,no_root_squash)" >> /etc/exports exportfs -arv systemctl restart nfs cat > serviceaccount.yaml << EOF apiVersion: v1 kind: ServiceAccount metadata: name: nfs-provisioner EOF kubectl apply -f serviceaccount.yaml kubectl create clusterrolebinding nfs-provisioner-clusterrolebinding --clusterrole=cluster-admin --serviceaccount=default:nfs-provisioner cat > nfs.yaml << EOF kind: Deployment apiVersion: apps/v1 metadata: name: nfs-provisioner spec: selector: matchLabels: app: nfs-provisioner replicas: 1 strategy: type: Recreate template: metadata: labels: app: nfs-provisioner spec: serviceAccount: nfs-provisioner containers: - name: nfs-provisioner image: registry.cn-beijing.aliyuncs.com/mydlq/nfs-subdir-external-provisioner:v4.0.0 imagePullPolicy: IfNotPresent volumeMounts: - name: nfs-client-root mountPath: /persistentvolumes env: - name: PROVISIONER_NAME value: example.com/nfs - name: NFS_SERVER value: 192.168 .8 .159 - name: NFS_PATH value: /dirfornfs/nfs/ volumes: - name: nfs-client-root nfs: server: 192.168 .8 .159 path: /dirfornfs/nfs/ EOF kubectl apply -f nfs.yaml cat > nfs-storageclass.yaml << EOF kind: StorageClass apiVersion: storage.k8s.io/v1 metadata: name: nfs provisioner: example.com/nfs EOF kubectl apply -f nfs-storageclass.yaml cat > pvc.yaml << EOF kind: PersistentVolumeClaim apiVersion: v1 metadata: name: test spec: accessModes: ["ReadWriteMany" ] resources: requests: storage: 1Gi storageClassName: nfs EOF kubectl apply -f pv-sc.yaml kubectl get pv NAME CAPACITY ACCESS MODES RECLAIM POLICY STATUS CLAIM STORAGECLASS REASON AGE pvc-660c088b-c9ba-412b-8c54-7d0716844b24 1Gi RWX Delete Bound default/claim-test nfs 2m58s kubectl get pvc NAME STATUS VOLUME CAPACITY ACCESS MODES STORAGECLASS AGE test Bound pvc-660c088b-c9ba-412b-8c54-7d0716844b24 1Gi RWX nfs 3m13s cat > pvc-test.yaml << EOF kind: Pod apiVersion: v1 metadata: name: read-pod spec: containers: image: nginx imagePullPolicy: IfNotPresent volumeMounts: - name: nfs-pvc mountPath: /usr/share/nginx/html restartPolicy: "Never" volumes: persistentVolumeClaim: claimName: test EOF kubectl apply -f pvc-test.yaml kubectl get pods NAME READY STATUS RESTARTS AGE nfs-provisioner-5468dbd878-95jmz 1 /1 Running 0 15m read-pod 1 /1 Running 0 14m ls /dirfornfs/nfs/ default-claim-test-pvc-f2f469c5-df7d-44a8-8ddb-adb9744fb528 kubectl delete -f pvc-test.yaml
Statefulset控制器 StatefulSet是Kubernetes中的一种控制器(Controller),用于管理有状态应用程序的部署和管理。与Deployment控制器不同,StatefulSet被设计用于管理需要稳定网络标识和有序部署的有状态应用程序。
有状态服务在内部保存和管理状态或数据,具有稳定的标识和顺序依赖,不能随意修改名称或者状态的。而无状态服务不保留持久状态,可以简单地水平扩展并且无关顺序。选择使用有状态服务还是无状态服务取决于应用程序的需求、复杂性和可伸缩性要求。
yaml编写 1 2 3 4 5 6 7 8 9 10 11 12 13 14 15 16 17 18 19 20 21 22 23 24 25 26 27 28 29 30 31 32 33 34 35 36 37 38 39 40 41 42 43 44 45 46 47 48 49 50 51 52 53 54 55 56 57 58 59 60 61 62 63 64 65 66 67 68 69 70 71 72 73 74 75 76 77 78 79 80 81 82 83 84 85 86 87 88 89 90 91 kubectl explain sts echo " apiVersion: apps/v1 kind: StatefulSet metadata: name: test spec: replicas: 2 serviceName: svc-sta #关联创建的service selector: #关联pod matchLabels: app: nginx volumeClaimTemplates: #使用卷申请模板,自动从存储卷取得存储pv和pvc进行绑定 - metadata: name: nginx-html spec: accessModes: [" ReadWriteMany"] storageClassName: nfs resources: requests: storage: 1Gi template: metadata: labels: app: nginx spec: containers: - name: test-nginx image: docker.io/library/nginx imagePullPolicy: IfNotPresent ports: - containerPort: 80 volumeMounts: - name: nginx-html mountPath: /usr/share/nginx/html --- apiVersion: v1 kind: Service metadata: name: svc-sta spec: clusterIP: None ports: - port: 80 selector: app: nginx " > statefulset.yaml kubectl apply -f statefulset.yaml #使用我之前创建的存储类nfs kubectl get pods NAME READY STATUS RESTARTS AGE nfs-provisioner-5468dbd878-nf8n5 1/1 Running 0 48s test-0 1/1 Running 0 11s test-1 1/1 Running 0 8s kubectl get pvc NAME STATUS VOLUME CAPACITY ACCESS MODES STORAGECLASS AGE nginx-test-0 Bound pvc-bfd92daa-01a1-43e2-83df-03521105cd11 1Gi RWX nfs 4m3s nginx-test-1 Bound pvc-36143720-774f-47f7-8db1-b160d0909154 1Gi RWX nfs 4m #在master2中查看存储(存储类自动创建的,分别为每个pod创建了一个pvc ls /dirfornfs/nfs/ default-nginx-test-0-pvc-bfd92daa-01a1-43e2-83df-03521105cd11 default-nginx-test-1-pvc-36143720-774f-47f7-8db1-b160d0909154 # #虽然service没有IP,但是看describe能看到endpoint关联了pod的ip:port #并且有相关联的dns解析的域名 格式:pod名.service名.service的ns.svc.cluster.local test-0.svc-sta.default.svc.cluster.local test-1.svc-sta.default.svc.cluster.local #尝试删除pod kubectl delete pod test-0 kubectl get pods #可以看到test-0新创建出来了,并且名字相同 NAME READY STATUS RESTARTS AGE busybox 1/1 Running 0 8m44s nfs-provisioner-5468dbd878-nf8n5 1/1 Running 0 53m read-pod 1/1 Running 0 44m test-0 1/1 Running 0 5s test-1 1/1 Running 0 52m #从另外的pod中curl这个域名,可以看到能看到网页内容 #并且就算删除了pod,虽然pod的ip变化了,但是如果指定了域名,那么还是能够访问到 curl test-0.svc-sta.default.svc.cluster.local <html> <head><title>403 Forbidden</title></head> <body> <center><h1>403 Forbidden</h1></center> <hr><center>nginx/1.25.3</center> </body> </html>
statefulSet扩容缩容与更换镜像 1 2 3 4 5 6 7 8 9 10 11 12 13 14 15 16 17 18 19 20 21 22 23 24 25 26 27 28 29 30 31 32 33 34 35 36 37 38 39 40 41 42 43 44 45 46 47 48 49 50 51 52 53 54 55 56 57 58 59 60 61 62 63 64 65 66 67 68 69 70 71 72 73 74 75 76 77 78 79 80 81 82 83 84 85 86 87 88 89 90 91 92 93 94 95 96 97 98 99 100 101 102 103 104 105 106 107 108 109 110 111 112 113 114 115 116 117 118 119 120 121 122 123 124 125 126 127 128 129 130 131 132 133 134 135 136 137 138 139 140 141 142 143 144 145 146 147 148 149 150 151 152 153 154 155 156 157 158 159 160 161 162 163 164 165 166 167 168 169 170 171 172 173 174 ... spec: replicas: 4 serviceName: svc-sta ... kubectl apply -f statefulset.yaml kubectl get pods NAME READY STATUS RESTARTS AGE nfs-provisioner-5468dbd878-nf8n5 1/1 Running 0 75m test-0 1/1 Running 0 22m test-1 1/1 Running 0 74m test-2 1/1 Running 0 7s test-3 1/1 Running 0 5s ... spec: replicas: 1 serviceName: svc-sta ... kubectl apply -f statefulset.yaml kubectl get pods NAME READY STATUS RESTARTS AGE nfs-provisioner-5468dbd878-nf8n5 1/1 Running 0 76m test-0 1/1 Running 0 23m kubectl explain sts.spec.updateStrategy rollingUpdate <Object> type <string>可选type 类型有: OnDelete( RollingUpdate(滚动更新 kubectl explain sts.spec.updateStrategy.rollingUpdate maxUnavailable <string> (最多不可用pod数或百分比 partition <integer > (最少的可用pod数或百分比 cat > statefulset.yaml << EOF apiVersion: apps/v1 kind: StatefulSet metadata: name: test spec: replicas: 4 serviceName: svc-sta #关联创建的service selector: #关联pod matchLabels: app: nginx updateStrategy: #默认type字段为RollingUpdate rollingUpdate: maxUnavailable: 0 #最多不可用pod数量为0,即逐个进行更新 partition: 1 #将序号>=1的pod做更新 volumeClaimTemplates: #卷申请模板,自动从存储卷取得存储 - metadata: name: nginx spec: accessModes: ["ReadWriteMany"] storageClassName: nfs resources: requests: storage: 1Gi template: metadata: labels: app: nginx spec: containers: - name: test-nginx image: docker.io/library/nginx:1.21 imagePullPolicy: IfNotPresent ports: - containerPort: 80 volumeMounts: - name: nginx mountPath: /usr/share/nginx/html --- apiVersion: v1 kind: Service metadata: name: svc-sta spec: clusterIP: None #设置service没有ip ports: - port: 80 selector: app: nginx EOF kubectl apply -f statefulset.yaml ... image: docker.io/library/nginx:latest ... kubectl apply -f statefulset.yaml kubectl get pods -w NAME READY STATUS RESTARTS AGE nfs-provisioner-5468dbd878-nf8n5 1/1 Running 0 112m read-pod 1/1 Running 0 103m test-0 1/1 Running 0 59m test-1 1/1 Running 0 80s test-2 1/1 Running 0 79s test-3 1/1 Running 0 78s test-3 1/1 Terminating 0 100s test-3 1/1 Terminating 0 100s test-3 0/1 Terminating 0 100s test-3 0/1 Terminating 0 100s test-3 0/1 Terminating 0 100s test-3 0/1 Pending 0 0s test-3 0/1 Pending 0 0s test-3 0/1 ContainerCreating 0 0s test-3 0/1 ContainerCreating 0 1s test-3 1/1 Running 0 1s test-2 1/1 Terminating 0 102s test-2 1/1 Terminating 0 103s test-2 0/1 Terminating 0 104s test-2 0/1 Terminating 0 104s test-2 0/1 Terminating 0 104s test-2 0/1 Pending 0 0s test-2 0/1 Pending 0 0s test-2 0/1 ContainerCreating 0 0s test-2 0/1 ContainerCreating 0 0s test-2 1/1 Running 0 1s test-1 1/1 Terminating 0 106s test-1 1/1 Terminating 0 106s test-1 0/1 Terminating 0 106s test-1 0/1 Terminating 0 106s test-1 0/1 Terminating 0 106s test-1 0/1 Pending 0 0s test-1 0/1 Pending 0 0s test-1 0/1 ContainerCreating 0 0s test-1 0/1 ContainerCreating 0 1s test-1 1/1 Running 0 1s test-2 1/1 Running 0 4s test-1 1/1 Running 0 15s test-3 1/1 Running 0 19s ... updateStrategy: type : OnDelete ... image: docker.io/library/nginx:latest ... kubectl apply -f statefulset.yaml kubectl delete -f statefulset.yaml kubectl apply -f statefulset.yaml test-0 0/1 ContainerCreating 0 <invalid> test-0 0/1 ContainerCreating 0 <invalid> test-0 1/1 Running 0 <invalid> test-1 0/1 Pending 0 <invalid> test-1 0/1 Pending 0 <invalid> test-1 0/1 ContainerCreating 0 <invalid> test-1 0/1 ContainerCreating 0 <invalid> test-1 1/1 Running 0 <invalid> test-2 0/1 Pending 0 <invalid> test-2 0/1 Pending 0 <invalid> test-2 0/1 ContainerCreating 0 <invalid> test-2 0/1 ContainerCreating 0 <invalid> test-2 1/1 Running 0 <invalid> test-3 0/1 Pending 0 <invalid> test-3 0/1 Pending 0 <invalid> test-3 0/1 ContainerCreating 0 <invalid> test-3 0/1 ContainerCreating 0 <invalid> test-3 0/1 ContainerCreating 0 <invalid> test-1 1/1 Running 0 <invalid> test-3 1/1 Running 0 <invalid>
DaemonSet控制器 DaemonSet控制器是一种用于在每个节点上运行Pod副本的控制器。他能确保在集群中的每个节点上都会运行一个Pod副本。当有新节点加入集群时,DaemonSet会自动在新节点上创建一个Pod副本,以确保在整个集群中的每个节点上都存在相应的Pod,并且支持平滑扩展,支持亲和性和污点,支持滚动更新等
1 2 3 4 5 6 7 8 9 10 11 12 13 14 15 16 17 18 19 20 21 22 23 24 25 26 27 28 29 30 31 32 33 34 35 36 37 38 39 40 41 42 43 44 45 46 47 48 49 50 51 52 53 54 55 56 57 58 59 60 61 62 63 64 65 66 67 68 69 70 71 72 73 74 75 76 kubectl explain ds mkdir -p /test/logtouch /test/log/dsTaints: node-role.kubernetes.io/control-plane:NoSchedule cat > ds.yaml << EOF apiVersion: apps/v1 kind: DaemonSet metadata: name: ds-test labels: app: ds spec: minReadySeconds: 5 #初始化等待时间 selector: matchLabels: name: fluentd #与template中的labels一样,以此为依据 # updateStrategy: #更新策略 template: metadata: name: ds-pod labels: name: fluentd spec: tolerations: #要在master节点上部署pod,则需要定义污点容忍度 - key: node-role.kubernetes.io/control-plane effect: NoSchedule containers: - name: ds-pod image: fluentd:latest #使用其他镜像亦可 imagePullPolicy: IfNotPresent resources: requests: #requests字段可选cpu、memory、hugepages memory: '1Gi' cpu: '200m' limits: cpu: '200m' memory: '1Gi' volumeMounts: - name: ds mountPath: /test/log volumes: - name: ds hostPath: path: /test/log EOF kubectl apply -f ds.yaml kubectl get pods -owide NAME READY STATUS RESTARTS AGE IP NODE NOMINATED NODE READINESS GATES ds-test-hdjqf 1/1 Running 0 37s 10.10.234.111 ws-k8s-node2 <none> <none> ds-test-qrgj2 1/1 Running 0 37s 10.10.189.215 ws-k8s-master1 <none> <none> ds-test-z7swf 1/1 Running 0 37s 10.10.250.3 ws-k8s-master2 <none> <none> ds-test-zk6pl 1/1 Running 0 37s 10.10.179.56 ws-k8s-node1 <none> <none> kubectl get ds NAME DESIRED CURRENT READY UP-TO-DATE AVAILABLE NODE SELECTOR AGE ds-test 4 4 4 4 4 <none> 3m3s ... updateStrategy: rollingUpdate: maxUnavailable: ... kubectl set image <控制器类型> <控制器名称> <container名称>=<镜像名称> kubectl set image daemonsets ds-test ds-pod=ikubernetes/nginx:1.21 kubectl set image daemonsets ds-test ds-pod=xianchao/fluentd:v2.5.1
job与cronjob控制器 job控制器 Job控制器用于管理Pod对象运行一次性任务 ,启动一个pod,这个pod专门用来完成某个任务,不需要重启,而是将Pod对象置于”Completed”(完成)状态,若容器中的进程因错误而终止,则需要按照重启策略配置确定是否重启,对于Job这个类型的控制器来说,需不需要重建pod就看任务是否完成,完成就不需要重建,没有完成就需要重建pod
Job三种使用场景:
Job的主要参数:
Cronjob控制器 CronJob跟Job完成的工作是一样的,只不过CronJob添加了定时任务能力可以指定时间,实现周期性运行。Job,CronJob和Deployment,DaemonSet显著区别在于不需要持续在后台运行
使用场景:
CronJob的典型用法如下:
使用job 1 2 3 4 5 6 7 8 9 10 11 12 13 14 15 16 17 18 19 20 21 22 23 24 25 26 27 28 29 30 31 vim job.yaml "" " completions:完成该Job需要执行成功的Pod数 parallelism:能够同时运行的Pod数 backoffLimit:允许执行失败的Pod数(重启几次) activeDeadlineSeconds: Job的超时时间 " "" apiVersion: batch/v1 kind: Job metadata: name: job-test spec: completions: 5 parallelism: 3 backoffLimit: 5 activeDeadlineSeconds: 180 template: spec: restartPolicy: Never containers: - name: job image: busybox imagePullPolicy: IfNotPresent command: - /bin/sh - -c - echo "123456" ; sleep 60 ; echo "qwertyu" kubectl apply -f job.yaml
使用Cronjob 1 2 3 4 5 6 7 8 9 10 11 12 13 14 15 16 17 18 19 20 21 22 vim cronjob.yaml apiVersion: batch/v1 kind: CronJob metadata: name: cronjob-test spec: schedule: "*/10 * * * *" jobTemplate: spec: template: spec: containers: - name: date image: busybox imagePullPolicy: IfNotPresent command: - /bin/sh - -c - date restartPolicy: OnFailure kubectl apply -f cronjob.yaml
下图对比pod的状态与输出
configmap配置管理中心 configmap是k8s中的一种资源对象,用以保存非机密性的配置
满足了变更大批量配置的需求,允许动态的管理需求
configmap不能保存大量数据,在configmap中保存的数据不能超过1MiB
环境介绍 从本节开始我更换了环境,做简要说明
虚机环境:
容器环境:
网络环境:
软件说明:
1 2 3 4 5 6 7 8 9 10 11 FROM 192.168.8.10:1000/hcie-cloud/centos:7.6.1810 WORKDIR /opt/solo COPY http.repo /etc/yum.repos.d/ COPY solo-v4.4.0.zip . RUN yum -y install unzip && unzip solo-v4.4.0.zip ADD openjdk-12.0.2_linux-x64_bin.tar.gz /opt COPY local.properties . RUN rm -rf /etc/yum.repos.d/C* && rm -rf solo-v4.4.0.zip ENV PATH=/usr/local/sbin:/usr/local/bin:/usr/sbin:/usr/bin:/root/bin:/opt/jdk-12.0.2/bin ENTRYPOINT java -cp "lib/*:." org.b3log.solo.Server
configmap的创建方法 1 2 3 4 5 6 7 8 9 10 11 12 13 14 15 16 17 18 19 20 21 22 23 24 25 26 27 28 29 30 31 32 33 34 35 36 37 38 39 40 41 42 43 44 45 46 47 48 49 50 51 52 53 54 55 56 57 58 59 60 61 62 63 64 65 66 67 68 69 70 71 72 73 74 75 76 77 78 79 80 81 82 83 84 85 86 87 88 89 90 91 92 93 94 95 96 97 98 99 100 101 102 103 104 105 106 107 108 109 110 111 112 113 114 115 116 117 118 119 120 121 122 123 124 125 126 127 128 129 kubectl create configmap 参数 --from-literal=<key>=<value> 使用键值对的形式直接指定配置参数 --from-file=<文件路径> 从文件中读取,可指定多个 --namespace=<命名空间> --output=...:指定输出的格式。可以选择的选项包括 json、yaml、name、wide 等 -save-config:将当前的配置保存到配置文件中 --dry-run=client:不真正创建,而是模拟API请求 1.在命令行中直接指定configmap参数创建 kubectl create configmap solo-blog --from-literal=solo_port=8080 kubectl describe cm solo-blog Name: solo-blog Namespace: default Labels: <none> Annotations: <none> Data ==== solo_port: ---- 8080 BinaryData kubectl delete configmap solo-blog 2.通过文件方式创建 mkdir cmcd cm/cat > solo-blog.yaml << EOF server { solo_port 8080 } EOF kubectl create configmap solo-blog2 --from-file=/root/cm/solo-blog.yaml kubectl describe cm solo-blog2 Name: solo-blog2 Namespace: default Labels: <none> Annotations: <none> Data ==== solo-blog.yaml: ---- server { solo_port 8080 } BinaryData ==== kubectl delete configmap solo-blog2 3.通过指定目录创建configmap mv solo-blog.yaml solo-blog.cnfecho "MYSQL_HOST=192.168.8.12" > solo-blog.cnfcat > solo-blog2.cnf << EOF MYSQL_HOST=192.168.8.14 EOF kubectl create configmap solo-blog3 --from-file=/root/cm/ kubectl describe cm solo-blog3 Name: solo-blog3 Namespace: default Labels: <none> Annotations: <none> Data ==== solo-blog.cnf: ---- MYSQL_HOST=192.168.8.12 solo-blog2.cnf: ---- MYSQL_HOST=192.168.8.14 BinaryData ==== Events: <none> kubectl delete configmap solo-blog3 4.在yaml文件创建cm cd ~/cmcat > cm.yaml << EOF apiVersion: v1 kind: ConfigMap metadata: name: solo-blog labels: app: blog data: MYSQL_HOST: 192.168.8.12 # 添加配置项(变量) solo-blog.cnf: | # 添加配置文件,|表示添加多行 [solo-blog] PATH=/NFS/jkd12.0.2/bin:/usr/local/sbin:/usr/local/bin:/usr/sbin:/usr/bin:/root/binEOF EOF kubectl apply -f cm.yaml kubectl describe cm solo-blog Name: solo-blog Namespace: default Labels: app=blog Annotations: <none> Data ==== MYSQL_HOST: ---- 192.168.8.12 solo-blog.cnf: ---- [solo-blog] PATH=/NFS/jkd12.0.2/bin:/usr/local/sbin:/usr/local/bin:/usr/sbin:/usr/bin:/root/binEOF BinaryData ==== Events: <none> kubectl delete -f cm.yaml
configmap的使用 使用configMapKeyRef 1 2 3 4 5 6 7 8 9 10 11 12 13 14 15 16 17 18 19 20 21 22 23 24 25 26 27 28 29 30 31 32 33 34 35 36 37 38 39 40 41 42 43 44 45 46 47 48 49 50 51 52 53 54 55 56 57 58 59 60 61 62 63 64 65 66 67 68 69 kubectl explain pod.spec.containers.env.valueFrom configMapKeyRef <Object> fieldRef <Object> resourceFieldRef <Object> secretKeyRef <Object> cat > cm1.yaml << EOF apiVersion: v1 kind: ConfigMap metadata: name: solo-blog labels: app: blog data: MYSQL_HOST: 192.168.8.12 PATH: /NFS/jdk-12.0.2/bin:/usr/local/sbin:/usr/local/bin:/usr/sbin:/usr/bin:/root/bin EOF kubectl apply -f cm.yaml kubectl get cm NAME DATA AGE kube-root-ca.crt 1 55d solo-blog 2 1s cat > pod-cm.yaml << EOF apiVersion: v1 kind: Pod metadata: name: blog labels: app: solo-blog spec: containers: - name: solo image: docker.io/library/solo:1.0 imagePullPolicy: IfNotPresent volumeMounts: - name: nfs mountPath: /NFS ports: - containerPort: 8080 env: - name: PATH valueFrom: configMapKeyRef: name: solo-blog key: PATH volumes: - name: nfs nfs: path: /NFS server: 192.168.8.159 EOF kubectl apply -f pod-cm.yaml NAME READY STATUS RESTARTS AGE IP NODE NOMINATED NODE READINESS GATES blog 1/1 Running 11 (29m ago) 47h 10.10.234.125 ws-k8s-node2 <none> <none> curl 10.10.234.125:8080 kubectl exec -it blog -- /bin/bash echo $PATH
使用envFrom 1 2 3 4 5 6 7 8 9 10 11 12 13 14 15 16 17 18 19 20 21 22 23 24 25 26 27 28 29 30 31 32 33 34 35 36 37 38 39 40 41 42 43 44 45 46 直接将cm的整体注入Container中 kubectl explain pod.spec.containers.envFrom configMapRef <Object> prefix <string> secretRef <Object> cat > pod-cm2.yaml << EOF apiVersion: v1 kind: Pod metadata: name: blog2 labels: app: solo-blog spec: containers: - name: solo2 image: docker.io/library/solo:1.0 imagePullPolicy: IfNotPresent volumeMounts: - name: nfs mountPath: /NFS ports: - containerPort: 8080 envFrom: - configMapRef: name: solo-blog volumes: - name: nfs nfs: path: /NFS server: 192.168.8.159 EOF kubectl apply -f pod-cm2.yaml kubectl get pods -owide NAME READY STATUS RESTARTS AGE IP NODE NOMINATED NODE READINESS GATES blog 1/1 Running 11 (92m ago) 2d 10.10.234.125 ws-k8s-node2 <none> <none> blog2 1/1 Running 0 12m 10.10.234.126 ws-k8s-node2 <none> <none> curl 10.10.234.126:8080 kubectl exec -it blog2 -- /bin/bash echo $PATH
将cm制作成volume进行挂载 1 2 3 4 5 6 7 8 9 10 11 12 13 14 15 16 17 18 19 20 21 22 23 24 25 26 27 28 29 30 31 32 33 34 35 36 37 38 39 40 41 42 43 44 45 46 47 48 49 50 51 52 53 54 55 56 57 58 59 60 61 62 63 64 65 66 67 68 69 70 71 72 73 cat > cm2.yaml << EOF apiVersion: v1 kind: ConfigMap metadata: name: solo-blog2 labels: app: blog data: local.properties: | runtimeDatabase=MYSQL jdbc.username=root jdbc.password=Admin@123! jdbc.driver=com.mysql.cj.jdbc.Driver jdbc.URL=jdbc:mysql://192.168.8.12:3306/solo?useUnicode=yes&characterEncoding=UTF-8&useSSL=false&serverTimezone=UTC&allowPublicKeyRetrieval=true jdbc.minConnCnt=5 jdbc.maxConnCnt=10 jdbc.tablePrefix=b3_solo #new #这是一个标记 EOF kubectl apply -f cm2.yaml kubectl get cm NAME DATA AGE kube-root-ca.crt 1 57d solo-blog 2 2d1h solo-blog2 2 14s cat > pod-cm3.yaml << EOF apiVersion: v1 kind: Pod metadata: name: blog3 labels: app: solo-blog spec: containers: - name: solo3 image: docker.io/library/solo:1.0 imagePullPolicy: IfNotPresent volumeMounts: - name: nfs mountPath: /NFS - name: solo mountPath: /tmp/test #配置文件放置位置,此目录必须为新目录,不然就会被覆盖 ports: - containerPort: 8080 envFrom: - configMapRef: #引入solo-blog的环境变量 name: solo-blog volumes: - name: nfs nfs: path: /NFS server: 192.168.8.159 - name: solo configMap: name: solo-blog2 #指定cm名 EOF kubectl apply -f pod-cm3.yaml kubectl exec -it blog3 -- /bin/bash ls /tmp/test/cat /tmp/test/local.properties
configmap热更新 1 2 3 4 5 6 7 8 9 10 11 12 13 14 15 16 17 18 19 20 21 22 23 24 25 26 27 28 29 30 31 32 33 34 35 36 37 38 39 40 41 42 43 44 45 46 47 48 49 可以通过用kubectl edit cm来进行滚动更新,热更新只支持volumes挂载的方式 因为volume是可变的,但cm配置文件不会变,就需要再次应用 ... lifecycle: postStart: exec : command : - /bin/bash - -c - cp /tmp/test/local.properties /opt/solo ... kubectl delete -f pod-cm3.yaml kubectl apply -f pod-cm3.yaml apiVersion: v1 kind: ConfigMap metadata: name: solo-blog labels: app: blog data: MYSQL_HOST: 192.168.8.12 PATH: /NFS/jdk-12.0.2/bin:/usr/local/sbin:/usr/local/bin:/usr/sbin:/usr/bin:/root/bin kubectl edit cm solo-blog2 ... jdbc.URL=jdbc:mysql://${MYSQL_HOST} :3306/solo?useUnicode=yes &characterEncoding=UTF-8&useSSL=false &serverTimezone=UTC&allowPublicKeyRetrieval=true ... kubectl exec -it blog3 -- /bin/bash echo $MYSQL_HOST 192.168.8.12 cat /tmp/test/local.propertiesruntimeDatabase=MYSQL jdbc.username=root jdbc.password=Admin@123! jdbc.driver=com.mysql.cj.jdbc.Driver jdbc.URL=jdbc:mysql://${MYSQL_HOST} :3306/solo?useUnicode=yes &characterEncoding=UTF-8&useSSL=false &serverTimezone=UTC&allowPublicKeyRetrieval=true jdbc.minConnCnt=5 jdbc.maxConnCnt=10 jdbc.tablePrefix=b3_solo
secret配置管理中心 secret一般用来保存密文数据,比如密码等
也可以用环境变量或者以卷的形式进行挂载
1 2 3 4 5 6 7 8 9 10 11 12 13 14 15 16 kubectl explain secret kind <string> stringData <map[string]string> type <string> generic 通用 tls 私钥和证书 docker-registry docker仓库的认证信息 Service account 用于被sa引用,会制动创建secret,并且会自动挂载至pod Opaque 默认类型,base64 格式的密码
…如下图
secret的使用 环境变量的引入 1 2 3 4 5 6 7 8 9 10 11 12 13 14 15 16 17 18 19 20 21 22 23 24 25 26 27 28 29 30 31 32 33 34 35 36 37 38 39 40 41 42 43 44 45 46 47 48 49 50 51 52 53 54 55 56 57 58 59 60 61 62 mkdir ~/seccd ~/sec/kubectl create secret generic sec1 --from-literal=MYSQL_PASSWORD=Admin@123! kubectl get secret NAME TYPE DATA AGE sec1 Opaque 2 20s kubectl describe secret sec1 Name: sec1 Namespace: default Labels: <none> Annotations: <none> Type: Opaque Data ==== MYSQL_PASSWORD: 10 bytes cat > pod-sec.yaml <<EOF apiVersion: v1 kind: Pod metadata: name: blog labels: app: solo-blog spec: containers: - name: solo image: docker.io/library/solo:1.0 imagePullPolicy: IfNotPresent volumeMounts: - name: nfs mountPath: /NFS ports: - containerPort: 8080 env: - name: MYSQL_PASSWORD #变量名 valueFrom: secretKeyRef: name: sec1 #sec名 key: MYSQL_PASSWORD #sec中的key,其value会被赋给变量名 volumes: - name: nfs nfs: path: /NFS server: 192.168.8.159 EOF kubectl apply -f pod-sec.yaml pod/blog created kubectl get pods NAME READY STATUS RESTARTS AGE blog 1/1 Running 0 5s kubectl exec -it blog -- /bin/bash echo ${MYSQL_PASSWORD} Admin@123!
作为volume挂载(常用) 1 2 3 4 5 6 7 8 9 10 11 12 13 14 15 16 17 18 19 20 21 22 23 24 25 26 27 28 29 30 31 32 33 34 35 36 37 38 39 40 41 42 43 44 45 46 47 48 49 50 51 52 53 54 55 56 57 58 59 60 61 62 63 64 echo -n 'Admin@123!' | base64 QWRtaW5AMTIzIQ== echo -n 'root' | base64 cm9vdA== cat > pod-sec2.yaml <<EOF apiVersion: v1 kind: Secret type: Opaque metadata: name: sec2 data: user: cm9vdA== passwd: QWRtaW5AMTIzIQ== --- apiVersion: v1 kind: Pod metadata: name: blog2 labels: app: solo-blog2 spec: containers: - name: solo2 image: docker.io/library/solo:1.0 imagePullPolicy: IfNotPresent volumeMounts: - name: nfs mountPath: /NFS - name: sec-volume mountPath: /etc/secret readOnly: true ports: - containerPort: 8080 volumes: - name: nfs nfs: path: /NFS server: 192.168.8.159 - name: sec-volume secret: secretName: sec2 #sec名称 EOF kubectl apply -f pod-sec2.yaml kubectl get pods kubectl exec -it blog2 -- /bin/bash cat /etc/secret/user root cat /etc/secret/passwd Admin@123! exit kubectl delete -f .
注: 用generic方式加密时在pod中会自动解密,安全性不高
RBAC基础概念 RBAC是基于角色的访问控制的简称Role-Based Access Control
认证方式:
1和2都是kubectl与apiserver的交互,kubectl是外部的管理命令行,都属于内外部的交互
kubeconfig文件(config资源):
可以通过kubectl get pods —kubeconfig=…来指定配置文件,跟ansible一样
账号分类 kubernetes中账户分为:UserAccounts(用户账户) 和 ServiceAccounts(服务账户)
UserAccounts ,用来给外部用户使用,默认账户是kubernetes-admin,也就是在kubeconfig中默认制定的用户,需要用证书进行签发
ServiceAccounts,给集群内部使用的,进程需要访问apiserver时,需要一个serviceaccount账号。SA账号以ns为区分,每个ns创建时都会有一个default service account,创建pod时如果没有指定service account就会自动使用ns的default sa
RBAC资源与认证策略 有四个资源对象Role、RoleBinding、ClusterRole和ClusterRoleBinding
授权方式:
2.user通过roleBinding绑定到clusterRole
3.user通过clusterroleBinding绑定到clusterRole
role 1 2 3 4 5 6 7 8 9 10 11 kubectl create ns ws apiVersion: rbac.authorization.k8s.io/v1 kind: Role metadata: namespace: ws name: pod-read rules: - apiGroups: ["" ] resources: ["pods" ] resourceNames: [] verbs: ["get" ,"watch" ,"list" ]
clusterrole 1 2 3 4 5 6 7 8 apiVersion: rbac.authorization.k8s.io/v1 kind: ClusterRole metadata: name: clusterrole-secrets rules: - apiGroups: ["" ] resources: ["secrets" ] verbs: ["get" ,"watch" ,"list" ]
rilebinding 1 2 3 4 5 6 7 8 9 10 11 12 13 14 15 16 17 18 19 20 21 22 23 24 25 26 27 28 29 30 apiVersion: rbac.authorization.k8s.io/v1 kind: RoleBinding metadata: name: bind namespace: ws subjects: - kind: User name: yonghu apiGroup: rbac.authorization.k8s.io roleRef: - kind: Role name: pod-read apiGroup: rbac.authorization.k8s.io apiVersion: rbac.authorization.k8s.io/v1 kind: RoleBinding metadata: name: bind-clsterrole namespace: ws subjects: - kind: User name: yonghu apiGroup: rbac.authorization.k8s.io roleRef: kind: ClusterRole name: cluster-admin apiGroup: rbac.authorization.k8s.io
准入插件 k8s的准入控制器有LimitRanger(默认)、ResourceQuota、ServiceAccount、PodSecurityPolicy(k8s1.25废弃了)等
查看当前k8s中的准入插件
1 2 3 cat /etc/kubernetes/manifests/kube-apiserver.yaml | grep enable-admission
使用SA 1 2 3 4 5 6 7 8 9 10 11 12 13 14 15 16 17 18 19 20 21 22 23 24 25 26 27 28 29 30 31 32 33 34 35 36 37 38 39 40 41 42 43 44 45 46 47 48 49 50 51 52 53 54 55 56 57 58 59 60 61 62 63 64 65 66 67 68 69 70 71 72 73 74 75 76 77 78 79 80 81 82 83 84 85 86 87 88 89 90 91 92 93 94 95 96 97 98 99 100 101 102 103 104 105 106 107 108 109 110 111 112 113 114 115 116 117 mkdir RBACcd RBAC/kubectl create sa sa-test kubectl get sa kubectl explain pod.spec serviceAccount <string> DeprecatedServiceAccount is a depreciated alias for ServiceAccountName. Deprecated: Use serviceAccountName instead. serviceAccountName <string> ServiceAccountName is the name of the ServiceAccount to use to run this pod. More info: https://kubernetes.io/docs/tasks/configure-pod-container/configure-service-account/ cat > pod-test.yaml << EOF apiVersion: v1 kind: Pod metadata: name: test labels: app: sa spec: serviceAccountName: sa-test containers: - name: test-sa ports: - containerPort: 8080 image: docker.io/library/solo:1.0 imagePullPolicy: IfNotPresent EOF kubectl apply -f pod-test.yaml kubectl get pods kubectl exec -it test -- /bin/bash cd /var/run/secrets/kubernetes.io/serviceaccount/ls curl --cacert ./ca.crt -H "Authorization: Bearer $(cat ./token) " \ https://kubernetes/api/v1/namespaces/kube-system { "kind" : "Status" , "apiVersion" : "v1" , "metadata" : {}, "status" : "Failure" , "message" : "namespaces \"kube-system\" is forbidden: User \"system:serviceaccount:default:sa-test\" cannot get resource \"namespaces\" in API group \"\" in the namespace \"kube-system\"" , "reason" : "Forbidden" , "details" : { "name" : "kube-system" , "kind" : "namespaces" }, "code" : 403 由于sa-test的sa权限不足,请求时会报错403 kubectl create clusterrolebinding sa-test-admin --clusterrole=cluster-admin \ --serviceaccount=default:sa-test curl --cacert ./ca.crt -H "Authorization: Bearer $(cat ./token) " \ https://kubernetes/api/v1/namespaces/kube-system { "kind" : "Namespace" , "apiVersion" : "v1" , "metadata" : { "name" : "kube-system" , "uid" : "4f07055e-7da0-461c-9c95-a4d8c21124bc" , "resourceVersion" : "12" , "creationTimestamp" : "2024-01-05T23:40:24Z" , "labels" : { "kubernetes.io/metadata.name" : "kube-system" }, "managedFields" : [ { "manager" : "kube-apiserver" , "operation" : "Update" , "apiVersion" : "v1" , "time" : "2024-01-05T23:40:24Z" , "fieldsType" : "FieldsV1" , "fieldsV1" : { "f:metadata" : { "f:labels" : { "." : {}, "f:kubernetes.io/metadata.name" : {} } } } } ] }, "spec" : { "finalizers" : [ "kubernetes" ] }, "status" : { "phase" : "Active" }
资源的引用 大多数资源都可以使用endpoint中的URL相对路径来引用
1 2 3 4 5 6 7 8 9 10 11 12 13 14 15 16 17 18 19 20 21 22 23 24 25 26 27 28 29 30 31 32 33 34 35 36 37 38 39 40 41 42 43 44 45 46 47 48 49 50 51 52 53 54 55 56 57 58 59 60 61 62 63 64 65 66 67 68 69 70 71 72 73 74 75 76 77 78 79 kubectl create ns ws kubectl create sa test -n ws cat > pod-log.yaml << EOF apiVersion: rbac.authorization.k8s.io/v1 kind: Role metadata: name: role-for-log namespace: ws rules: - apiGroups: ["" ] resources: ["pods" ,"pods/log" ] verbs: ["get" ,"list" ,"watch" ] --- apiVersion: rbac.authorization.k8s.io/v1 kind: RoleBinding metadata: name: bind namespace: ws subjects: - kind: ServiceAccount name: test apiGroup: rbac.authorization.k8s.io roleRef: kind: Role name: role-for-log apiGroup: rbac.authorization.k8s.io --- apiVersion: v1 kind: Pod metadata: name: pod namespace: ws spec: serviceAccountName: test containers: ports: - containerPort: 8080 image: docker.io/library/solo:1.0 imagePullPolicy: IfNotPresent EOF kubectl apply -f pod-log.yaml kubectl exec -it pod -n ws -- /bin/bash cd /var/run/secrets/kubernetes.io/serviceaccount/ curl --cacert ./ca.crt -H "Authorization: Bearer $(cat ./token)" \ https://kubernetes.default/api/v1/namespaces/default/pods/test/log "kind": "Status" , "apiVersion": "v1" , "metadata": {}, "status": "Failure" , "message": "pods \"test\" is forbidden: User \"system:serviceaccount:ws:test\" cannot get resource \"pods/log\" in API group \"\" in the namespace \"default\"" , "reason": "Forbidden" , "details": { "name": "test" , "kind": "pods" }, "code": 403 无法请求,因为该sa只在自己ns中生效,无权查看default的ns下的pod curl --cacert ./ca.crt -H "Authorization: Bearer $(cat ./token)" \ https://kubernetes.default/api/v1/namespaces/ws/pods/pod-test/log [INFO ]-[2024-03-06 10 :56:35]-[org.b3log.solo.Server:259]: Solo is booting [ver=4.4.0 , os=Linux , isDocker=true , inJar=false , luteAvailable=false , pid=1 , runtimeDatabase=MYSQL , runtimeMode=PRODUCTION , jdbc.username=root , jdbc.URL=jdbc:mysql://192.168.8.12:3306/solo?useUnicode=yes&characterEncoding=UTF-8&useSSL=false&serverTimezone=UTC&allowPublicKeyRetrieval=true ] [WARN ]-[2024-03-06 10 :56:35]-[org.b3log.solo.service.InitService:150]: Solo has not been initialized, please open your browser to init Solo 同理,也可以对其他类型的资源,进行其他类型的操作
RBAC常用授权操作 常用role与clusterRole定义 1 2 3 4 5 6 7 8 9 10 11 12 13 14 15 16 17 18 19 20 21 22 23 24 25 26 27 28 29 30 31 32 apiVersion: rbac.authorization.k8s.io/v1 kind: Role/ClusterRole metadata: name: <name> namespace: <ns> rules: - apiGroups: ["" ] resources: ["pods" ] verbs: ["get" ,"list" ,"watch" ] rules: - apiGroups: ["apps" ] resources: ["deployments" ] verbs: ["get" ,"list" ,"watch" ,"create" ,"update" ,"patch" ,"delete" ] rules: - apiGroups: ["" ] resources: ["pods" ] verbs: ["get" ,"list" ,"watch" ] - apiGroups: ["" ] resources: ["jobs" ] verbs: ["get" ,"list" ,"watch" ,"create" ,"update" ,"patch" ,"delete" ] rules: - apiGroups: ["" ] resources: ["configmaps" ] resourceNames: ["<cm>" ] verbs: ["get" ] rules: - apiGroups: ["" ] resources: ["nodes" ] verbs: ["get" ,"list" ,"watch" ] rules: - nonResourceURLs: ["/healthz" ,"/healthz/*" ] verbs: ["get" ,"post" ]
常用rolebinding 1 2 3 4 5 6 7 8 9 10 11 12 13 14 15 16 17 apiVersion: rbac.authorization.k8s.io/v1 kind: RoleBinding metadata: name: bind namespace: <ns-name> subjects: - kind: User name: ws apiGroup: rbac.authorization.k8s.io subjects: - kind: Group name: ws apiGroup: rbac.authorization.k8s.io subjects: - kind: ServiceAccount name: default namespace: kube-system
使用命令行进行roleBinding和clusterRoleBinding 1 2 3 4 5 6 7 8 9 10 11 12 13 14 15 16 17 18 19 20 21 22 23 24 25 26 27 28 29 30 kubectl create rolebinding <要创建的资源名> \ --clusterrole=<集群角色> --serviceaccount=<ns名>:<sa名> \ --namespace=<资源的ns名> \ ----user=<user名> kubectl create rolebinding sa-view \ --clusterrole=view --serviceaccount=<ns-name>:wangsheng --namespace=ws kubectl create rolebinding sas-view \ --clusterrole=view --group=system:serviceaccounts:wangsheng \ --namespace=wangsheng kubectl create clusterrolebinding sas-view \ --clusterrole=cluster-admin --group=system:serviceaccounts:wangsheng kubectl create rolebinding user-admin \ --clusterrole=admin --user=wangsheng --namespace=ws kubectl create clusterrolebinding cluster-binding \ --clusterrole=cluster-admin --user=root kubectl create clusterrolebinding service-account-binding \ --clusterrole=view --serviceaccount=root
User的创建与限制使用 1 2 3 4 5 6 7 8 9 10 11 12 13 14 15 16 17 18 19 20 21 22 23 24 25 26 27 28 29 30 31 32 33 34 35 36 37 38 39 40 41 42 43 44 45 46 47 48 49 50 51 52 53 54 55 56 57 58 59 60 61 62 63 64 65 66 67 68 69 70 71 72 73 74 75 76 77 78 79 80 81 82 83 84 85 86 87 88 89 90 91 92 93 94 95 96 97 98 99 100 101 102 103 104 105 106 107 108 109 110 111 112 113 114 115 116 117 118 119 120 121 122 123 124 125 126 127 128 129 130 131 132 133 134 135 136 137 138 139 140 141 cd /etc/kubernetes/pki/ umask 077 ; openssl genrsa -out wangsheng.key 2048 openssl req -new -key wangsheng.key -out wangsheng.csr -subj "/CN=wangsheng" openssl x509 -req -in wangsheng.csr -CA ca.crt -CAkey ca.key \ -CAcreateserial -out wangsheng.crt -days 3650 此时wangsheng已经被信任可以访问apiserver cd /root/.kube cp config config.bak cd /etc/kubernetes/pki/ kubectl config set-credentials wangsheng --client-certificate=./wangsheng.crt \ --client-key=./wangsheng.key --embed-certs=true kubectl config view 可以看到已经有了一个wangsheng用户 apiVersion: v1 clusters: - cluster: certificate-authority-data: DATA+OMITTED server: https://192.168.8.160:6443 name: kubernetes contexts: - context: cluster: kubernetes user: kubernetes-admin name: kubernetes-admin@kubernetes current-context: kubernetes-admin@kubernetes kind: Config preferences: {}users: - name: kubernetes-admin user: client-certificate-data: DATA+OMITTED client-key-data: DATA+OMITTED - name: wangsheng user: client-certificate-data: DATA+OMITTED client-key-data: DATA+OMITTED kubectl config set-context wangsheng@kubernetes --cluster=kubernetes \ --user=wangsheng 此时context中多了一个 apiVersion: v1 clusters: - cluster: certificate-authority-data: DATA+OMITTED server: https://192.168.8.160:6443 name: kubernetes contexts: - context: cluster: kubernetes user: kubernetes-admin name: kubernetes-admin@kubernetes - context: cluster: kubernetes user: wangsheng name: wangsheng@kubernetes current-context: kubernetes-admin@kubernetes kind: Config preferences: {}users: - name: kubernetes-admin user: client-certificate-data: DATA+OMITTED client-key-data: DATA+OMITTED - name: wangsheng user: client-certificate-data: DATA+OMITTED client-key-data: DATA+OMITTED kubectl config use-context wangsheng@kubernetes 此时查看kubeconfig, current-context: wangsheng@kubernetes kubectl config use-context kubernetes-admin@kubernetes kubectl create ns ws kubectl create rolebinding wangsheng-binding \ --clusterrole=cluster-admin --user=wangsheng --namespace=ws 如果操作出错了,将原本的Rolebinding删除重新创建即可 kubectl config use-context wangsheng@kubernetes kubectl get pods -n ws kubectl create sa 11111 -n ws 此时已经可以访问,并且具有修改权限 useradd xhy cp /root/.kube/config / vim /config mkdir /home/xhy/.kube/ -p cp /config /home/xhy/.kube cp -r /root/.kube/cache /home/xhy/.kube chown -R xhy:xhy /home/xhy passwd xhy kubectl get pods -n ws kubectl create sa 1111 -n ws 此时可以访问k8s,查看ns-ws内的内容,相当于此时xhy已经拥有了wangsheng的权限 wangsheng当前只有虽然具有clusterrole 但是因为使用的是rolebinding,所有wangsheng只具有ns ws内的权限 如果想创建一个用户xuehuiying,具有所有集群下的只读权限,则可以创建clusterrole 并使用clusterrolebinding将clusterrole进行绑定; 再创建普通用户xuehuiying2,重复上面的步骤: 删除/home/xuehuiying2/.kube/config中的admin部分 只保留xuehuiying的部分,此时xuehuiying2就拥有与xuehuiying一样的权限
ResourceQuota准入控制 ResourceQuota准入控制是k8s内置的准入控制器,默认就是启用状态。
用来限制ns级别下pod占用的资源
限制cpu mem pod dp数量 1 2 3 4 5 6 7 8 9 10 11 12 13 14 15 16 17 18 19 20 21 22 23 24 25 26 27 28 29 30 31 32 33 34 35 36 37 38 39 40 41 42 43 44 45 46 47 48 49 50 51 52 53 54 55 56 57 58 59 60 61 62 63 64 65 66 67 68 69 70 mkdir quota cd quota/ cat > quota.yaml << EOF apiVersion: v1 kind: ResourceQuota metadata: name: quota namespace: ws spec: hard: pods: "3" requests.cpu: "2" requests.memory: "2Gi" limits.cpu: "4" limits.memory: "4Gi" count/deployments.apps: "2" --- apiVersion: apps/v1 kind: Deployment metadata: name: quota namespace: ws spec: replicas: 4 selector: matchLabels: app: test template: metadata: labels: app: test namespace: ws spec: containers: - name: quota image: docker.io/library/solo:1.0 imagePullPolicy: IfNotPresent ports: - containerPort: 80 resources: requests: cpu: 100m memory: 100Mi limits: cpu: 1000m memory: 100Mi EOF kubectl apply -f quota.yaml kubectl get pods -n ws 只创建了两个副本,这个pod是本来就就有的,加上两个quota就有3个了,ns ws中就不能再创建更多pod kubectl describe quota -n ws Name: quota Namespace: ws Resource Used Hard -------- ---- ---- count/deployments.apps 1 2 limits.cpu 2 4 limits.memory 200Mi 4Gi pods 3 3 requests.cpu 200m 2 requests.memory 200Mi 2Gi
LimitRanger准入控制 LimitRanger准入控制是之前版本k8s的准入控制器,只限制单个pod资源的使用
如果创建pod时定义了资源上下限,但不满足LimitRange规则中定义的资源上下限,此时LimitRanger就会拒绝创建此pod;如果创建资源没有指定其资源限制,默认使用LimitRange规则中的默认资源限制
1 2 3 4 5 6 7 8 9 10 11 12 13 14 15 16 17 18 19 20 21 22 23 24 25 26 27 28 apiVersion: v1 kind: Namespace metadata: name: limit --- apiVersion: v1 kind: LimitRange metadata: name: limitR namespace: ws spec: limits: cpu: 1000m memory: 1000Mi defaultRequest: cpu: 500m memory: 500Mi min: cpu: 500m memory: 500Mi max: cpu: 2000m memory: 2000Mi maxLimitRequestRatio: cpu: 4 memory: 4 type: Container
ingress七层代理 四层负载与七层代理的区别:
四代负载基于vip+port,如果想要让服务被k8s集群外部访问,需要用nodeport类型,nodeport会在ip上绑定端口,每个服务都绑定一个端口会导致端口过多
七层负载是基于虚拟的URL或ip的负载均衡,除了根据VIP+port,还可以根据URL,语言,浏览器类别来进行负载均衡
ingress资源概述 Ingress 控制器 | Kubernetes
Ingress | Kubernetes
Ingress简单的理解就是你原来需要改Nginx配置,然后配置各种域名对应哪个 Service,现在把这个动作抽象出来,变成一个 Ingress 对象,你可以用 yaml 创建,直接改yaml。
ingress资源是用来管理ingress controller的,ingress controller能够实现nginx的负载均衡功能
ingress controller ingress controller是一个七层负载均衡调度器,将封装的nginx放到pod中运行
用户请求到达ingress controller,ingress controller根据ingress资源的配置,通过路由到四层service,service再转发至pod
ingress controller比虚机nginx的优点:如果是nginx,需要reload才可以生效,如果使用ingress controller,使用ingress维护配置时,会自动进行reload使配置生效
使用ingress controller代理的步骤 1.部署ingress controller(只需要做一次)
2.创建pod
3.创建service绑定pod
4.创建ingress http
5.创建ingress https
ingress controller高可用 Deployment+ nodeSeletor+pod反亲和性方式部署在k8s指定的两个work节点,nginx-ingress-controller这个pod共享宿主机ip,然后通过keepalive+nginx实现nginx-ingress-controller高可用
部署ingress controller 部署的yaml下载地址https://github.com/kubernetes/ingress-nginx/tree/main/deploy/static/provider/baremetal
1 2 3 4 5 6 7 8 9 10 11 12 13 14 15 16 17 18 19 20 21 22 23 24 25 26 27 28 29 30 31 32 33 34 35 36 37 38 39 40 41 42 43 44 ctr images pull registry.cn-hangzhou.aliyuncs.com/google_containers/nginx-ingress-controller:v1.1.0 ctr images pull registry.cn-hangzhou.aliyuncs.com/google_containers/kube-webhook-certgen:v1.1.1 mkdir ingress cd ingress/ kubectl apply -f deploy.yaml 版本过低可能会报错internal error,如果报错执行 kubectl delete -A ValidatingWebhookConfiguration ingress-nginx-admission kubectl get ns NAME STATUS AGE blue-green Active 50d default Active 61d ingress-nginx Active 18m kube-node-lease Active 61d kube-public Active 61d kube-system Active 61d ws Active 60d kubectl get pods -n ingress-nginx -owide NAME READY STATUS RESTARTS AGE IP NODE NOMINATED NODE READINESS GATES ingress-nginx-admission-create-rvbbw 0 /1 Completed 0 20m 10.10 .234 .75 ws-k8s-node2 <none> <none> ingress-nginx-admission-patch-jgpmd 0 /1 Completed 0 20m 10.10 .179 .39 ws-k8s-node1 <none> <none> ingress-nginx-controller-678b9b68c4-4p4lh 1 /1 Running 0 20m 192.168 .8 .162 ws-k8s-node2 <none> <none> ingress-nginx-controller-678b9b68c4-f4mn9 1 /1 Running 0 20m 192.168 .8 .161 ws-k8s-node1 <none> <none>
ingress controller的负载均衡和反向代理 使用keepalive+nginx对ingress controller做负载均衡和反向代理
1 2 3 4 5 6 7 8 9 10 11 12 13 14 15 16 17 18 19 20 21 22 23 24 25 26 27 28 29 30 31 32 33 34 35 yum -y install epel-release nginx keepalived nginx-mod-stream scp nginx.conf ws-k8s-node1:/etc/nginx scp nginx.conf ws-k8s-node2:/etc/nginx scp keepalived.conf ws-k8s-node1:/etc/keepalived/ scp check_nginx.sh ws-k8s-node1:/etc/keepalived/ scp keepalived.conf2 ws-k8s-node2:/etc/keepalived/ scp check_nginx.sh ws-k8s-node2:/etc/keepalived/ systemctl daemon-reload systemctl enable nginx.service keepalived.service --now systemctl daemon-reload systemctl enable nginx.service keepalived.service --now ip a | grep 192.168.8 inet 192.168.8.161/24 brd 192.168.8.255 scope global noprefixroute ens33 inet 192.168.8.199/24 scope global secondary ens33 systemctl stop keepalived.service ip a| grep 192.168.8 inet 192.168.8.162/24 brd 192.168.8.255 scope global noprefixroute ens33 inet 192.168.8.199/24 scope global secondary ens33 systemctl start keepalived.service ip a| grep 192.168.8 inet 192.168.8.161/24 brd 192.168.8.255 scope global noprefixroute ens33 inet 192.168.8.199/24 scope global secondary ens33
相关配置文件 nginx.conf配置文件:
1 2 3 4 5 6 7 8 9 10 11 12 13 14 15 16 17 18 19 20 21 22 23 24 25 26 27 28 29 30 31 32 33 34 35 36 37 38 39 40 41 user nginx; worker_processes auto; error_log /var/log/nginx/error.log; pid /run/nginx.pid; include /usr/share/nginx/modules/*.conf; events { worker_connections 1024; } stream { log_format main '$remote_addr $upstream_addr - [$time_local] $status $upstream_bytes_sent' ; access_log /var/log/nginx/k8s-access.log main; upstream k8s-ingress-controller { server 192.168.8.161:80 weight=5 max_fails=3 fail_timeout=30s; server 192.168.8.162:80 weight=5 max_fails=3 fail_timeout=30s; } server { listen 30080; proxy_pass k8s-ingress-controller; } } http { log_format main '$remote_addr - $remote_user [$time_local] "$request" ' '$status $body_bytes_sent "$http_referer" ' '"$http_user_agent" "$http_x_forwarded_for"' ; access_log /var/log/nginx/access.log main; sendfile on; tcp_nopush on; tcp_nodelay on; keepalive_timeout 65; types_hash_max_size 2048; include /etc/nginx/mime.types; default_type application/octet-stream; }
keepalive.conf配置文件和脚本:
1 2 3 4 5 6 7 8 9 10 11 12 13 14 15 16 17 18 19 20 21 22 23 24 25 26 27 28 29 30 31 32 33 global_defs { notification_email { acassen@firewall.loc # 设置通知电子邮件地址 failover@firewall.loc sysadmin@firewall.loc } notification_email_from Alexandre.Cassen@firewall.loc # 设置发送通知的电子邮件地址 smtp_server 127.0.0.1 # 设置用于发送电子邮件通知的SMTP服务器地址 smtp_connect_timeout 30 # 设置SMTP服务器连接超时时间(以秒为单位) router_id NGINX_MASTER # 设置VRRP路由器的标识符 } vrrp_script check_nginx { script "/etc/keepalived/check_nginx.sh" # 设置用于检查Nginx工作状态的脚本路径 } vrrp_instance VI_1 { state MASTER # 设置当前实例的状态为主服务器 interface ens33 # 设置实际网卡名称 virtual_router_id 51 # 设置VRRP路由器ID实例,每个实例唯一 priority 100 # 设置当前实例的优先级为100(备用服务器通常设置为较低的优先级,如90) advert_int 1 # 设置VRRP心跳包通告间隔时间为1秒(默认值为1秒) authentication { auth_type PASS # 明文 auth_pass wangsheng # 设置VRRP身份验证密码 } virtual_ipaddress { 192.168.8.199/24 # 设置虚拟IP地址(VIP) } track_script { check_nginx # 设置要跟踪的脚本(用于根据Nginx状态进行故障转移) } }
备配置
1 2 3 4 5 6 7 8 9 10 11 12 13 14 15 16 17 18 19 20 21 22 23 24 25 26 27 28 29 30 31 32 33 global_defs { notification_email { acassen@firewall.loc failover@firewall.loc sysadmin@firewall.loc } notification_email_from Alexandre.Cassen@firewall.loc smtp_server 127.0.0.1 smtp_connect_timeout 30 router_id NGINX_MASTER } vrrp_script check_nginx { script "/etc/keepalived/check_nginx.sh" } vrrp_instance VI_1 { state BACKUP interface ens33 virtual_router_id 51 priority 90 advert_int 1 authentication { auth_type PASS auth_pass wangsheng } virtual_ipaddress { 192.168.8.199/24 } track_script { check_nginx } }
check_nginx脚本
1 2 3 4 5 6 7 8 9 10 11 12 13 #!/bin/bash counter=$(ps -ef |grep nginx | grep sbin | egrep -cv "grep|$$" ) if [ $counter -eq 0 ]; then service nginx start sleep 2 counter=$(ps -ef |grep nginx | grep sbin | egrep -cv "grep|$$" ) if [ $counter -eq 0 ]; then service keepalived stop fi fi
基于http测试ingress代理 1 2 3 4 5 6 7 8 9 10 11 12 13 14 15 16 17 18 19 20 21 22 23 24 25 26 27 28 29 30 31 32 33 34 35 36 37 38 39 40 41 42 43 44 45 46 47 48 49 50 51 52 53 54 55 56 57 58 59 60 61 62 63 64 65 66 mkdir ~/ingress-testcd ~/ingress-testcat > pod.yaml << EOF apiVersion: v1 kind: Service metadata: name: solo namespace: test spec: selector: app: solo portocol: http ports: targetPort: 8080 port: 8080 --- apiVersion: apps/v1 kind: Deployment metadata: name: solo-dp namespace: de spec: replicas: 3 selector: matchLabels: app: solo portocol: http template: metadata: labels: app: solo portocol: http namespace: test spec: containers: - name: solo-blog image: 192.168.10.130/wangsheng/solo:1.0 imagePullPolicy: IfNotPresent ports: - name: http containerPort: 8080 EOF kubectl apply -f pod.yaml kubectl get pods NAME READY STATUS RESTARTS AGE solo-dp-57fc49b5b8-959f2 1/1 Running 0 60s solo-dp-57fc49b5b8-jnn4t 1/1 Running 0 60s solo-dp-57fc49b5b8-zcszk 1/1 Running 0 60s cd skubectl get ingress NAME CLASS HOSTS ADDRESS PORTS AGE test-http nginx solo.wangsheng.com 192.168.8.161,192.168.8.162 80 4m1s 192.168.8.199 solo.wangsheng.com solo.wangsheng.com:30080 → 192.168.8.199:30080 → 192.168.8.161,192.168.8.162:80 → svc:solo:8080 kubectl delete -f .
1 2 3 4 5 6 7 8 9 10 11 12 13 14 15 16 17 18 19 20 21 22 23 24 25 26 27 28 29 30 31 32 33 cat > ingress-http.yaml << EOF apiVersion: v1 kind: Service metadata: name: solo-http namespace: default spec: selector: app: solo ports: targetPort: 8080 port: 8080 --- apiVersion: networking.k8s.io/v1 kind: Ingress metadata: name: http namespace: default spec: ingressClassName: nginx #指定类,ingress controller默认类为nginx rules: http: paths: - backend: #必填项,要关联的后端 service: #指定关联的service和对应端口 name: solo port: number: 8080 #name: path: / pathType: Prefix EOF
基于https测试ingress代理 1 2 3 4 5 6 7 8 9 10 11 12 13 14 15 16 17 18 19 20 21 22 23 24 25 26 27 28 29 30 31 32 33 34 35 36 37 38 39 40 41 42 43 44 45 46 47 48 49 50 51 52 53 54 55 56 57 58 59 cd ~openssl genrsa -out tls.key 4096 openssl req -new -x509 -key tls.key -out tls.crt \ -subj /C=CN/ST=Beijing/L=Beijing/O=DevOps/CN=solo.wangsheng.com kubectl create secret tls solo-ingress-secret --cert=tls.crt --key=tls.key kubectl get secret kubectl describe secret solo-ingress-secret cat > ingress-https.yaml << EOF apiVersion: networking.k8s.io/v1 kind: Ingress metadata: name: test-http namespace: default spec: ingressClassName: nginx #指定类,ingress controller默认类为nginx tls: - solo.wangsheng.com #被签发的域名 secretName: solo-ingress-secret #指定创建的secret rules: http: paths: - backend: #必填项,要关联的后端 service: #指定关联的service和对应端口 name: solo port: number: 8080 #name: path: / pathType: Prefix #必填项 EOF kubectl get pods kubectl apply -f ingress-https.yaml kubectl get ingress 修改hosts后再次使用浏览器进行访问
ingress controller灰度发布 通过配置Ingress Annotations来实现不同场景下的灰度发布和测试
选择方式:
nginx.ingress.kubernetes.io/canary-by-header:基于Request Header的流量切分,适用于灰度发布以及 A/B 测试。当Request Header 设置为 always时,请求将会被一直发送到 Canary 版本;当 Request Header 设置为 never时,请求不会被发送到 Canary 入口。
nginx.ingress.kubernetes.io/canary-by-header-value:要匹配的 Request Header 的值,用于通知 Ingress 将请求路由到 Canary Ingress 中指定的服务。当 Request Header 设置为此值时,它将被路由到 Canary 入口。
nginx.ingress.kubernetes.io/canary-weight:基于服务权重的流量切分,适用于蓝绿部署,权重范围 0 - 100 按百分比将请求路由到 Canary Ingress 中指定的服务。权重为 0 意味着该金丝雀规则不会向 Canary 入口的服务发送任何请求。权重为60意味着60%流量转到canary。权重为 100 意味着所有请求都将被发送到 Canary 入口。
nginx.ingress.kubernetes.io/canary-by-cookie:基于 Cookie 的流量切分,适用于灰度发布与 A/B 测试。用于通知 Ingress 将请求路由到 Canary Ingress 中指定的服务的cookie。当 cookie 值设置为 always时,它将被路由到 Canary 入口;当 cookie 值设置为 never时,请求不会被发送到 Canary 入口。
1 2 3 4 5 6 7 8 9 10 11 12 13 14 15 16 17 18 19 20 21 22 23 24 25 26 27 28 29 30 31 32 33 34 35 36 37 38 39 40 41 42 43 44 45 46 47 48 49 50 51 52 53 54 55 56 57 58 59 60 61 62 63 64 65 66 67 68 69 70 71 72 73 74 75 76 77 78 79 80 81 82 83 84 85 86 87 88 89 90 91 92 93 94 95 96 97 98 99 100 101 102 103 104 105 106 107 108 109 110 111 112 113 114 115 116 117 118 119 120 121 122 123 124 125 126 127 128 129 130 131 132 133 134 135 136 137 138 139 140 141 142 143 144 145 146 147 148 149 150 151 152 153 154 155 156 157 158 159 160 161 162 163 164 165 166 167 168 169 170 171 172 173 174 175 176 177 178 179 180 181 182 183 184 185 186 187 mkdir ingress-updatecd ingress-update/apiVersion: apps/v1 kind: Deployment metadata: name: nginx-v1 spec: minReadySeconds: 5 replicas: 1 selector: matchLabels: app: nginx version: v1 template: metadata: labels: app: nginx version: v1 spec: containers: - name: nginx image: openresty/openresty:centos imagePullPolicy: IfNotPresent ports: - name: http protocol: TCP containerPort: 80 volumeMounts: - mountPath: /usr/local/openresty/nginx/conf/nginx.conf name: config subPath: nginx.conf volumes: - name: config configMap: name: nginx-v1 --- apiVersion: v1 kind: ConfigMap metadata: labels: app: nginx version: v1 name: nginx-v1 data: nginx.conf: | worker processes 1; events { accept_mutex on; multi_accept on; use epoll; worker_connections 1024; } http { ignore_invalid_headers off; server { listen 80; location / { access_by_lua ' local header_str = ngx.say("nginx-v1") ' ; } } } --- apiVersion: v1 kind: Service metadata: name: nginx-v1 spec: type : ClusterIP ports: protocol: TCP name: http selector: app: nginx version: v1 kubectl apply -f v1.yaml apiVersion: apps/v1 kind: Deployment metadata: name: nginx-v2 spec: replicas: 1 selector: matchLabels: app: nginx version: v2 template: metadata: labels: app: nginx version: v2 spec: containers: - name: nginx image: "openresty/openresty:centos" imagePullPolicy: IfNotPresent ports: - name: http protocol: TCP containerPort: 80 volumeMounts: - mountPath: /usr/local/openresty/nginx/conf/nginx.conf name: config subPath: nginx.conf volumes: - name: config configMap: name: nginx-v2 --- apiVersion: v1 kind: ConfigMap metadata: labels: app: nginx version: v2 name: nginx-v2 data: nginx.conf: |- worker_processes 1; events { accept_mutex on; multi_accept on; use epoll; worker_connections 1024; } http { ignore_invalid_headers off; server { listen 80; location / { access_by_lua ' local header_str = ngx.say("nginx-v2") ' ; } } } --- apiVersion: v1 kind: Service metadata: name: nginx-v2 spec: type : ClusterIP ports: protocol: TCP name: http selector: app: nginx version: v2 kubectl apply -f v2.yaml apiVersion: networking.k8s.io/v1 kind: Ingress metadata: name: nginx annotations: kubernetes.io/ingress.class: nginx spec: rules: http: paths: - path: / pathType: Prefix backend: service: name: nginx-v1 port: number: 80 kubectl apply -f v1-ingress.yaml
创建 Canary Ingress,指定 v2 版本的后端服务,且加上一些 annotation,实现仅将带有名为 Region 且值为 cd 或 sz 的请求头的请求转发给当前 Canary Ingress,模拟灰度新版本给成都和深圳地域的用户:
1 2 3 4 5 6 7 8 9 10 11 12 13 14 15 16 17 18 19 20 21 22 23 24 25 26 27 28 29 v2-ingress.yaml apiVersion: networking.k8s.io/v1 kind: Ingress metadata: annotations: kubernetes.io/ingress.class: nginx nginx.ingress.kubernetes.io/canary: "true" nginx.ingress.kubernetes.io/canary-by-header: "Region" nginx.ingress.kubernetes.io/canary-by-header-pattern: "cd|sz" name: nginx-canary spec: rules: http: paths: - path: / pathType: Prefix backend: service: name: nginx-v2 port: number: 80 kubectl apply -f v2-ingress.yaml curl -H "Host: canary.example.com" -H "Region: cd" \ http://192.168.8.199 返回v2,只有为cd 或sz时会返回v2,如果是其他的会返回v1 kubectl delete -f v2-ingress.yaml
基于 Cookie 的流量切分 与前面 Header 类似,不过使用 Cookie 就无法自定义 value 了,这里以模拟灰度成都地域用户为例,仅将带有名为 user_from_cd 的 cookie 的请求转发给当前 Canary Ingress 。先删除前面基于 Header 的流量切分的 Canary Ingress,然后创建下面新的 Canary Ingress:
1 2 3 4 5 6 7 8 9 10 11 12 13 14 15 16 17 18 19 20 21 22 23 24 25 26 27 28 29 v1-cookie.yaml apiVersion: networking.k8s.io/v1 kind: Ingress metadata: annotations: kubernetes.io/ingress.class: nginx nginx.ingress.kubernetes.io/canary: "true" nginx.ingress.kubernetes.io/canary-by-cookie: "user_from_cd" name: nginx-canary spec: rules: http: paths: - path: / pathType: Prefix backend: service: name: nginx-v2 port: number: 80 kubectl apply -f v1-cookie.yaml curl -H "Host: canary.example.com" --cookie "user_from_cd=always" \ http://192.168.8.199 返回v2,带有cookie: "user_from_cd" 返回v1 kubectl delete -f v1-cookie.yaml
基于权重 1 2 3 4 5 6 7 8 9 10 11 12 13 14 15 16 17 18 19 20 21 22 v1-weight.yaml apiVersion: networking.k8s.io/v1 kind: Ingress metadata: annotations: kubernetes.io/ingress.class: nginx nginx.ingress.kubernetes.io/canary: "true" nginx.ingress.kubernetes.io/canary-weight: "10" name: nginx-canary spec: rules: http: paths: - path: / pathType: Prefix backend: service: name: nginx-v2 port: number: 80 kubectl apply -f v1-weight.yaml for i in {1..10}; do curl -H "Host: canary.example.com" http://192.168.8.199; done ;
一些新特性 PodDisruptionBudget 它可以确保在节点故障时,Pod 具有更高的可用性。PodDisruptionBudget 可以限制允许同时处于故障中的 Pod 数量,从而避免因节点故障而导致太多的 Pod 关闭。
具体来说,PodDisruptionBudget 通过以下方式确保 Pod 的高可用性:
具体实现时,可以通过在 PodDisruptionBudget 中设置 minAvailable 字段来限制允许同时处于故障中的 Pod 数量。例如,如果设置 minAvailable 为 2,则在任何时间点上至少有两个 Pod 在运行,即使某些节点发生故障。
1 2 3 4 5 6 7 8 9 apiVersion: policy/v1 kind: PodDisruptionBudget metadata: name: nginx-pdb spec: selector: matchLabels: app: nginx minAvailable: 2
Pod优先级 这个特性允许用户在定义 Pod 时设置优先级,并在节点资源紧张时,Kubernetes 会根据优先级自动进行抢占,从而保证高优先级的 Pod 能够优先调度和运行。
1 2 3 4 5 6 7 8 9 10 11 12 13 14 15 16 17 18 19 20 21 apiVersion: scheduling.k8s.io/v1 kind: PriorityClass metadata: name: high-priority value: 1000000 --- apiVersion: v1 kind: Pod metadata: name: high-priority-pod spec: priorityClassName: high-priority containers: image: nginx globaldefault设置为true ,表示没有设置PriorityClass的pod都为这个优先级 如果没有globaldefault,则没有设置PriorityClass的pod优先级都为0