如果出现无法载图的情况,请检查与github的连通性
环境
VMware Workstation 17 Pro
CentOS Linux release 7.9.2009 (Core)
4G,8vCPU,100G精简置备,NAT网络网段192.168.8.0/24
wsdocker 192.168.8.150/24
harbor 192.168.8.148/24
harbor版本: v2.10
自签发证书
1
2
3
4
5
6
7
8
9
10
11
12
13
14
15
16
17
18
19
20
21
22
23
24
25
26
27
28
29
30
31
32
33
34
| hostnamectl set-hostname harbor && bash
1.生成CA证书
SSL工具生成2048位的密钥对,并将私钥保存到名为 "ca.key" 的文件中,3072位更加安全
openssl genrsa -out ca.key 2048
生成一个自签发的 X.509 格式的 CA(证书颁发机构)证书
openssl req -new -x509 -days 365 -key ca.key -out ca.pem
2.生成域名的证书
SSL工具生成2048位的RSA私钥
openssl genrsa -out harbor.key 2048
SSL工具用创建的私钥生成一个证书签署请求,用以向CA申请签署证书
openssl req -new -key harbor.key -out harbor.csr
3.签发证书
证书签署请求(CSR)与根证书进行签署,生成一个具有指定有效期的 X.509 格式的证书
openssl x509 -req -in harbor.csr -CA ca.pem -CAkey ca.key -CAcreateserial -out harbor.pem -days 365
|
安装harbor
harbor版本采用最新的v2.10
1
2
3
4
5
6
7
8
9
10
11
12
13
14
15
16
17
18
19
20
21
22
23
24
25
26
27
28
29
30
31
32
33
34
35
36
37
38
39
40
41
42
43
44
45
46
47
48
49
50
51
52
53
54
55
56
57
58
59
60
61
62
63
64
65
66
67
68
69
70
71
72
73
74
75
76
77
78
79
80
81
82
83
84
85
86
|
yum -y install iptables-services
systemctl disable firewalld --now
systemctl disable iptables --now
iptables -F
sed -i 's/SELINUX=.*/SELINUX=disabled/' /etc/selinux/config
setenforce 0
sed -i 's/^server/#server/g' /etc/chrony.conf
sed -i '1s/^/server cn.pool.ntp.org iburst\n/' /etc/chrony.conf
systemctl restart chronyd.service
echo "
192.168.8.150 wsdocker
192.168.8.148 harbor
" >> /etc/hosts
yum install -y wget net-tools nfs-utils lrzsz gcc gcc-c++ make cmake libxml2-devel openssl-devel curl curl-devel unzip sudo ntp libaio-devel wget vim ncurses-devel autoconf automake zlib-devel python-devel epel-release openssh-server socat ipvsadm conntrack
yum install -y wget net-tools nfs-utils lrzsz gcc gcc-c++ make cmake libxml2-devel openssl-devel curl curl-devel unzip sudo ntp libaio-devel wget vim ncurses-devel autoconf automake zlib-devel python-devel epel-release openssh-server socat ipvsadm conntrack
yum install -y wget net-tools nfs-utils lrzsz gcc gcc-c++ make cmake libxml2-devel openssl-devel curl curl-devel unzip sudo ntp libaio-devel wget vim ncurses-devel autoconf automake zlib-devel python-devel epel-release openssh-server socat ipvsadm conntrack
curl -fsSL https://get.docker.com -o get-docker.sh
sh get-docker.sh
systemctl enable docker --now
docker --version
modprobe br_netfilter
echo "
net.bridge.bridge-nf-call-ip6tables = 1
net.bridge.bridge-nf-call-iptables = 1
net.ipv4.ip_forward = 1
" > /etc/sysctl.d/docker.conf
sysctl -p /etc/sysctl.d/docker.conf
echo '
{
"registry-mirrors": ["https://bsx9xf1d.mirror.aliyuncs.com"]
}
' >> /etc/docker/daemon.json
systemctl daemon-reload
systemctl restart docker
cd ~
wget https://github.com/docker/compose/releases/download/v2.23.3/docker-compose-linux-x86_64
mkdir -p /usr/bin/docker-compose
mv docker-compose-linux-x86_64 /usr/bin/docker-compose/
chmod +x /usr/bin/docker-compose
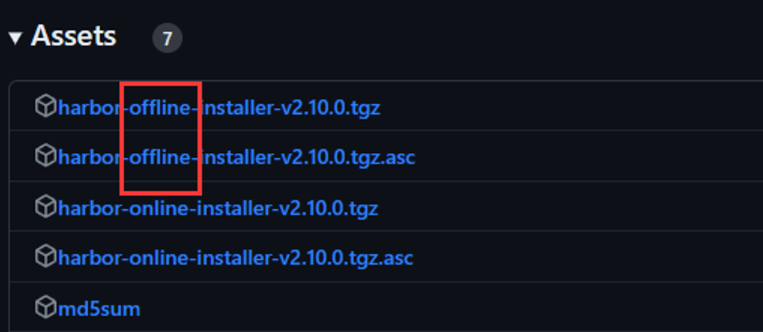
tar zxvf harbor-offline-installer-v2.10.0.tgz
cd harbor
cp harbor.yml.tmpl harbor.yml
mkdir /ssl
cp harbor.* ca.* /ssl/
vim harbor.yml
sed -i 's/^hostname.*/hostname: harbor/' harbor.yml
sed -i 's/\/your\/certificate\/path/\/ssl\/harbor.pem/' harbor.yml
sed -i 's/\/your\/private\/key\/path/\/ssl\/harbor.key/' harbor.yml
cd ~/harbor/
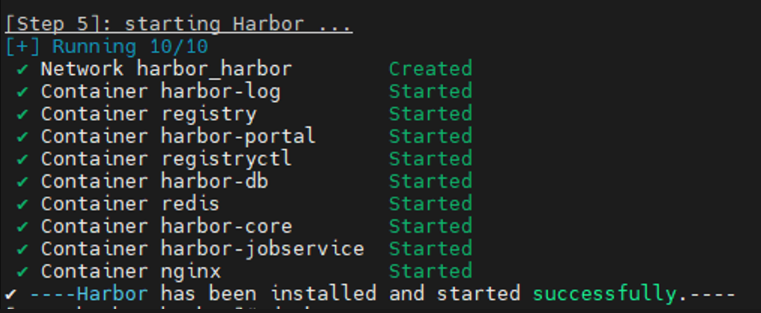
./install.sh
C:\Windows\System32\drivers\etc\hosts
在末尾添加并保存
192.168.8.148 harbor
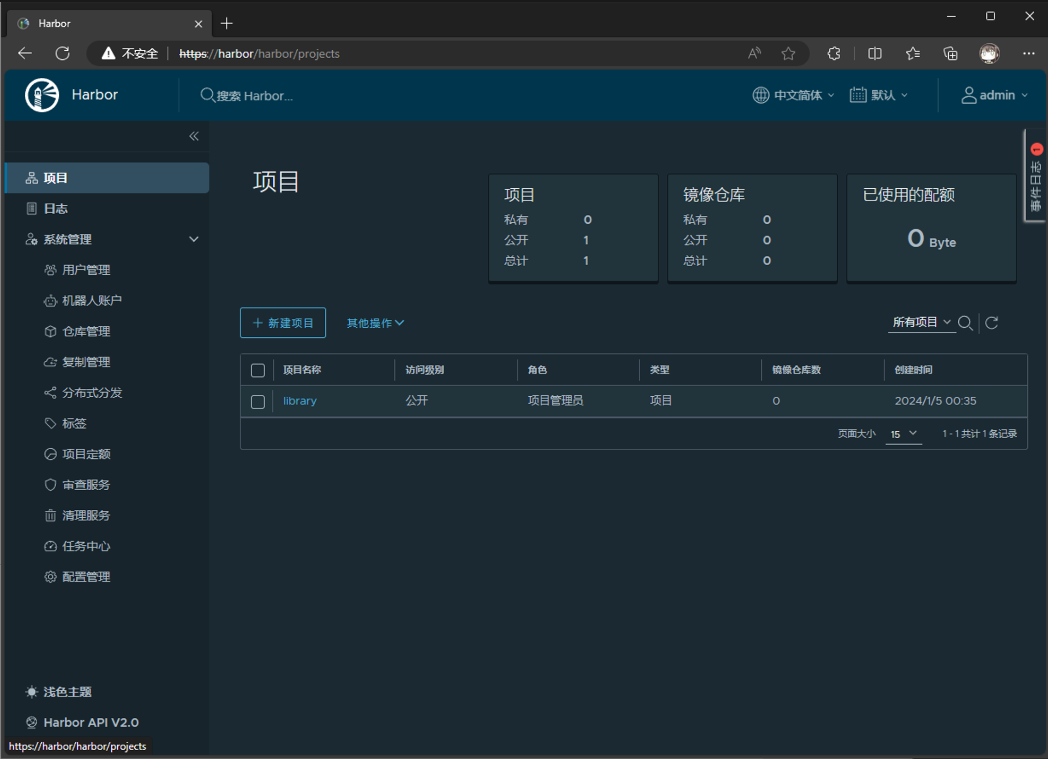
宿主机访问https://harbor/
|
安装完成如图提示
登录web界面
测试:使用harbor内的镜像
1
2
3
4
5
6
7
8
9
10
11
12
13
14
15
16
17
18
19
20
21
22
23
24
25
26
27
28
29
30
31
32
33
34
35
36
37
38
39
40
41
|
hostnamectl set-hostname wsdocker && bash
echo '
{
"registry-mirrors": ["https://bsx9xf1d.mirror.aliyuncs.com"],
"insecure-registries": ["192.168.8.148","harbor"]
}
' > /etc/docker/daemon.json
systemctl daemon-reload
systemctl restart docker
echo "
192.168.8.150 wsdocker
192.168.8.148 harbor
" >> /etc/hosts
docker login 192.168.8.148
docker pull centos
docker save -o centos.tar.gz centos
ls | grep centos.tar.gz
docker load -i centos.tar.gz
docker push 192.168.8.148/ws/centos:ws
docker rmi -f 192.168.8.148/ws/centos:ws
docker pull 192.168.8.148/ws/centos:ws
docker images | grep 192
192.168.8.148/ws/centos ws 5d0da3dc9764 2 years ago 231MB
|
docker主机上成功登录

