如果出现无法载图的情况,请检查与github的连通性
nginx可以通过反向代理功能对后端服务器实现负载均衡功能
正向代理与反向代理 正向代理:
举个例子
从本机——代理服务器之间打一个vpn
包装后外层地址变为 目的地址为代理服务器
代理服务器访问服务器,服务器返回数据
代理服务器通过vpn传回数据
通常情况下的正向代理是通过路由器SNAT功能完成
反向代理:
负责变换目的地址,接受朝向自己的连接,然后将其重新朝向A
在此基础上提供高可用集群的入口,比如朝向A1,A2,A23,就称之为负载均衡
负载均衡硬件有F5 bigip / A10 / 等
Nginx 服务 包含两个进程
nginx.conf配置文件 - /etc/nginx
1
2
3
4
5
6
7
8
9
10
11
12
13
14
15
16
17
来看一个最简单的 Nginx 负载均衡配置。 http { upstream cluster { server srv1; server srv2; server srv3; } server { listen 80 ; location / { proxy_pass http://cluster; } } } 通过上述配置,Nginx 会作为 HTTP 反向代理,把访问本机的 HTTP 请求,均分到后端集 群的 3 台服务器上。
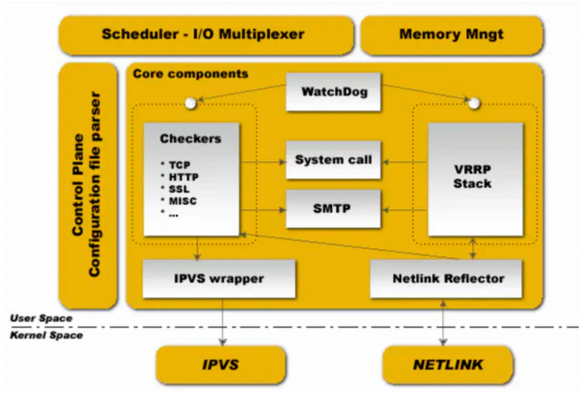
keepalived服务 keepalived 高可用集群选举软件
又可以选举主备,又可以提供
keepalived架构
1、keepalived core 核心模块
2、keepalived VRRP模块,加载vrrp协议,通过vrrp进行主备选举
——设置vrrp优先级,默认优先级100,
3、keepalive check检查模块,监控检查
——心跳检测,每一秒发送一次心跳
结合systemcall系统调用
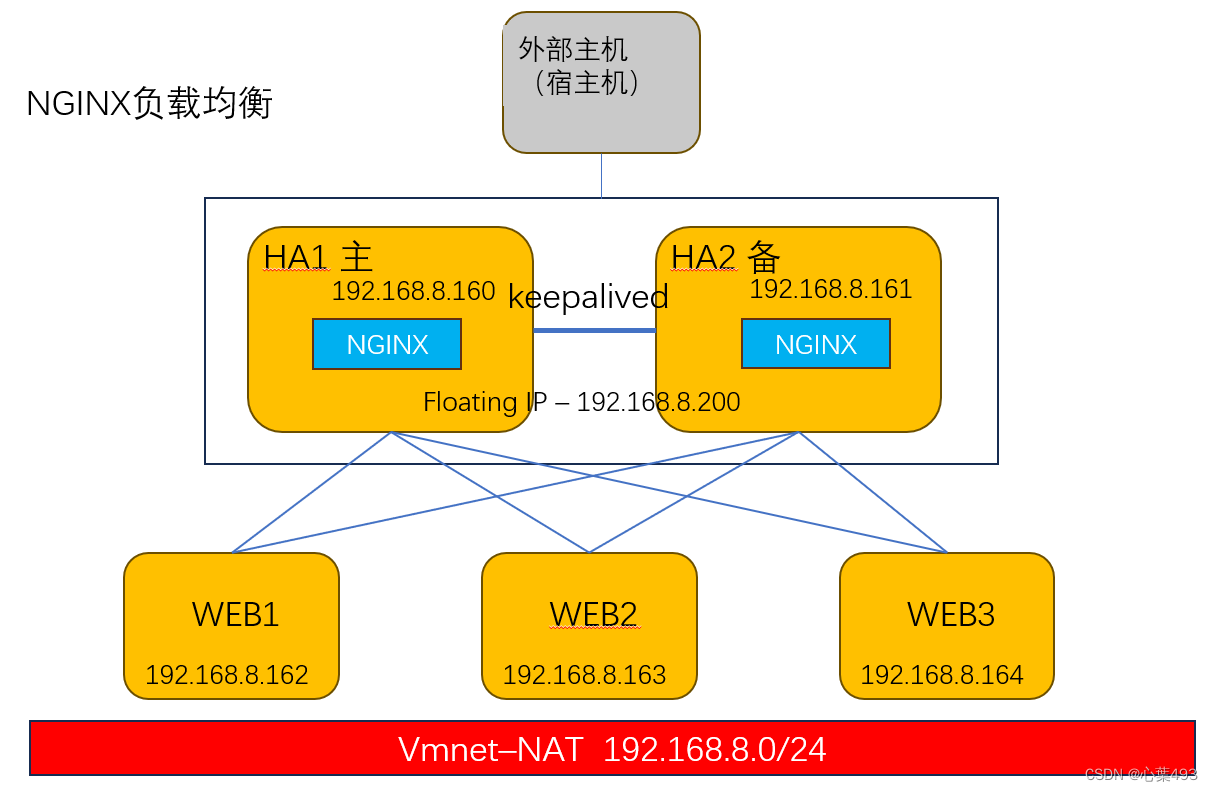
nginx环境搭建 环境:
5节点部署,如图所示
搭建web节点 1 2 3 4 5 6 7 8 9 10 11 12 13 14 15 16 17 yum -y install httpd hostnamectl set-hostname WEB1 && bash echo web1 > /var/www/html/index.htmlhostnamectl set-hostname WEB2 && bash echo web2 > /var/www/html/index.htmlhostnamectl set-hostname WEB3 && bash echo web3 > /var/www/html/index.htmlsystemctl enable httpd --now systemctl disable firewalld --now sed -i 's/^SELINUX=.*/SELINUX=disabled/' /etc/selinux/config
搭建nginx服务 1 2 3 4 5 6 7 8 9 10 11 12 13 14 15 16 hostnamectl set-hostname HA1 && bash hostnamectl set-hostname HA2 && bash yum -y install wget vim net-tools wget -O /etc/yum.repos.d/epel.repo http://mirrors.aliyun.com/repo/epel-7.repo yum -y install nginx nginx-mod-stream systemctl enable nginx --now netstat -tunlp | grep -i nginx systemctl disable firewalld --now sed -i 's/^SELINUX=.*/SELINUX=disabled/' /etc/selinux/config
nginx服务配置 1 2 3 4 5 6 7 8 9 10 11 12 13 14 15 16 17 18 19 20 21 22 23 24 25 26 27 28 29 30 31 32 33 34 35 36 37 38 39 40 41 42 43 44 45 46 47 48 49 50 51 52 53 54 55 56 57 58 59 60 61 62 63 64 65 66 67 68 69 70 71 72 73 74 75 76 77 78 cp /etc/nginx/nginx.conf /etc/nginx/nginx.conf.baksed -i 's/.*#.*//' /etc/nginx/nginx.conf vim /etc/nginx/nginx.conf user nginx; worker_processes auto; error_log /var/log/nginx/error.log; pid /run/nginx.pid; include /usr/share/nginx/modules/*.conf; events { worker_connections 1024; } http { log_format main '$remote_addr - $remote_user [$time_local] "$request" ' '$status $body_bytes_sent "$http_referer" ' '"$http_user_agent" "$http_x_forwarded_for"' ; access_log /var/log/nginx/access.log main; sendfile on; tcp_nopush on; keepalive_timeout 65; types_hash_max_size 4096; include /etc/nginx/mime.types; default_type application/octet-stream; include /etc/nginx/conf.d/*.conf; server { listen 80; listen [::]:80; server_name _; root /usr/share/nginx/html; include /etc/nginx/default.d/*.conf; error_page 404 /404.html; location = /404.html { } error_page 500 502 503 504 /50x.html; location = /50x.html { } } } user nginx; worker_processes auto; error_log /var/log/nginx/error.log; pid /run/nginx.pid; include /usr/share/nginx/modules/*.conf; events { worker_connections 1024; } stream { log_format main '$remote_addr $upstream_addr - [$time_local] $status $upstream_bytes_sent' ;access_log /var/log/nginx/web_cluster.log main; upstream web_LB { server 192.168.8.162:80; server 192.168.8.163:80; server 192.168.8.164:80; } server { listen 80; proxy_pass web_LB; } } nginx -t nginx -s reload
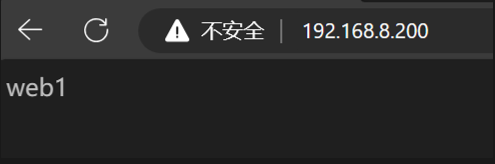
此时重新访问,发现访问160和161能访问到后端的web服务器,清除缓存后会变化
Nginx的负载分担方式 最小连接 通过判断哪一个服务器的负载最小,选择负载最小的服务器进行连接
修改配置文件
1
2
3
4
5
6
7
8
9
vim /etc/nginx/nginx.conf upstream web_LB { least_conn; server 192.168.8.162:80; server 192.168.8.163:80; server 192.168.8.164:80; } nginx -t nginx -s reload
权重轮询 通过修改weight值,根据权重进行负载的分配
设置web1权重为1,web2权重为2,web3权重为3
修改配置文件
1
2
3
4
5
6
7
8
vim /etc/nginx/nginx.conf nginx -t nginx -s reload
IP哈希 根据源ip地址进行hash计算,根据计算值自动匹配到后端服务器
同个ip固定匹配一个服务器
适合流量大的时候使用,流量越多越均衡
修改配置文件
1
2
3
4
5
6
7
8
9
vim /etc/nginx/nginx.conf hash $remote_addr consistent;nginx -t nginx -s reload
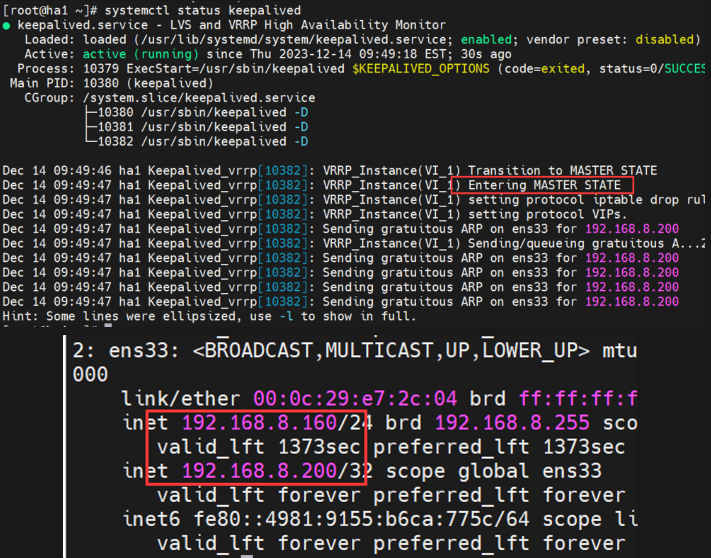
keepalived节点搭建 1 2 3 4 5 6 7 8 9 10 11 12 13 14 15 16 17 18 19 20 21 22 23 24 25 26 27 28 29 30 31 32 33 34 35 36 37 38 39 40 41 42 yum install -y keepalived cp /etc/keepalived/keepalived.conf /etc/keepalived/keepalived.conf.bakvim /etc/keepalived/keepalived.conf 根据实际情况修改 ! Configuration File for keepalived global_defs { notification_email { acassen@firewall.loc failover@firewall.loc sysadmin@firewall.loc } notification_email_from Alexandre.Cassen@firewall.loc smtp_server 127.0.0.1 smtp_connect_timeout 30 router_id ha1 vrrp_skip_check_adv_addr vrrp_garp_interval 0 vrrp_gna_interval 0 } vrrp_instance VI_1 { state MASTER interface ens33 virtual_router_id 100 priority 100 advert_int 1 authentication { auth_type PASS auth_pass 1111 } virtual_ipaddress { 192.168.8.200 } } systemctl enable keepalived --now systemctl restart keepalived
测试 访问网页测试:
主备倒换测试: